-
CDST_LT: Molecular basics
FullscreenUnderstanding Key elements of Molecular Biology
ContentTo understand Line Probe Assay (LPA), we need to understand key elements of Molecular Biology.
Molecular Biology is the study of living systems at the molecular level, especially DNA, RNA and proteins.
Cell
The cell is the fundamental unit of life and is the building block of all organisms. It has three main components:
- Cell membrane
- Nucleus
- Cytoplasm
Types of Cells
Cells are of two types- Prokaryotic and Eukaryotic and are distinguished by the size and types of internal organelles they contain.
- Prokaryotes are single cell organisms e.g., bacteria like Mycobacterium tuberculosis.
- Eukaryotes are either single celled or multicellular with membrane-bound organelles. All animals, plants, fungi and protists are eukaryotic cells.
DNA
- The DNA molecule is a nucleic acid containing genetic information and is made of two nucleotide strands bonded together.
- In prokaryotes, the DNA is present in the cytoplasm and in eukaryotes, it is present in the nucleus.
- The functional unit of the DNA is known as a gene.
RNA
- RNA is formed by the transcription of a DNA molecule
- RNA is also a nucleic acid but has a different nucleotide composition
- RNA translates to further form proteins, which are large molecules formed by one or more chains of amino acids
Table: Comparison between DNA and RNA
DNA RNA Double Strand Single Strand Transcribed to RNA Translated to Proteins Bases: adenine (A), cytosine (C), guanine (G), and thymine (T) Bases: adenine (A), cytosine (C), guanine (G), and uracil (U) Sugar Motif - Deoxy Ribose Sugar Motif - Ribose Stable Prone to Hydrolysis Resources
Kindly provide your valuable feedback on the page to the link provided HERE
Structure of DNA in a Prokaryotic Cell
Content- Deoxyribonucleic acid (DNA) is a molecule that contains genetic information.
- DNA molecules have two nucleotide strands that wind around one another to form double helix structure.
- Each nucleotide strand has a backbone made of alternating sugar (deoxyribose) and phosphate groups.
- Attached to each sugar is one of four nitrogenous bases: adenine (A), cytosine (C), guanine (G), and thymine (T)
- These bases occur in pairs, where in Adenine is always bonded to Thymine with a 2-H bonds and Cytosine bonded to Guanine with 3-H bonds.
- Prokaryotic cells do not have a defined nucleus hence the DNA is tightly coiled in the cytoplasm.
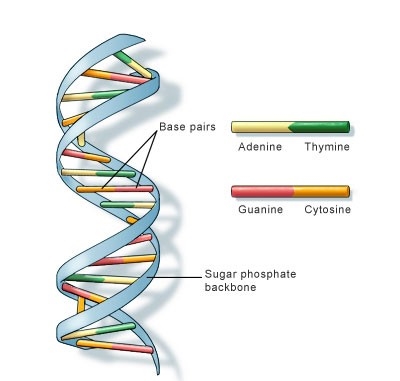
Figure: DNA double helix structure
Resources
Kindly provide your valuable feedback on the page to the link provided HERE
Central Dogma in the Function of DNA: Replication
ContentDeoxyribose Nucleic Acid (DNA) carry genetic information that is transmitted to new cells/off-springs.
The process by which cells maintain their genetic information and convert the genetic information encoded in DNA into gene products is called the Central Dogma.
The central dogma of DNA (Figure 1) are replication, transcription and translation.
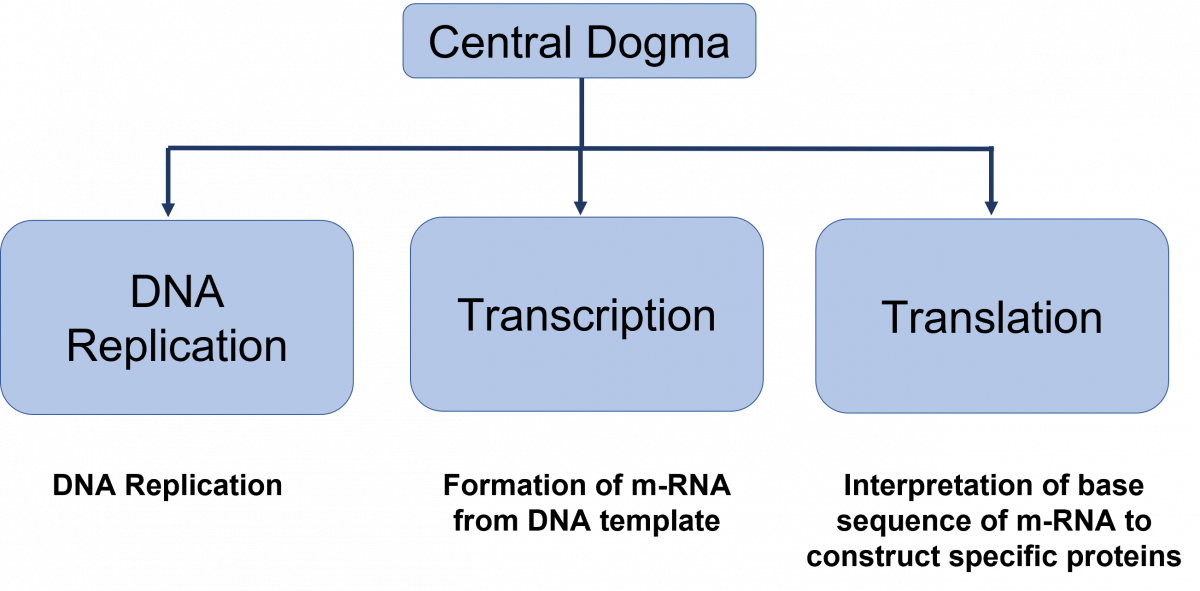
Figure: Central dogma of DNA functions

DNA Replication
DNA replication is the production of two identical replicas of DNA from one original DNA molecule.
Steps in DNA replication
- Helicase enzyme unzips coiled DNA to form a replication fork. The two separated strands act as templates for making new strands of DNA.
- Primase enzyme makes short primers to which DNA polymerase III enzyme binds and adds DNA nucleotides to create the leading strand during DNA replication.
- Primers are removed and replaced with DNA nucleotides by bacterial DNA polymerase I and DNA ligase seals the gaps between fragments.
- Okazaki fragments are short sequences of DNA synthesized discontinuously; linked by DNA ligase to create the lagging strand during DNA replication.
- Exonuclease enzyme removes primers and gaps are filled by DNA polymerase.
Resources
Kindly provide your valuable feedback on the page to the link provided HERE
Central Dogma in the Function of DNA: Transcription and Translation
ContentTranscription and translation together are responsible for Gene Expression.
Transcription
- The transcription process involves the formation of m-Ribo-Nucleic Acid (RNA) from DNA (Deoxyribose Nucleic Acid).
- One strand of DNA acts as a template, RNA polymerase associates with the DNA strand on the promoter region and transcription begins.

- RNA polymerase moves over the template DNA and adds complementary bases.

- RNA Polymerase stops transcription when the termination sequence is reached and releases the complete RNA chain, which moves to the cytoplasm.
Translation
- It is a process of synthesis of proteins from m-RNA.
- It starts when ribosomes attach to m-RNA.
- Bacterial ribosome has two subunits 50s and 30s, containing r-RNA and t-RNA.
- t-RNA is an adapter molecule - one side attaches to m-RNA, reading the triplet code and the other end attaches to a specific amino acid sequence.
- Once this assembly is formed, r-RNA catalyzes the process of attaching new amino acids, forming a chain.
The process of transcription and translation is shown in Figure 1

Figure 1: Process of transcription and translation under the central dogma of DNA function
Resources
Kindly provide your valuable feedback on the page to the link provided HERE
Molecular Basis of Genetic Code and Mutation
ContentThe genetic code is a triplet nucleotide sequence (codon) which encodes a specific amino acid during translation.
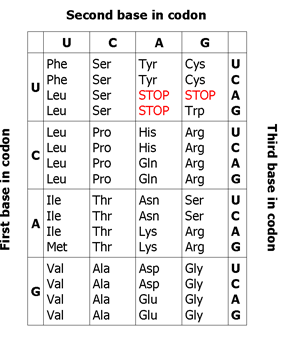
Figure 1: Genetic code
The three-letter codons consisting of four nucleotides found in mRNA (A, U, G, C) which produce a total of 64 different combinations. Of these 64 codons, 61 code for amino acids, the remaining three represent stop signals which trigger the end of protein synthesis (see Figure 1).
Properties of Genetic Code
- Universal: A particular codon will encode the same amino acid in all living beings
- Multiple codons: Different codons code for the same amino acid e.g. UUC and UUU code for Phe (Phenylalanine)
- Non-ambiguous: Each triplet specifies only a single amino acid
- Start codon (AUG): Codes for Met (Methionine) and marks the beginning of translation
- Stop codons (UAG, UAA, and UGA): Terminate protein synthesis as they do not code for any amino acid
Mutations
- Any alterations in the DNA sequence will result in an amino acid change e.g., GAA (Glutamic Acid) changes to GAC (Aspartic Acid)
- Changes in the amino acid sequence will alter the structure of the protein e.g., GAA (Glutamic Acid) changes to UAA (Stop codon)
- The structural change in the protein will alter its function e.g., for extracellular protein mutations in ACG (Cysteine) to TAT (Tyrosine) leads to loss of disulfide bond and protein function
- Silent mutations alter the DNA structure, but do not result in amino acid and functional changes e.g., GAA (Glutamic Acid) change to GAG (Glutamic Acid)
Resources
Kindly provide your valuable feedback on the page to the link provided HERE
Molecular Basis: Introduction to Polymerase Chain Reaction(PCR) Technology
ContentPolymerase Chain Reaction (PCR) is a laboratory technique to amplify Deoxyribose Nucleic Acid (DNA).
The PCR mix consists of:
- MgCl2 :1.5 - 6 mM
- Buffer (pH 8.3 - 8.8)
- DNA polymerase (Taq polymerase): 0.5 - 2.5 U
- Target DNA: <1µg
- Primers: Short DNA sequences to select the region to be amplified
During PCR, the temperature of the PCR mix is repeatedly raised and lowered to help the DNA polymerase enzyme replicate the target DNA sequence in the presence of the primer (Figure 1) and produce multiple copies in a few hours (Figure 2).
Steps in PCR:
- Denaturation of the DNA into single strands (94-95ºC)
- Annealing of primers to each strand for new strand synthesis (58-65ºC)
- Extension of the new DNA strands (72ºC)
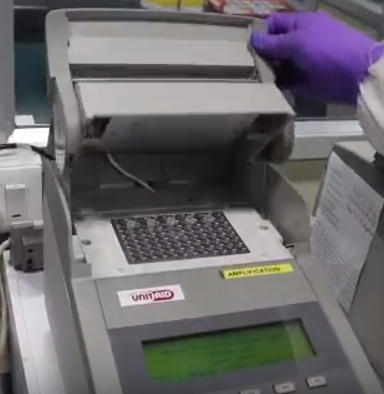
The test is performed in a thermal cycler machine that maintains a different temperature required during the different PCR steps.
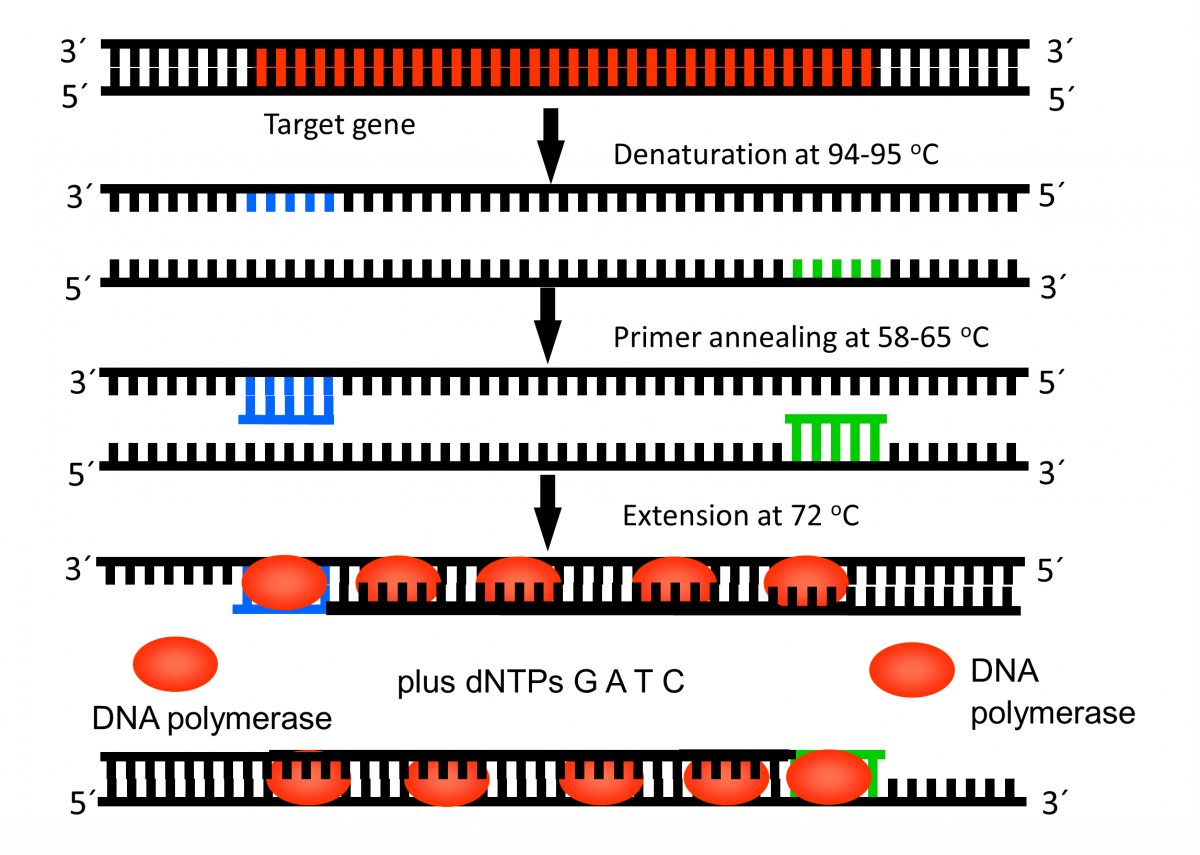
Figure 1: First Cycle in Thermal Cycler Machine

Figure 2: Exponential Amplification of Target Gene
Resources
Kindly provide your valuable feedback on the page to the link provided HERE
Molecular Mechanism of Multi-drug Resistance in Mycobacterium tuberculosis
ContentAnti-TB drugs and molecular mechanism of multi-drug resistance with regards to First Line- Line Probe Assay (FL-LPA) and Second Line- LPA (SL-LPA) is described here.
Rifampicin (RIF)
- It has a bactericidal effect on metabolically active M. tuberculosis and late sterilizing action on semi-dormant organisms undergoing short bursts of metabolic activity
- The mechanism of action of Rifampicin is the inhibition of RNA transcription in the mycobacterial cell by targeting DNA dependent RNA polymerase gene rpo B
- Resistance is due to mutations leading to a change in the structure of the beta subunit of Mycobacterium tuberculosis RNA polymerase
Isoniazid (INH)
- It has a potent early bactericidal action
- It is a pro-drug that requires activation by the mycobacterial enzyme, Catalase peroxidase gene katg
- INH resistant clinical isolates frequently lose their catalase peroxidase activity
INH may act on several targets within the mycobacterial cell, significant evidence supports the concept that it blocks the synthesis of cell wall mycolic acids. The major components of the envelope of M. tuberculosis.
Genes targeted in mycolic acid synthesis include:
- nadh-dependent enoyl acp synthase (encoded by inha)
- malonyl-coa acyl carrier protein (acp) transacylase (fabd)
- acetyl-coa carboxylase (accd6)
Other isoniazid target genes include peroxiredoxin alkyl hydroperoxide reductase subunit c (ahpc), ahpc-oxyrintergenic regulatory region; several efflux proteins encoded by iniabc and efpa
- Resistance is due to
- Mutations in katg, fabg1, oxyr- ahpc intergenic region, accd6 and efflux proteins
- Promoter region of inha, which leads to overexpression of isoniazid's target inha, requiring higher doses of the drug to achieve complete inhibition
Ethionamide (Eto)
- It has a bacteriostatic or bactericidal action, depending on the drug concentration in host
- It is a pro-drug, converted to active form by the bacterial monooxygenase EthA
- It targets mycolic acid synthesis
- Resistance is due to mutations in the inhA promoter
Pyrazinamide (Z)
- It has a bactericidal action; kills nonreplicating persistent Mycobacterium tuberculosis in macrophages
- It inhibits the synthesis of fatty acids; this disrupts the Mycobacterium tuberculosis cell membrane
- It is a pro-drug which must be activated by pyrazinamidase encoded by pncA, rpsA, and panD genes
- Resistance is due to mutation in pncA, rpsA, and panD; active drug effflux
Fluoroquinolones (Ofloxacin, Ofx; Levofloxacin, Lfx; Moxifloxacin, Mfx; Gatifloxacin, Gfx)
- Have a bactericidal action
- Inhibits gyrases encoded by gyrA and gyrB genes
- Prevent bacterial DNA synthesis
- High-level resistance requires multiple mutations in gyrA, or concurrent mutations in both gyrA and gyrB
Aminoglycosides (Kanamycin, Km; Amikacin, Am) /Polypeptides (Capreomycin, Cm)
- Have a bactericidal action
- Acts on ribosome rrs gene
- Prevents bacterial protein synthesis
- Resistance is due to mutation in rrs
- Low-level resistance to Kanamycin is associated with the promoter region of eis (enhanced intracellular survival protein) gene
Resources
Kindly provide your valuable feedback on the page to the link provided HERE
-
CDST_LT: Introduction to LPA
FullscreenLPA for DR-TB Diagnosis
ContentAs per the Integrated Drug Resistant Tuberculosis (DR-TB) Diagnostic Algorithm:
- Nucleic Acid Amplification Test (NAAT) are preferred for initial detection of Rifampicin (R) resistance.
- Line Probe Assay (LPA) test is preferred for detection of Isoniazid (H), Fluroquinolones (FQ) and second-line injectable (SLI) drugs resistance.
- When Rifampicin resistance is detected by NAAT (Figure):
- Offer first-line (FL) and second line (SL) LPA
- Direct LPA performed on smear positive specimen or indirect LPA is performed on culture isolate when smear is negative
- When Rifampicin resistance is not detected by NAAT (Figure):
- Offer FL-LPA to detect H resistance
- Direct LPA performed on smear positive specimen or indirect LPA is performed on culture isolate when smear is negative
- If H resistance is detected, SL-LPA is performed to check FQ resistance.
- When Rifampicin resistance is detected by NAAT (Figure):

Figure: Flow Chart to decide FL/SL-LPA after NAAT Results
Resources
Kindly provide your valuable feedback on the page to the link provided HERE
Line Probe Assay [LPA] in DR-TB Diagnosis
ContentAs per the Integrated Drug-resistant Tuberculosis (DR-TB) Diagnostic Algorithm:
- Nucleic Acid Amplification Tests (NAAT) are preferred for the initial detection of Rifampicin (R) resistance
- Line Probe Assays (LPA) are preferred for the detection of Isoniazid (H), Fluoroquinolones (FQ) and second-line injectable (SLI) drugs resistance.
When rifampicin resistance is detected by NAAT (see figure below):
- Offer first-line (FL) and second line (SL) LPA
- Direct LPA performed on smear positive specimen or indirect LPA is performed on culture isolate when the smear is negative
When Rifampicin resistance is not detected by NAAT (see figure below):
- Offer FL LPA to detect H resistance
- Direct LPA performed on smear positive specimen or indirect LPA is performed on culture isolate when the smear is negative
- If H resistance is detected; SL LPA is performed to check FQ resistance
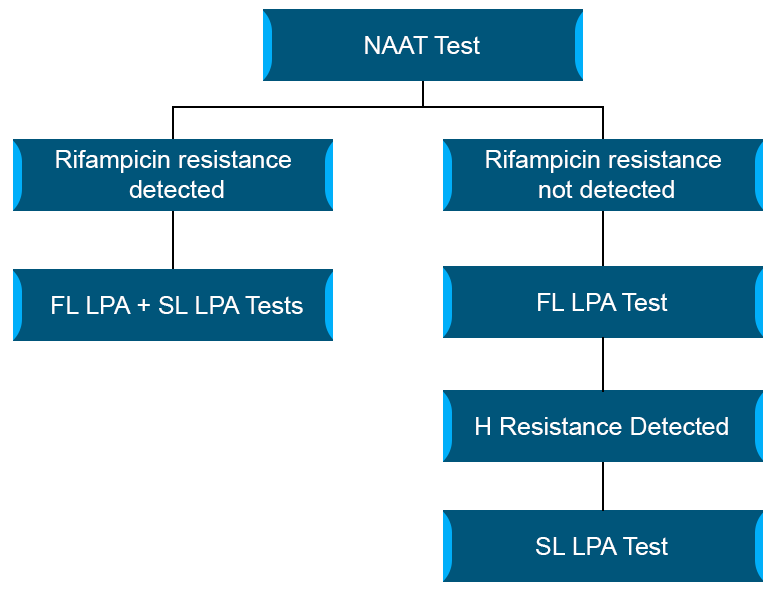
Figure: Flowchart to decide FL/SL-LPA after NAAT results
Resources
Kindly provide your valuable feedback on the page to the link provided HERE
First Line LPA [FLLPA]
ContentFirst Line (FL) LPA
- Performed using GenoType MTBDR plus ver 2.0 kit
- GenoType MTBDR plus (Figure) identifies:
- Mutations in the Rif-resistance Determining Region (RRDR) of rpoB gene (from codon 505 to 533) to detect Rifampicin resistance
- Mutations in the inhA promoter (from -16 to -8 nucleotides upstream) and the katG (codon 315) regions to identify Isoniazid resistance.

Figure: GenoType MTBDR plus FL-LPA strip to determine Wild Type genes and mutations responsible for resistance to Rifampicin and Isoniazid; Source: GLI LPA Guidance Document.
Resources
Kindly provide your valuable feedback on the page to the link provided HERE
Second Line LPA [SLLPA]
ContentSecond-line Line Probe Assay (SL-LPA) is a LPA to detect resistance to the second-line anti-TB drugs. This test is recommended for identifying TB patients with Multidrug-resistance (MDR) or rifampicin-resistance and those who can be placed on the shorter MDR-TB regimen.
The SL-LPA produces results in just 24-48 hours.
- It is performed using GenoType MTBDRsl Version 2.
- This is a DNA-based test that identifies genetic mutations in MDR-TB strains, making them resistant to fluoroquinolones and injectable second-line TB drugs.
- GenoType MTBDRsl Version 2 (Figure) identifies:
- Quinolone-resistance determining region (QRDR) of gyrA (from codon 85 to 96) and of gyrB (from codon 536 to 541) genes for detection of resistance to fluoroquinolones
- rrs (nucleic acid position 1401, 1402 and 1484), eis promoter region (from -37
to -2 nucleotides upstream, low level kanamycin resistance) for detection of resistance to SLI drugs.
- Single mutation in gyrA confers low level fluoroquinolone resistance.
- Concurrent mutations in gyrA or both gyrA and gyrB confer high level fluoroquinolone resistance.
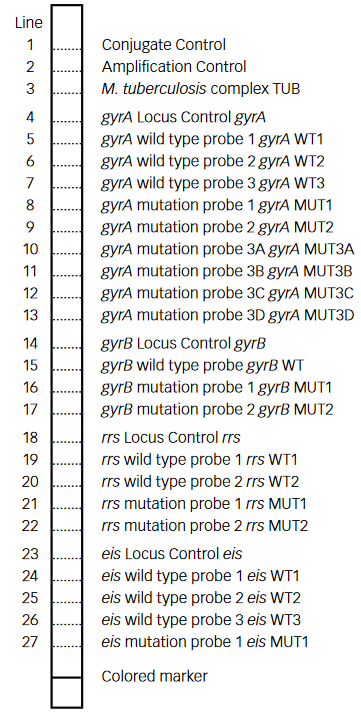
Figure: GenoType MTBDRsl Version 2 SL-LPA strip to determine Wild Type genes and mutations responsible for Resistance to Fluoroquinolones and Second-line Injectable Drugs; Source: GLI LPA Guidance Document.
Resources
Kindly provide your valuable feedback on the page to the link provided HERE
-
CDST_LT: LPA lab biosafety requirements
FullscreenBiosafety Requirements in Line Probe Assay [LPA] Laboratory
ContentDNA extraction for Line Probe Assay (LPA) from clinical specimens can be performed in either a BSL-2 or BSL-3 laboratory, while DNA extraction from mycobacterial cultures must be performed in a BSL-3 laboratory. Only after heat-killing of the organism and DNA isolation can the sample be considered non-infectious and moved to the LPA laboratory.
The subsequent steps, i.e., amplification and post-amplification, only require a BSL-1 laboratory.
Aspects of biosafety in LPA laboratory include:
- Facility Design
- Workflow description
- Rooms required to complete LPA procedures
- Access to authorized personnel only
- Electricity and backup power supply
- Laboratory Equipment
- Equipment operation
- Equipment maintenance
- Safe Lab Practices
- Cleaning and disinfecting work areas
- Use of Personal Protective Equipment (PPE)
- Disinfection and decontamination
- Biomedical waste management
Resources
Kindly provide your valuable feedback on the page to the link provided HERE
- Facility Design
Biosafety Requirements in LPA Facility Design
ContentThere are two types of risk while setting up a Polymerase Chain Reaction (PCR) facility for Line Probe Assay (LPA):
- Biohazard risk: The potential that a laboratory worker will become infected when working with live M. tuberculosis.
- Bio-risk: The potential that specimens or reagents will become contaminated with DNA, amplified products (amplicons) or exogenous contaminants that lead to false-positive PCR results.
Precautionary measures to reduce the biohazard and bio-risk in DNA molecular procedures are critical and drive the general facility design.
LPA Facility Design and Layout
There should be four separate rooms for:
- DNA extraction
- Reagent preparation for PCR - the pre-amplification step
- PCR amplification
- Hybridization and detection
In case of space constraints, one room can be used for both hybridization and amplification.
Movement in the LPA Facility (Figure 1 and 2)
- There should be a unidirectional flow of lab staff, as well as the tools used.
- Never reverse the flow.
For example:
- In the morning, commence work in the reagent preparation room as it is “the ultra-clean room”. From this room, one may proceed to either the specimen preparation room, the PCR amplification room, or the PCR amplification and detection room.
- If one starts work in the specimen preparation room they should not enter the reagent preparation room, but they may work in the PCR amplification room, or the PCR amplification and detection room.
- If one starts working in the amplification or detection room they should not enter the reagent preparation room.
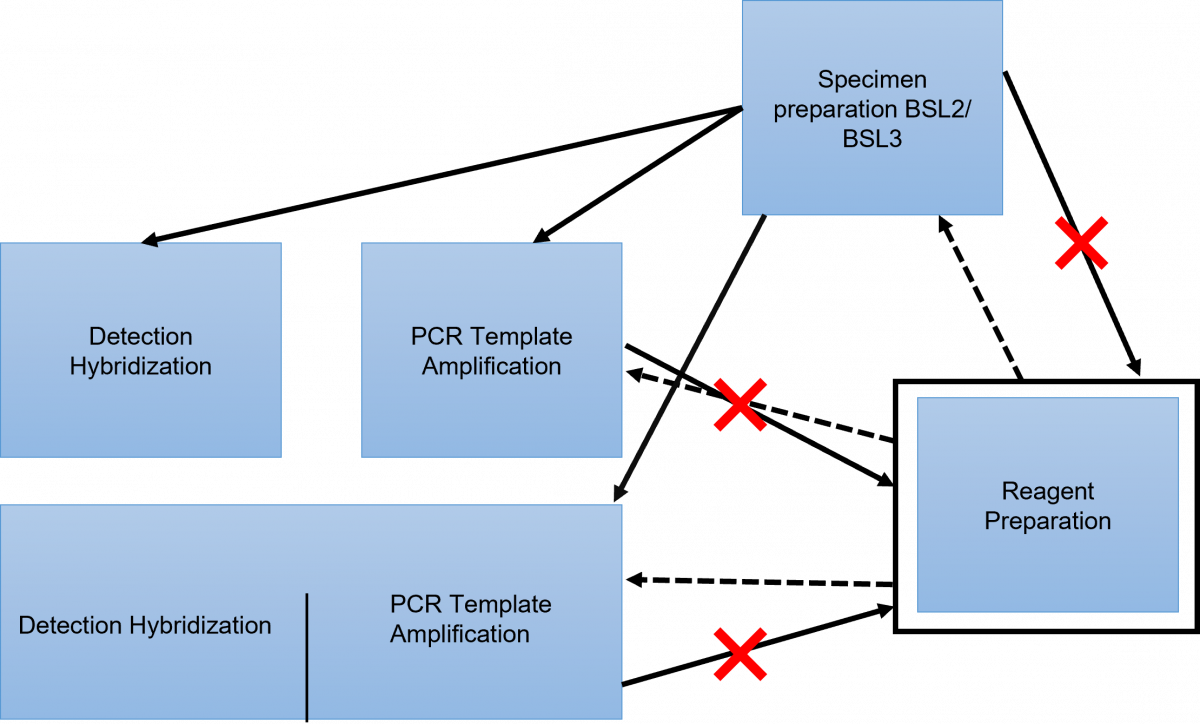
Figure 1: LPA Facility Layout showing Maintenance of Unidirectional Movement and Flow of Tools

Figure 2: Requirements to Maintain the Unidirectional Flow of Tools and Staff in the LPA Laboratory
Resources
Kindly provide your valuable feedback on the page to the link provided HERE
Electrical Supply and Back-up Power Requirements in LPA Facilities
ContentImportance of Electrical Supply and Backup Power in the Line Probe Assay (LPA) Facility
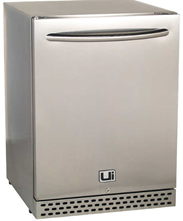
- Reagents used in LPA are to be stored at 4°C or -20°C. Hence, require uninterrupted electricity supply/ backup power.
- Amplification and hybridization procedures must be conducted under closely monitored temperature conditions.
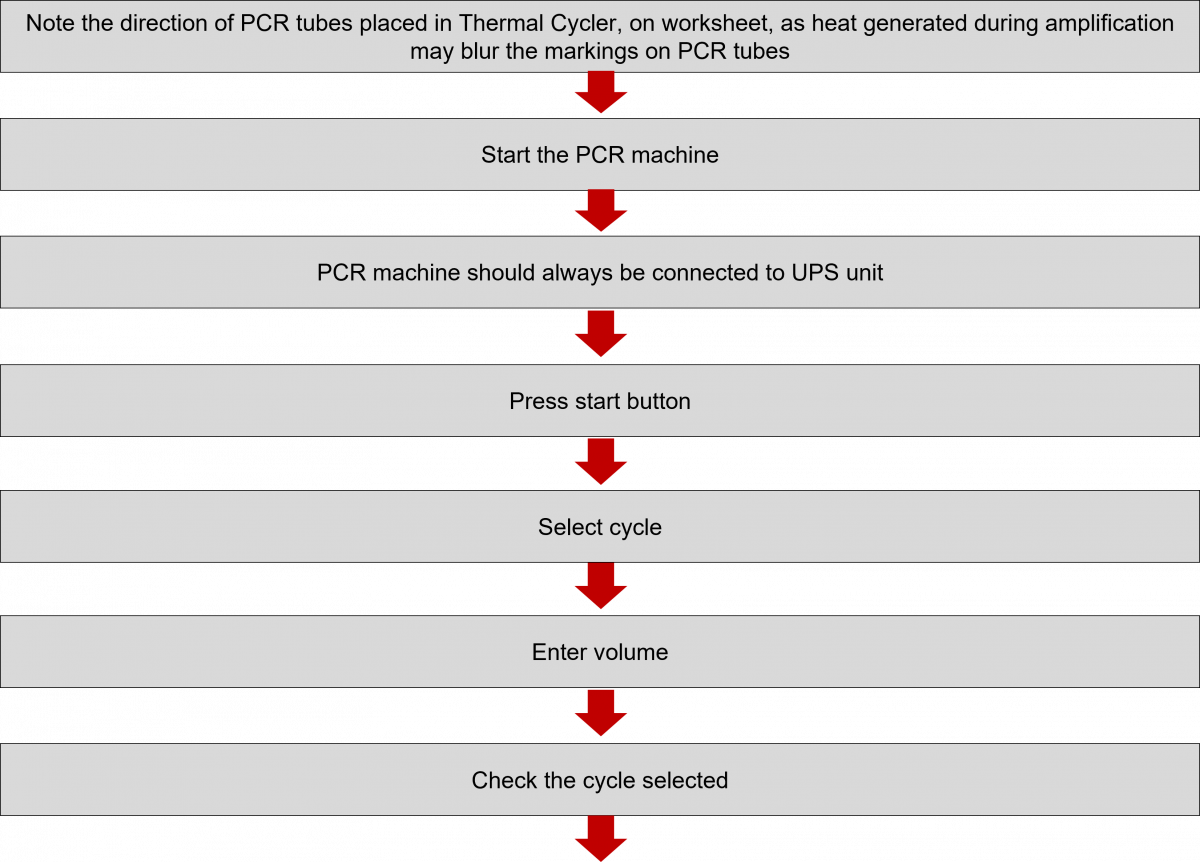
- Uninterrupted Power Supply (UPS) connection is required during PCR amplification and use of the automated hybridization systems to avoid interruption of the procedure and subsequent loss of results.
Features of Electrical Fittings, Wiring, Power Points, Sockets, Fixtures and Electrical Boxes in the LPA Facility
- All the electrical fittings in the LPA laboratory areas should be suitable for clean room application and sealed (all conduits, outlets) with silicon sealant, leak-proof and capable of withstanding chemical exposures during fumigation.
- Necessary wiring and power points (at least six in each room) should be provided for all equipment.
- Modular type, power points of 5A/15A required at various locations on the wall as per placement of equipment.
- Power backup of about 125 KVA capacity is required for LPA laboratory.
- Provision should be made for backup power supply to the critical components and equipment through a UPS and diesel power generator set.
- There should be two outlets, one for direct line and one for UPS backups, planned for each lab equipment.
- The sockets meant for UPS should be screen printed as (UPS) for ease of operation and identification. Marked wires and cables used should be copper wire of standard make (ISI marked) and manufacturer.
- Light fixtures should be placed flush with roof, with gasket or otherwise sealed with silicon sealant.
- Accessibility for replacement of light fixtures should be provided from the roof side.
- Circuit breakers must be able to accommodate the electrical demand needed to operate the various laboratory equipment for LPA.
- All electrical boxes and wiring should be certified to avoid surges that might render the equipment inoperable.
Resources
Kindly provide your valuable feedback on the page to the link provided HERE
Equipment Required in Different Rooms in the LPA Lab Facility
ContentThe design of the LPA facility includes the availability of different rooms to perform different steps. Each room has a set of specific equipment.
There should be a minimum of 4 separate rooms to carry out procedures. The details of these rooms and equipment are elaborated below:
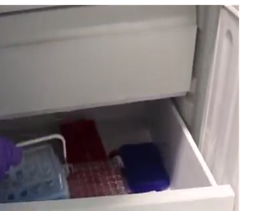
1. DNA Extraction Room: For DNA extraction from decontaminated samples. Table 1 shows the equipment in the DNA extraction room.
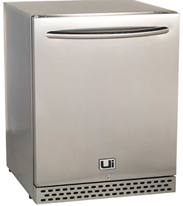
Table 1: Equipment in the DNA Extraction Room
BIOSAFETY CABINET MICROLITER CENTRIFUGE VORTEX MIXER 

HOT AIR OVEN REFRIGERATOR 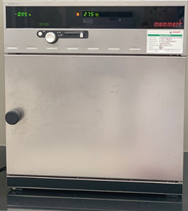
2. Master Mix/ Reagent Preparation Room: For the preparation of reagents required in the master mix for PCR. Table 2 shows the equipment required in this room.
Table 2: Equipment in the Master Mix/Reagent preparation room
PCR HOOD
PICO-FUGE
-20ºC FREEZER
3. DNA Amplification Room: For PCR amplification of DNA. Table 3 shows the equipment in this room.
Table 3: Equipment in the DNA Amplification Room
PCR HOOD
THERMAL CYCLER
REFRIGERATOR


4. Hybridization – detection Room: For hybridization of amplicons with probes and detection of bands. Table 4 shows the equipment required in this room.
Table 4: Equipment in the Hybridization-detection Room
TWINCUBATOR
GT BLOT


REFRIGERATOR
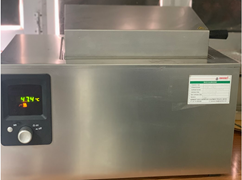
WATER BATH
Resources
- Molecular Detection of Drug-resistant Tuberculosis by Line Probe Assay.
- GLI Training Package on LPA.
Kindly provide your valuable feedback on the page to the link provided HERE
LPA Biosafety Essentials: Procedural Biosafety Measures
ContentProcedural biosafety measures include:
- Biosafety measures taken during the Line Probe Assay (LPA) procedures
- Aerosol generation and preventive measures
Manipulations that produce aerosols in DNA Extraction Room are:
- Pipetting
- Centrifugation
- Vortexing
- Discarding micropipette tips after use
Measures to Prevent Aerosol Generation
- Always open and manipulate specimens and cultures in a certified Biosafety Cabinet (BSC).
- Work over absorbent material (sheet/ paper) soaked in a disinfectant.
- Use centrifuge safety cups/ aerosol tight rotor and open them in the BSC.
Resources
Kindly provide your valuable feedback on the page to the link provided HERE
LPA Biosafety Essentials: Waste Disposal
ContentBiomedical Waste Management is an essential biosafety component of TB containment laboratories. All infectious materials should be decontaminated, incinerated, buried or autoclaved.
The following materials are suitable for waste disposal by autoclaving:
- All positive TB cultures
- Mycobacterial cultures
- All infectious materials from TB-containment laboratories where mycobacterial culture is performed
In laboratories where the risk of infection with TB is low, plastic sputum containers, cartridges used for molecular analysis - Nucleic Acid Amplification Test (NAAT) and Line Probe Assay (LPA) - (CBNAAT cartridges, TrueNAT chips, used tips, droppers, reagents, other consumables) and wooden applicator sticks, should be removed from the laboratory in sealed disposal bags and incinerated.
Important considerations for waste disposal
- Any materials that are reused must be decontaminated with a suitable disinfectant or autoclaved before being removed from the laboratory.
- All infectious waste should be soaked in appropriate disinfectant (5% phenol/ 1% sodium hypochlorite) and discarded in the bio-safety disposal bins.
- The bio-medical waste should be segregated into containers.
- Colored plastic bags should be used as per the Programmatic Management of Drug Resistant TB, 2021 Guidelines, at the point of generation.
- The authorized person should maintain records related to the generation, collection, reception, storage, transportation, treatment, disposal or any other form of handling of bio-medical waste, for a period of five years.
- Waste should be disposed off according to the Bio Medical Waste Guidelines, 2019.
Resources
- Guidelines for PMDT in India, 2021.
- Central Pollution Control Board: Waste Management and Handling Rules.
Kindly provide your valuable feedback on the page to the link provided HERE
-
CDST_LT: Equipment used in LPA labs
FullscreenBiosafety in TB Laboratories
ContentWhat is Biosafety?
Biosafety is safe handling and containment of infectious microorganisms and hazardous biological materials.
Why Biosafety?
Infections which are obtained through laboratory or laboratory-related activities are known as Laboratory Acquired Infections (LAI). These infections are major occupational health hazards and are a cause of concern for the safety of the staff working in laboratories.
Routes of entry of LAI
There are multiple routes of entry and transfer of toxic material through the body and its transfer to various organs and systems.
The most predominant routes of LAI are:
- Nose - Inhalation of infectious aerosols
- Mouth - Ingestion or exposure through mouth pipetting or touching mouth or eyes with contaminated fingers or contaminated object
- Skin and mucous membrane:
- Spills and splashes onto skin and mucous membranes
- Parenteral inoculations with syringes or other contaminated sharps
- Animal bites and scratches from research laboratories or activities
Biosafety guidelines are prepared to promote:
- Safe microbiological practices
- Safety equipment and facility safeguards for reducing LAIs
- To protect public health and the environment
Biosafety in Tuberculosis TB laboratory (lab)
In a TB lab, the primary risk for infection transmission is the aerosol contaminated with TB bacilli when:
- TB patients walk into the laboratory for specimen collection or other testing and may be a source of droplet infection if they cough during laboratory visits
- Procedures such as centrifugation, vortexing, and vigorous shaking generate significant aerosols that are biohazardous
Key points to consider for M. TB as a biological hazard are given in the table below.
MYCOBACTERIUM TUBERCULOSIS (M. TB) AS BIOLOGICAL HAZARD
RISK FACTORS
Pathogenicity
M.TB exposure may lead to infection
5-10% of infected persons will develop TB disease
Primary route of transmission
Inhalation
Stability
Tubercle bacilli can remain viable for extended periods in the environment
Infectious dose
As little as 10 bacilli can infect humans
Effective Vaccine (for adults)
No vaccine is available for adults
Effective treatment for strain susceptibility to different medicines
Yes
Effective treatment for MUltiple Drug Resistant (MDR), Extensively Drug Resistant (XDR) strains
Yes, but more difficult to treat than susceptible strains
Standards for TB Lab Biosafety
- Standards are prepared based on the recommendations from the WHO expert group in 2012.
- Standards use a procedural approach for the assessment of risk.
- It establishes minimum requirements necessary to ensure biosafety during TB microscopy, culture, drug-susceptibility testing (DST) and molecular testing in different countries and epidemiological settings.
Resources
Kindly provide your valuable feedback on the page to the link provided HERE
Precautions for Using the Biosafety cabinet [BSC]
ContentThere are certain Do’s & Don'ts that should be followed while operating the Bio Safety Cabinet (BSC).
Do’s:
- Read the Standard Operating Procedure (SOP) before starting the work inside the BSC.
- Carry out functionality tests (smoke test, pressure gauge monitoring) before use, and maintain a record at installation and after the maintenance of BSC.
- Check that the sash is at normal operating height (READY state). Adjust the chair height so that your face is above the sash.
- Always use good microbiological practice when working inside the BSC.
- Disinfect work surface, interior walls and interior window surface before and after work.
- Maintain the log sheet after every run of BSC and perform the maintenance activity as required.
Don’ts:
- Never work in the cabinet with the ultraviolet light ON.
- BSC should not be used with the sash window above the design opening mark.
- Perform all the work on or over the work surfaces; avoid working over or placing items on the front grill or blocking the front or rear grills.
- To reduce turbulence, avoid rapid movement while working.
- Avoid unnecessary movement of hands and arms in and out of the cabinet.
- Open flames (Bunsen burners) should never be used inside the BSC; open flames actually create turbulence that disrupts the air flow and damages the filters.
- Never operate the cabinet when any alarms are activated.
Resources
Kindly provide your valuable feedback on the page to the link provided HERE
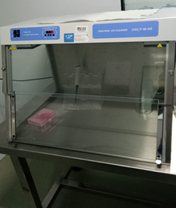
Biosafety Cabinet [BSC] Class I
ContentThe Biosafety Cabinet (BSC) or microbiological safety cabinet is an enclosed, ventilated laboratory workspace for safely working with materials.A Class I BSC is defined as a ventilated cabinet for personnel and environmental protection.Class I BSCs protect workers but do not protect work products (such as specimens or cultures) against contamination because unsterilized room air is drawn over the work surface.
- Class I biosafety cabinets are typically used to either enclose specific equipment like centrifuges or for procedures like aerating cultures that might potentially generate aerosols.
- Biosafety cabinets of this class are either ducted (connected to the building exhaust system) or unducted (recirculating filtered exhaust back into the laboratory).

Figure: BSC Class I Airflow Diagram - In the Class I BSC, the room air is drawn in through the opening that also allows the entry of the operator’s arm during work.
- The air inside the cabinet then takes in the aerosol particles that may have been generated and moves it away from the operator towards the HEPA filter.
- The air moving out of the cabinet is thus, sterilised via the HEPA filters before its discharge to the environment either:
- Into the laboratory and then to the outside of the building through the building’s exhaust system; or
- To the outside through the building’s exhaust system; or
- Directly to the outside.
- In this way, the cabinets protect the operator and the environment from the aerosols but not the sample.
Resources
Biosafety Cabinet [BSC] Class II Type A2
Biosafety Cabinet [BSC] Class III
Cleaning and Maintenance of the Biosafety cabinet [BSC]
ContentThe daily maintenance of the Bio Safety Cabinet (BSC) should be performed by lab staff and include:
- Surface decontamination of the work zone
- Cabinet power-up alarm verification
- Removal of unnecessary items from the BSC
- Flow check (inflow and downflow velocity)
- Smoke pattern test
- Entry in the logbook (shown in Table 2)
The weekly maintenance tasks to be performed by lab staff are:
- Surface decontamination of the drain pan
- Surface cleaning of fluorescent (FL) and ultraviolet (UV) lamps
- Front sash cleaning
Biosafety cabinets must undergo certification:
- At the time of installation
- Whenever they are moved
- Following any repairs or filter changes
The BSCs also require regular (annual) maintenance to ensure proper functioning.
Delaying maintenance or using underqualified personnel to conduct maintenance can put laboratory workers at risk.
Annual Maintenance - To be performed by an external agency
Parameters verified:
- Down flow and inflow velocities
- Particle count test
- Airflow smoke patterns
- Poly Alpha Olefin (PAO) test for High Efficiency Particulate Air (HEPA) filter integrity
The table 1 below summarizes the description of maintenance tasks to be performed and their frequency:
Table 1: Maintenance Tasks to be Conducted on the BSC
Description of task to be performed
Maintenance to be carried out every
Day
Week
Month
Quarter
Annually
1. Surface decontaminate the work zone
Yes
2. Cabinet power-up alarm verification
Yes
3. Decontaminate the work surface and interior surfaces with 5% phenol followed by 70% alcohol
Yes
4. Note the manometer’s reading, indicating any fall in pressure flowing through the HEPA filter
Yes
5. Thoroughly surface decontaminate the drain pan
Yes
6. Check the paper catch for retained materials
Yes
5. Clean the exterior surfaces of the cabinet
Yes
7. Check all service fixtures for proper operation
Yes
8. Inspect the cabinet for any physical abnormalities/ malfunction
Yes
9. Re-certification
Yes
10. Change UV-lamp
8000-9000 hrs. of use
Table 2: Maintenance Log Sheet
Date
Time of use
Cumulative duration of use
Cumulative duration of use of UV lamps
Visual alarm
Sound alarm
Smoke test
Airflow
m/s
(for class II BSC)
Observation
Operator’s
Sign
Change UV lamps after XXX hours of use (according to manufacturer's recommendations)
Resources
Kindly provide your valuable feedback on the page to the link provided HERE
Biosafety Requirements in the LPA Lab: Refrigerated Centrifuge Use
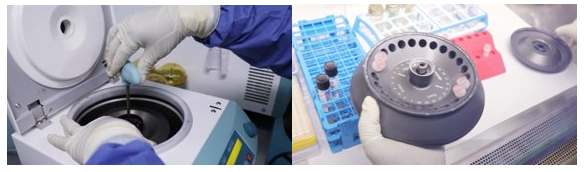
ContentThe refrigerated centrifuge is used in the mycobacteriology laboratory for concentrating bacterial cells, following the processing of sputum or other specimens. It is also used for spinning down reagents from walls of containers. The temperature maintained within the refrigerator centrifuge is 4°C to reduce the percentage of mycobacteria killed due to heat generated during centrifugation. The required G force is 3000 x g (not RPM).
Essential Features of the Refrigerated Centrifuge
- Swinging Bucket Rotor: The component that is rotated by the drive system and holds the containers being centrifuged. It is air and liquid-tight. It allows for longer distance of travel which allows better separation, and it is easier to withdraw or decant the supernatant without disturbing the pellet
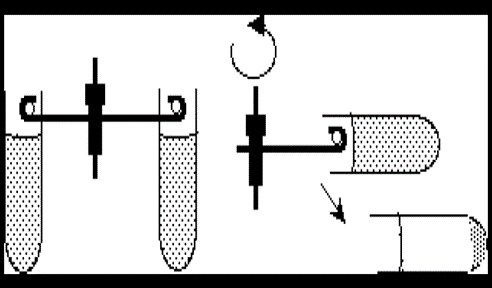
Figure 1: Advantage of the swing bucket in the centrifuge
- Sealed Safety Centrifuge Cups:
- Safety cups protect laboratory staff by providing containment of any aerosols that are produced during centrifugation, especially if tubes break (see Figure 2)
- Safety cups must be opened inside the biosafety cabinet (BSC)
- Safety cups have a silicone- coated rubber O-ring that provides an air-tight seal
- These seals must remain coated with silicone so that seals stays air-tight
Before use, it is important to inspect all the components.
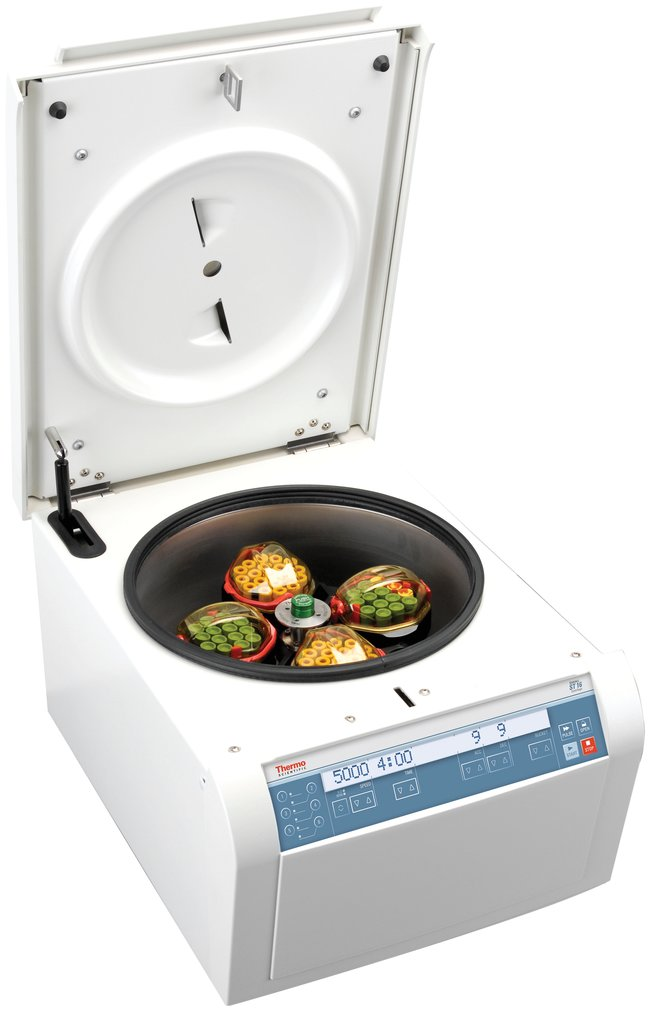
Figure 2: Refrigerated Centrifuge

Figure 3: Rotor and Centrifuge Cup (indicated by arrow) in a Refrigerated Centrifuge
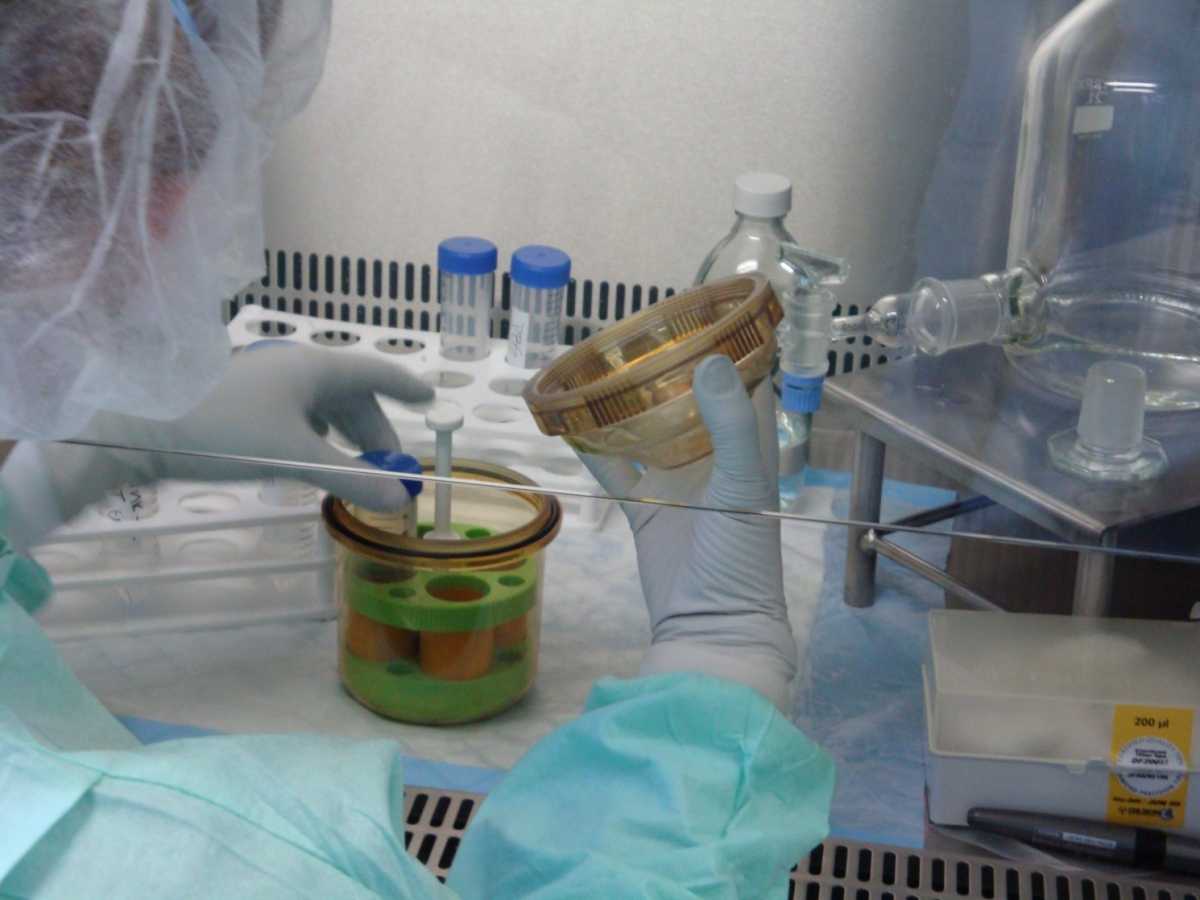
Figure 4: Safety bucket in use
Principle of Procedure
- A centrifuge is intended to separate particles in a liquid by sedimentation. Dense particles sediment first, followed by lighter particles.
- In a TB laboratory, centrifuges are used for the sedimentation and concentration of tubercle bacilli within liquefied sputa or body fluids (usually urine).
- To obtain a high sedimentation efficiency of 95%, i.e. 95% of bacilli recovered in the sediment and only 5% of bacilli still in suspension to be discarded with the supernatant, it is necessary to maintain 3,000 g for 15-20 minutes.
- The high speeds and time used to achieve effective sedimentation efficiency leads to heat build-up in the centrifuge and the specimen.
- To prevent cell death due to overheat, the use of a refrigerated centrifuge model, operated at 18-20°C, is recommended.
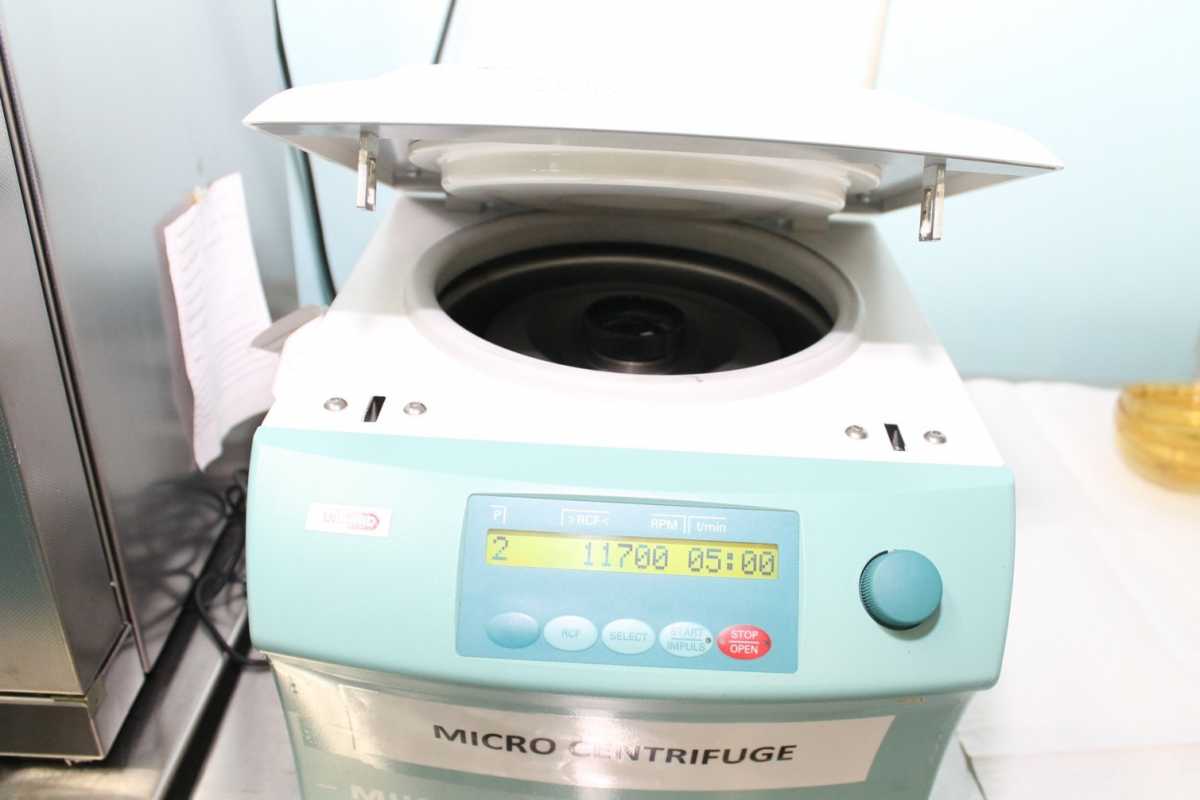
Refrigerated Microcentrifuge
- Provides high-speed centrifugation up to 13,000 rpm
- Use microcentrifuge tubes with a capacity of 1.5 to 2.0 ml
- Fixed angle rotor with a lid
- Rotor can be removed from the centrifuge chamber
Resources
Kindly provide your valuable feedback on the page to the link provided HERE
How to Use Refrigerated Centrifuges
ContentPrinciple of procedure
- A centrifuge separates particles in a liquid by sedimentation. Dense particles sediment first, followed by lighter particles
- To obtain a high sedimentation efficiency of 95%, it is necessary to centrifuge the TB specimens at 3,000 g for 15-20 minutes
- The high speed and time used to achieve effective sedimentation efficiency lead to heat build-up in the centrifuge and the specimens. To prevent cell death due to overheating, the use of a refrigerated centrifuge is recommended
How to use refrigerated centrifuges?
Select type of tube, based on:
- G force used for swing-out bucket
- Time of centrifugation
- Temperature
- Compatibility with specimen
- Chemically inert
Visually inspect tubes
Do not use if tubes have:
- Cracks
- Scratches
- Chipped rims
Fill tubes only to the recommended volume
- Do not overfill tubes
- High g forces can drive liquid up to the cap and cause overflowing
Before using centrifuge
- Inspect the interior of the bowl for stains
- Inspect rotors and buckets for cracks and signs of corrosion
- Always check the silicon O ring for any wear & tear of the aerosol lid
- Check log book to ensure centrifuge is in good working condition
- Pre-cool centrifuge prior to use
Use of safety centrifuge
- Centrifuge load MUST always be balanced to avoid the risk of damage
- Add a balance tube with the same volume of water if processing an odd number of specimens
- Select the required time and g force or RCF
- Stop centrifuge immediately if any abnormal noise and/or shaking is noticed
- Never use the brake to stop a normal operating centrifuge for TB specimen processing
- ALWAYS open the sealed buckets inside the biosafety cabinet (BSC)
Microcentrifuge
- Always balance the rotor
- Use high-quality screw-capped tubes, which will not leak or break during centrifugation
- When using a microcentrifuge for DNA extraction, the microcentrifuge should be loaded and unloaded inside the BSC
- Remove and replace the rotor carefully
Resources
- World Health Organization laboratory biosafety manual 3rd edition, pgs 72-73
- Manufacturer's instructions
- Global Laboratory Initiative LC training module on Equipment slides 32-34.
Kindly provide your valuable feedback on the page to the link provided HERE
Revolutions per minute [RPM] vs Relative centrifugal force [RCF] in the Safety Centrifuge
ContentRevolutions Per Minute (RPM) and Relative Centrifugal Force (RCF) are important abbreviations used while using a centrifuge. However, these terminologies differ from each other.
RPM vs. RCF (g force)
- RPM indicates the speed at which the rotor is rotating.
- RCF is the term used to describe the amount of accelerative force applied to a sample in a centrifuge.
- RCF is measured in multiples of the standard acceleration due to gravity on the Earth’s surface (x g).
- This is why RCF and “x g” are used interchangeably in centrifugation protocols.
- The two variables that describe RCF are the radius and the angular velocity of the rotor, i.e., how wide the rotor is and how fast it is moving.
- RCF is more precise than RPM because the rotor size might differ, and RCF will be different, while the revolutions per minute stay the same.
Calculating RCF required from the known RPM value
Formula:
RCF = 1.1118 x 10 -5 x r x rpm2
r = radius in cm from the centrifuge spindle to the bottom end of the tube
RCF = desired centrifugal force
A nomogram, provided by the manufacturer, can be used to convert RPM to RCF value.
Resources
Kindly provide your valuable feedback on the page to the link provided HERE
Protocol for Cleaning and Maintenance of Refrigerated Centrifuge
ContentPeriodic maintenance of the refrigerated centrifuge is essential to ensure that the centrifuge is in optimum condition.
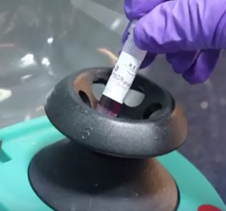
Daily Maintenance:
- For a refrigerated centrifuge that is turned off at the end of the day, open the top to allow the centrifuge chamber to dry (Figure 1).
- During the day, when the unit is under refrigeration, leave the top closed to avoid condensation and ice buildup.
- The centrifuge must not be used if the interior is hot, if unusual vibrations or noises occur, or if deterioration (corrosion of parts) is detected. A qualified service technician should be contacted.
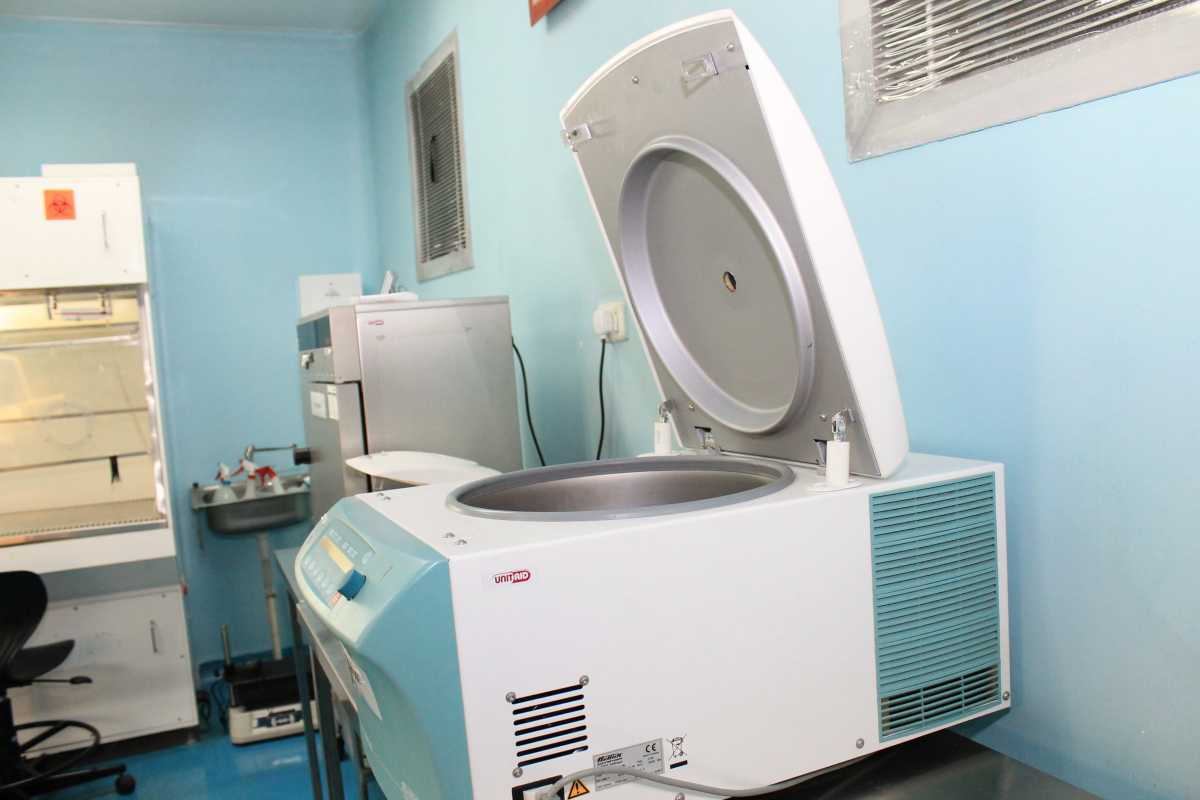
Figure 1: Refrigerated Centrifuge with Open Top to allow the centrifuge chamber to dry
Weekly Maintenance:
- Autoclave metal parts OR soak them in a disinfectant (not bleach or alcohol) for 15 minutes, rinse with sterile water and air dry.
- Soak lids in freshly prepared 1% bleach for 5 minutes and rinse with 70% alcohol or sterile water.
- Checking the rotors and rotor bores visually for residue and corrosion (Figure 2).
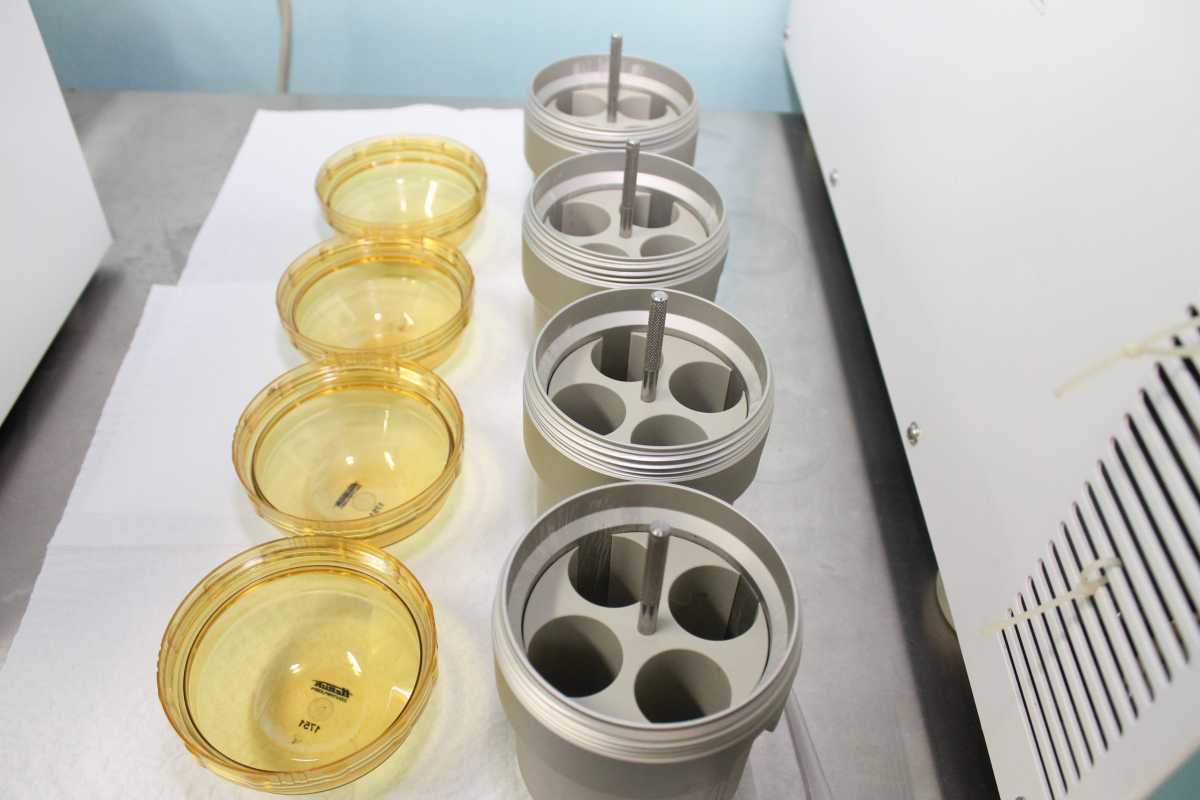
Figure 2: Lids and Rotor Bores
Monthly Maintenance:
- Clean the centrifuge housing, rotor chamber, rotors and rotor accessories with a neutral cleaning agent, e.g., mild soap.
- Lubricate rotor threads with lubricant.
- Lubricate O-rings with lubricant supplied by the manufacturer.
- Clean plastic and non-metal parts with a fresh solution of 1% sodium hypochlorite (bleach), followed rinsing with sterile water.
Note: Each laboratory should maintain centrifuge usage record in a log book (Figure 3).

Figure 3: Centrifuge Usage Log Book
Annual Maintenance:
Full service should be provided by a qualified service technician, which may include the servicing of the following:
- Centrifuge brushes
- Timer
- Electrical components
- Leaks
- Speed
Good practices for centrifuge usage:
- Always carefully read the operating manual before the initial operation of the centrifuge.
- Run the centrifuge with samples that are symmetrically loaded in the aerosol tightened buckets and open the buckets in the Bio Safety Cabinet (BSC) after centrifugation is done.
- Routinely check the silicon O-ring for any wear & tear of the aerosol lid.
- Always use centrifuge tubes that will withstand the required centrifugation speed.
- Perform maintenance activity as required.
Practices to be avoided when using the centrifuge are:
- Moving or knocking during operation
- Running the unit when there is heavy noise from the machine
- Running with unbalanced sample load
- Running if there is any wear & tear with the O-ring of the aerosol lid
- Adding water to a specimen to balance tubes
- Stopping the running cycle
Resources
- World Health Organization Laboratory Biosafety Manual, 3rd edition, p72-73.
- Global Laboratory Initiative Training Package on LC.
Kindly provide your valuable feedback on the page to the link provided HERE
Quality Control Process of the Autoclave
ContentThe quality control process for autoclaves is important to prevent the transmission of infection.
It is done to ensure that sterilization or decontamination by the autoclave is up to the mark.
To ensure that biohazardous waste is properly decontaminated during autoclaving, the following procedures should be followed by laboratory personnel for quality control during autoclaving:
A. Use of Chemical Indicator
- With each load of sterilization, an autoclave tape needs to be used (Figure 1)
- The autoclave tape is a visible temperature sensitive chemical indicator, with stripes that change colour after proper autoclaving is done (Figure 2)

Figure 1: Autoclave tape used on the load of material to be sterilized

Figure 2: Change in the colour of strips in the autoclave tape before and after proper autoclaving
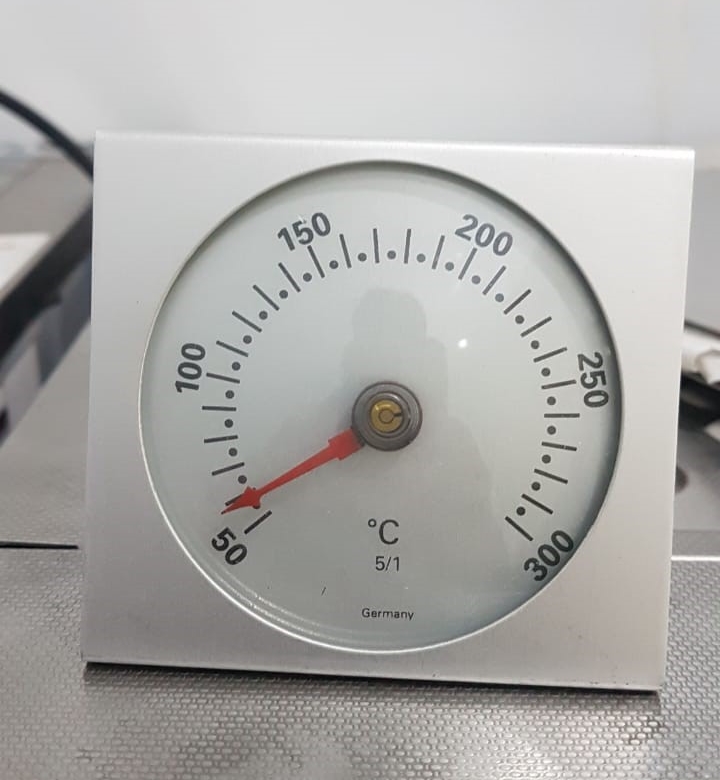
Note: Temperature sensitive autoclave tape is not sufficient on its own to indicate that the sterilization temperature (121ºC), is uniformly achieved throughout the chamber.
B. Biological Indicator (BI)
Biological indicators are used for checking the quality of autoclaving on a monthly basis, even if the autoclave has a paper printed monitoring system for autoclave effectiveness. The results need to be documented and kept for at least one year.
Principle of Biological Indicators
- Heat-resistant Geobacillus Stearothermophilus spores are used for autoclave efficiency testing
- After autoclaving, the autoclaved spore vial is incubated in a culture along with a non-autoclaved control vial at 56-60ºC
- The control biological indicator should yield positive results for bacterial growth and the autoclaved biological indicator should not show any growth (see Figure 3)
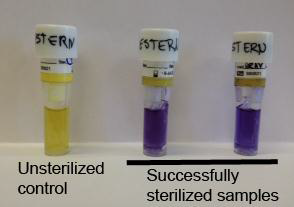
Figure 3: Showing effective use of the biological indicator
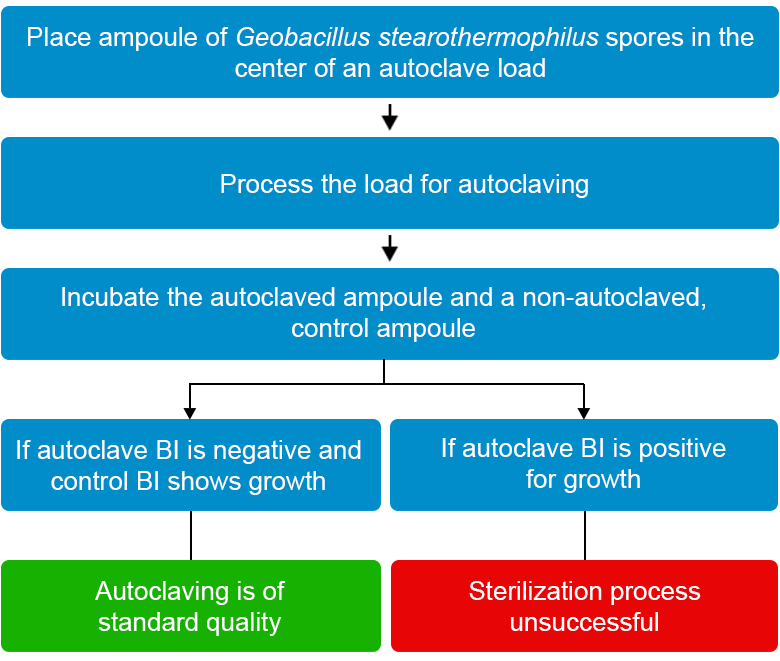
Figure 4: Steps to follow when using biological indicators
Reading and Recording
- Record details of the loading and of the autoclave’s operation in the autoclave logbook
- Incidents, accidents and/or mechanical problems must be recorded and reported to a supervisor immediately

Figure 5: Autoclave Logbook
Resources
- Tuberculosis Laboratory Biosafety Manual, 2012, WHO.
- Mycobacteriology Laboratory Manual, April 2014, WHO.
- Autoclave Quality Assurance Program, Biosafety Manual, Boston University.
Kindly provide your valuable feedback on the page to the link provided HERE
Maintenance of the Autoclave in TB Labs
ContentAutoclaves are pretty simple to use but there are a few steps for better maintenance of an autoclave.
A. Daily Maintenance
- Check that the lid/ door gasket is clean. After each cycle of an autoclave, the lid must be cleaned properly.
- Check if there is any crack in the gasket. If a crack is there, the instrument should not be used.
- Check for leaks while the autoclave is running. If bubbles are coming out, it indicates leaking from autoclave. Such an autoclave must be tagged as “Not Approved for Infectious Waste” and should not be used.
- The autoclave and work area must be cleaned after every use.
- Sensor must be checked after every use and there should not be any damage to the sensor.
- The work area must be disinfected according to the Standard Operating Procedure (SOP) for disinfection.
B. Weekly Preventive Maintenance
- The drain strainer must be removed and cleaned, if necessary.
- Whenever the drain strainer is cleaned, its entry into the logbook must be done.
- The operator must check the operation of the pressure release safety valve to verify proper function. During this check, the operator must keep himself away from the release valve exhaust to prevent a burn injury.
Resources
Kindly provide your valuable feedback on the page to the link provided HERE
Common Problems and Troubleshooting Related to Autoclaves in TB Lab
ContentCommon Problems and Troubleshooting Related to Autoclaves in TB Lab
Table: Common Problems and Troubleshooting Related to Autoclaves in TB Lab
SR NO
PROBLEM
CAUSES
SOLUTION
1
Drain is clogged or exhaust taking more time than normal
There may be clogging of drain valve dust
- Clean the chamber
- Drain the filter
2
Scaling and salt deposition
- Cleaning is not proper
- There is moisture inside the instrument
- Exposure to chemicals like acids & detergents
- Cleaning must be improved and proper
- Check the sterilizer for efficient drying
- Store autoclave in a dry area
- Do not expose instruments to chemicals like acids and detergents. If exposure occurs, rinse thoroughly after contact
- Use only distilled water in the boiler
3
Liquid container caps blowing off
The sterilizer is exhausting too rapidly
Use slow exhaust cycle during autoclaving
4
When the door of the autoclave is open, the solution is still boiling
The door of an autoclave is opened too quickly
- Do not open an autoclave door until the temperature gauge is below 85⁰C and the pressure gauge is at "0"
- Do not touch or move a load, when the solution is boiling
5
Indicator of an autoclave shows sterilization not complete
- Load in an autoclave chamber may be too large, too dense, or improperly loaded
- The time provided for an autoclaving is not sufficient for the load
- Autoclave may be malfunctioning
- Don’t overload an autoclave with the material
- Load must be placed properly in an autoclave chamber
- Increase the time given for autoclaving
- Strips may need to be changed
6
Steam leakage
- The gasket may be worn out
- The door of an autoclave may be closed improperly
- The gasket needs to be changed
- The door needs to be closed properly
7
Chamber door won’t open
- There may be a vacuum in the chamber
- The door lock clutch of an autoclave may be jammed
- The gasket of an autoclave may be sticking to the door frame
- Follow manufacturer instructions properly during each cycle of autoclave
- Contact service engineer, if the problem persists
Resources
- Tuberculosis Laboratory Biosafety Manual, 2012, WHO.
- Mycobacteriology Laboratory Manual, April, 2014 , WHO.
Kindly provide your valuable feedback on the page to the link provided HERE
LPA Laboratory Equipment: Micro Pipettes
ContentUse of Micropipette
- Micropipette (Figure) dispenses and aspirates liquid (reagent, sample).
- IT is used in the DNA Extraction Room, Master Mix Room, Amplification Room and Hybridization Room to dispense reagents for Line Probe Assay (LPA).
- A micropipette should be dedicated to each room and labelled accordingly.
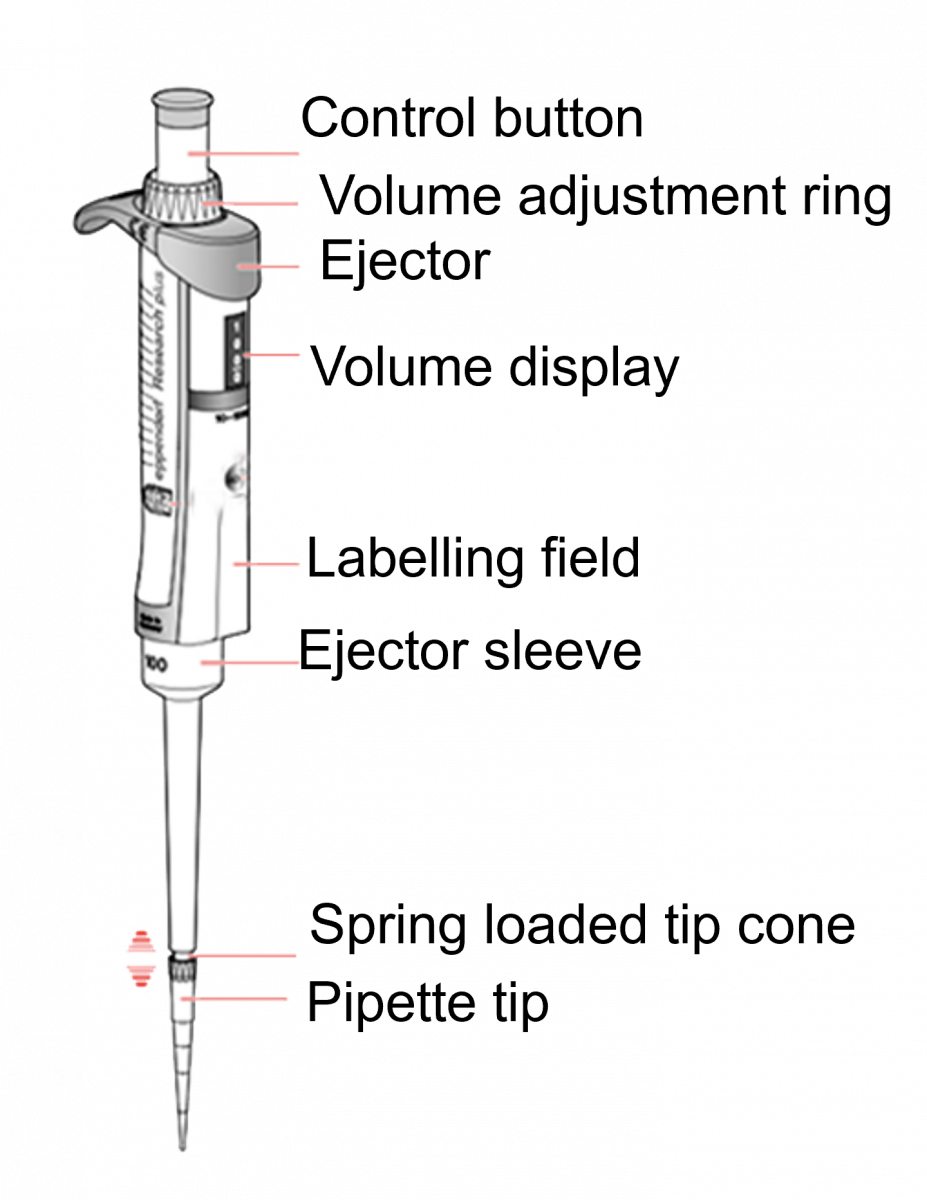
Figure: Micropipette
Cleaning:
- As per the manufacturer’s instructions
- Before and after every use wipe with 70% alcohol
Maintenance:
- Calibrated biannually
- To be done by a qualified service technician, which includes:
- Cleaning all parts
- Greasing of moving parts
- Checking function of all parts
- Calibration and validation using master calibration balance
Resources
Kindly provide your valuable feedback on the page to the link provided HERE
LPA Laboratory Equipment: Hot Air Oven
ContentUse of Hot Air Oven
- For heating non-explosive substances and objects
- For dry heat sterilization
- During DNA extraction step; kills Mycobacterium tuberculosis and partially lyses the cells at 95oC
Installation of the Hot Air Oven (Figure 1)
- The installation site must be flat and horizontal, and be able to reliably bear the weight of the appliance.
- Sufficient air circulation in the vicinity of the appliance must be guaranteed at all times.
- When installing, ensure that the distance between the wall and rear side of the appliance must be at least 15 cm.
- The clearance from the ceiling must not be less than 20 cm, and the side clearance from walls or nearby appliances must not be less than 5 cm.
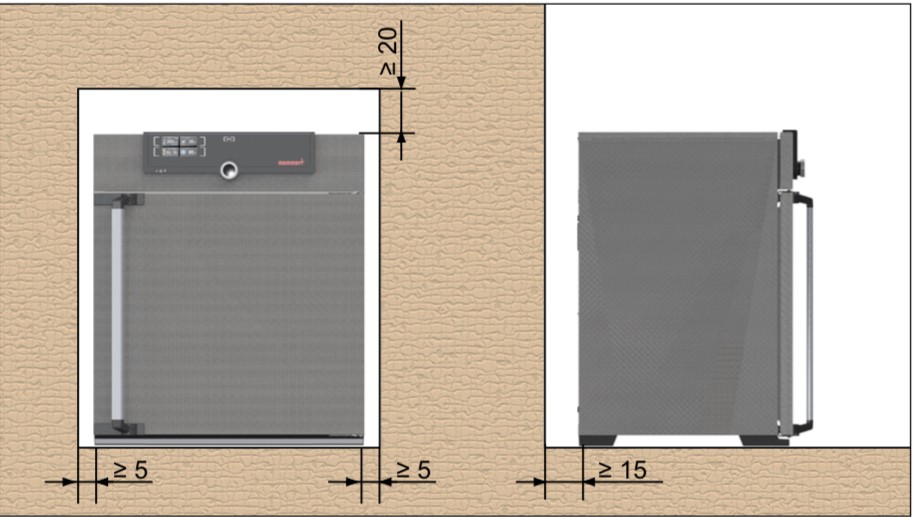
Figure 1: Clearance of the hot air oven to allow sufficient air circulation
Components of Hot Air Oven (Figure 2)
- Insulated chamber surrounded by an outer case containing electric heaters
- Fan
- Shelves
- Thermocouples
- Temperature sensor
- Door locking controls
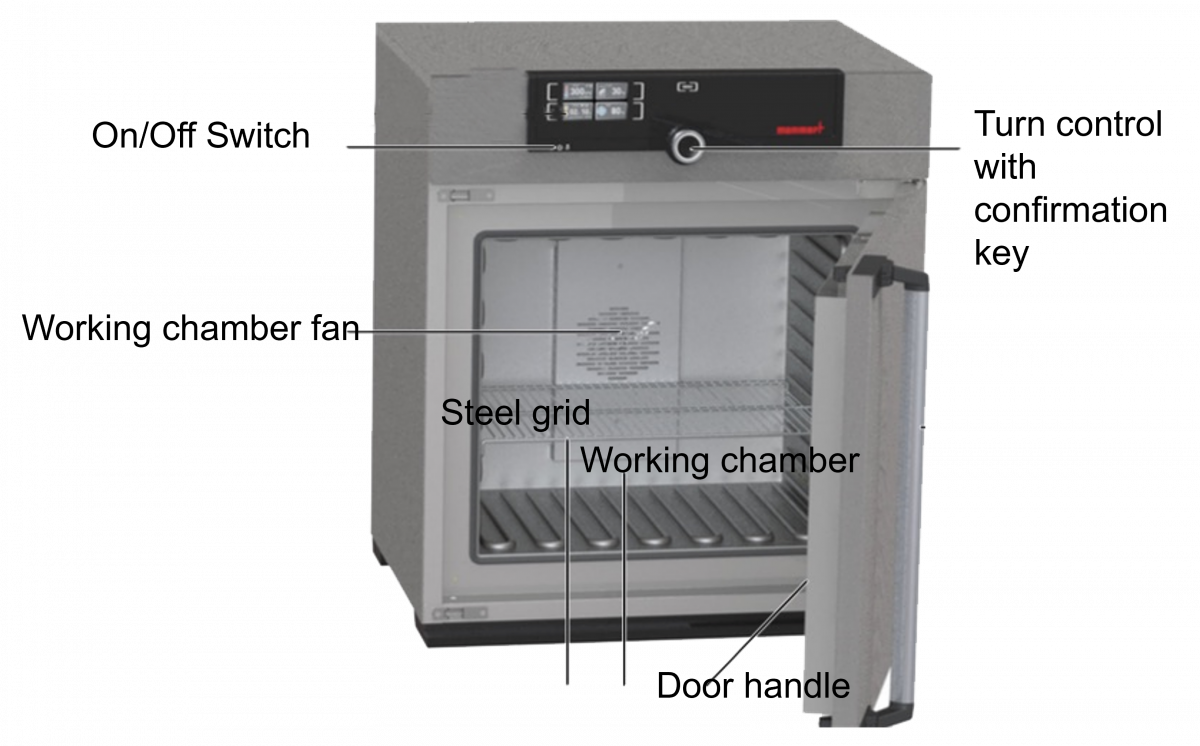
Figure 2: Hot Air Oven Components
General Instructions for Maintenance
- Always switch off the appliance before any maintenance activity.
- Always record every maintenance activity performed.
Maintenance:
- Monitor temperature
- Immediately clean up with disinfectant if there is any spill
- Leave the rack in the oven
- Lubricate the door hinges and door lock systems for proper operation
Annual Maintenance:
Performed by a qualified service technician:
- Check temperature system
- Temperature distribution
- Noise level detection
- Overall operation and alarm function
Resources
Kindly provide your valuable feedback on the page to the link provided HERE
LPA Laboratory Equipment: Micro Centrifuge
ContentUse of Micro Centrifuge
- Designed for the separation of materials through sedimentation using centripetal force
- Used in DNA Extraction Room to concentrate specimens during processing
Components and Use (Figure)
- Air tight rotor – Provides containment for aerosols that may be released during centrifugation, loaded symmetrically
- Positions in air tight rotor - To evenly distribute centrifuge tubes on all rotor positions
- Capacity of centrifuge tubes = 1.5 ml
- Can run a maximum of 24 samples at a time
Note: Always refer to the user manual for operations.
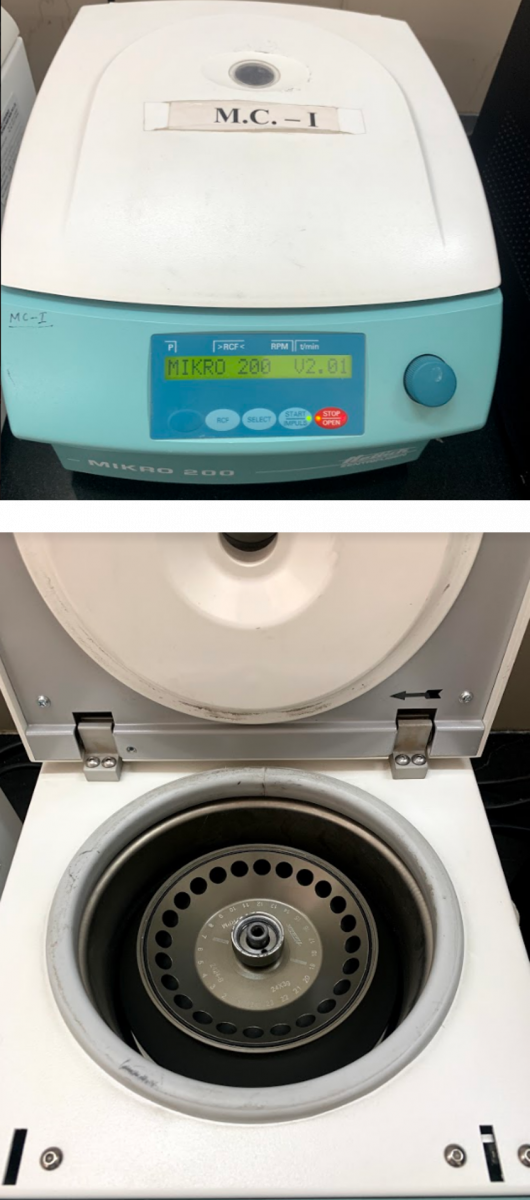
Figure: Top and Inside view of a Micro Centrifuge
General Instructions for Maintenance
- Always switch off the appliance before any maintenance activity.
- Always record every maintenance activity performed.
Maintenance
- Clean the appliances with clean tissue paper
- Lubricate/oil the turners, hinge of the rotor, lid locking systems
- Disinfect the spills with appropriate disinfectants
- Disinfect interior and exterior assembly with 70% Ethanol
Annual Maintenance
Performed by a qualified service technician who:
- Inspects each part
- Calibrates and validates
- Monitors temperature
- Sensors speed
Resources:
Kindly provide your valuable feedback on the page to the link provided HERE
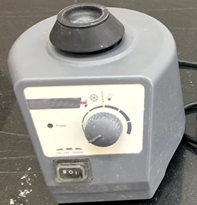
LPA Laboratory Equipment: Vortex Mixer
ContentKey Features of Vortex Mixer
It is used in the TB laboratory to mix specimens with decontamination solutions and to homogenize solutions of TB bacilli for DNA extraction and during the preparation of the PCR Master Mix.
- During the DNA extraction step:
- Growth from liquid culture is vortexed to break up clumped Mycobacterium tuberculosis
- Homogenize bacilli
- Mix specimens with decontamination solutions
- Gentle vortex is used to mix reagents in PCR master mix tube.
Most vortex mixers have variable speeds and can run continuously or run only when a tube is inserted in the rubber cup.
The mixer must always be placed on a level and stable surface. Vortex mixing generates aerosol, must be placed towards the back of the biosafety cabinet.
Components and Mechanism of the Vortex Mixer
The vortex mixer has the following components:
- Electric motor
- On and off switch
- Knob for increasing or decreasing the speed
- Cupped rubber piece mounted on the center

Figure: Components of the Vortex Mixer
As the motor runs, the rubber piece oscillates rapidly in a circular motion.
When a sample tube is pressed into the rubber cup or touched to its edge, the motion is transmitted to the liquid inside and vortex is created.
Maintenance of Vortex Mixer
- Before and after use, wipe it with 70% ethanol.
- Clean and replace the rubber cup as needed.
Resources
Kindly provide your valuable feedback on the page to the link provided HERE
- During the DNA extraction step:
LPA Laboratory Equipment: PCR Hood
ContentPolymerase Chain Reaction (PCR) hood is a workstation enclosed by three sides.
Use of Polymerase Chain Reaction (PCR) Hood:
- Used in the Master Mix Reagent Preparation and DNA Amplification Room
- Ultraviolet (UV) light (Figure) in PCR hood denatures nucleic acids
- Used to decontaminate reagents and equipment prior to PCR reaction
- Provides protection against exogenous DNA, contaminants or inhibitors from entering the reaction tubes
Figure: Components of the PCR Hood
- PCR Hood has UV light and recirculator fan with prefilters
- It is made of stainless steel, therefore easier to clean
- Always refer to the user manual for operating the equipment

General Instructions on Maintenance
- Always switch off the appliance before any maintenance activity.
- Always record every maintenance activity performed.
Maintenance
- Clean outer and inner surfaces with freshly prepared 1% sodium hypochlorite.
- Replace UV bulbs and filters according to manufacturer recommendations.
Resources
Kindly provide your valuable feedback on the page to the link provided HERE
LPA Laboratory Equipment: Thermocycler
ContentThermocycler is also known as Polymerase Chain Reaction (PCR) Machine.
Use of Thermocycler
Thermal cycler is used for amplification of nucleic acid by PCR.
The thermocycler should be placed in the amplification/ post-amplification area.
The features of a thermocycler are listed below.
Features of a thermocycler:
- High accuracy
- Programmable heat block
- Temperature controlled
- Time controlled
PCR is performed based on denaturation, amplification and annealing steps at different temperatures (Figure).
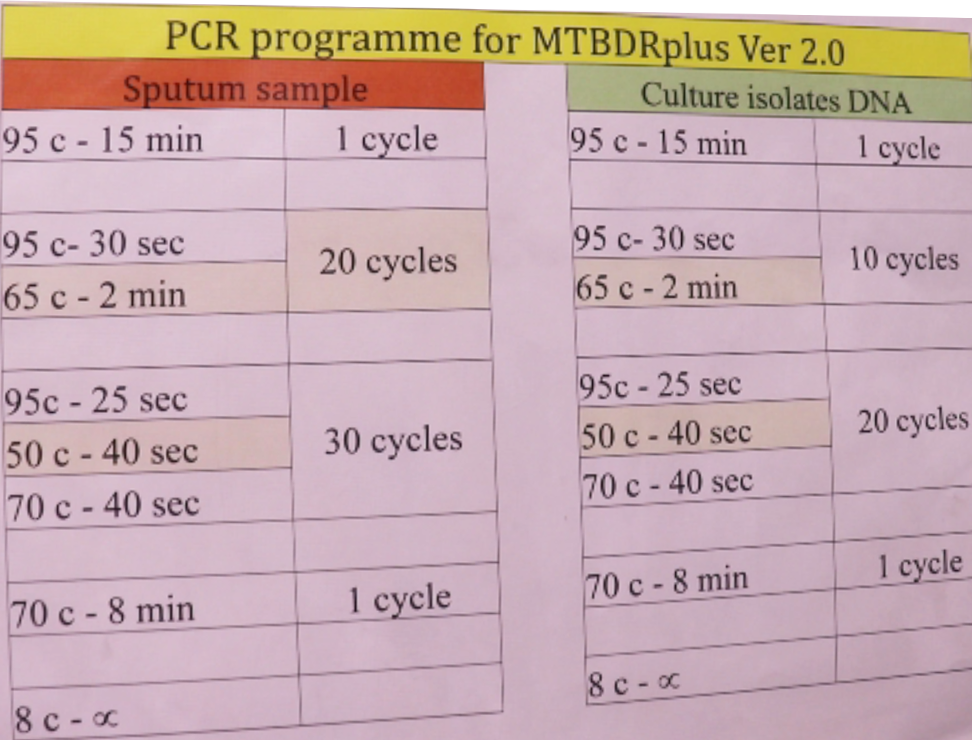
Figure: PCR Programme for MTBDR Plus Ver.2.0
General Instructions for Maintenance
- Always switch off the appliance before any maintenance activity.
- Always record every maintenance activity performed.
Annual Maintenance and Calibration
This is to be done by a qualified service engineer:
- Clean the exhaust fan assembly.
- Check all inbuilt switches.
- Temperature calibration and time validation with devices traceable to national and international standards.
- Validate the Peltier element efficiency by checking heating and cooling time, regimes and rates of block.
- Validate thermal block using PCR validation kit.
Resources
Kindly provide your valuable feedback on the page to the link provided HERE
LPA Laboratory Equipment: Water Bath
ContentIn the Line Probe Assay (LPA) lab, the water bath is used for warming reagents used in the Hybridization Room.
It is electrically heated and electronically controlled.
Components:
- Recessing push/ turn control for simple operation of the bath
- Visual temperature indication
- Push button to set desired temperature
- Electrically heated and electronically controlled
- Water trough
Installation of Water Bath (Figure):
- The unit must be placed on a horizontal, non-flammable sturdy surface.
- The vent openings must remain unobstructed.
- Minimum wall spacing on all sides is 80 millimetres.
- The minimum spacing from top of the bath to the next ceiling must be 750 millimetres.
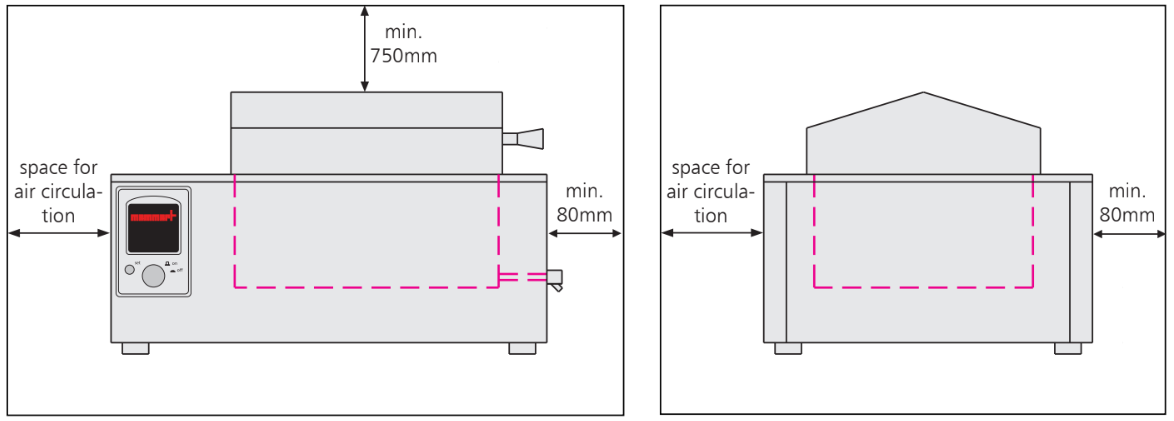
Figure: Spacing during Installation of Water Bath (Front and Side View)
Working with the Water Bath:
The heating positioned on three sides around the tank ensures a natural water circulation of the liquid inside, thus securing an optimal uniform temperature distribution.
- Vent openings must be unobstructed.
- The surface must be horizontal, nonflammable during installation.
General Instructions for Maintenance
- Always switch off the appliance before any maintenance activity.
- Always record the maintenance activity performed.
- Rusting objects must not come into contact with stainless steel bath tank.
- Rusting areas must be cleaned and polished immediately.
- Lubricate/ oil the hinge bolts from time to time.
- Replace distilled/ demineralized water and clean the water bath every week.
Annual Maintenance
- This is done by a qualified service technician
- Includes the calibration or validation of the temperature with a thermostat/ digital controller with devices traceable to National/ International Standards.
Resources
Kindly provide your valuable feedback on the page to the link provided HERE
LPA Laboratory Equipment: Twincubator
ContentUses of Twincubator in Line Probe Assay (LPA):
- Different steps of the hybridization (shown in figure below) and detection procedure with DNA strips in reverse blot hybridization assays.
- In the amplification/ post-amplification area.
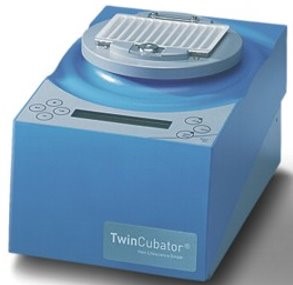
Figure: Twincubator used in Hybridization
Features of Twincubator:
- Provides dry incubation
- Thermo-shaker
- Programmable
- Temperature and time-controlled features
- Pre-installed temperature profile for processing of the LPA tests
- Nine storage programs with up to 20 steps
- No. of samples run - 1 to 12, including one positive and two negative controls
- User friendly with minimum risk of contamination
Note: Always refer to the user manual for operation.
Maintenance:
- Always switch off the appliance before any activity.
- Always record every maintenance activity performed.
- Clean the housing of the instrument.
- The instrument must be protected from harsh chemicals.
- Clean the instrument immediately, if liquid enters the hybridization block.
- Perform preventive maintenance (temperature check) regularly.
Resources
Kindly provide your valuable feedback on the page to the link provided HERE
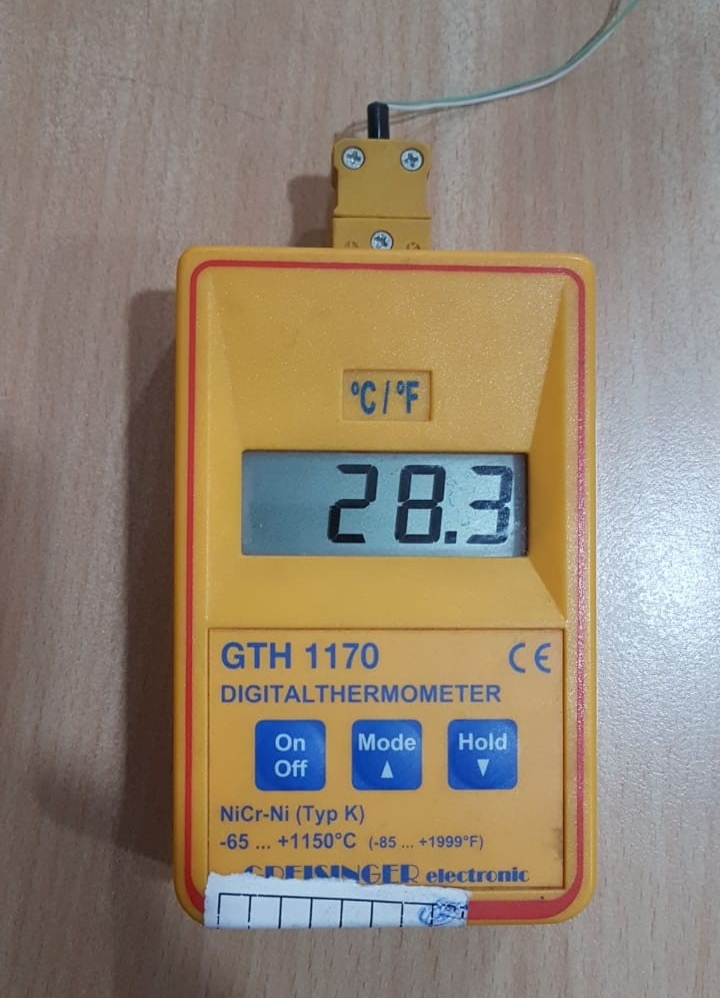
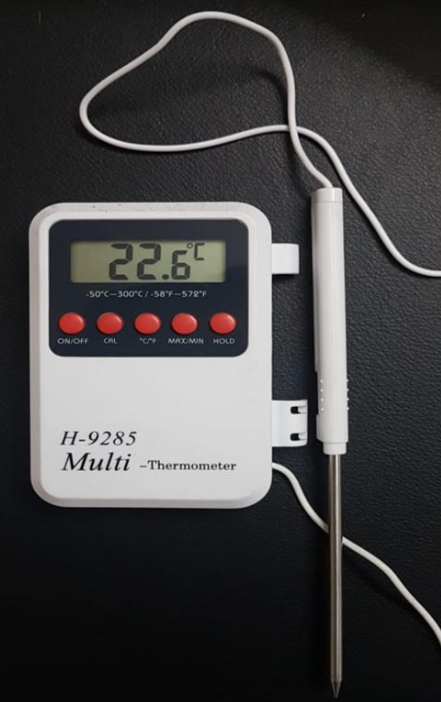
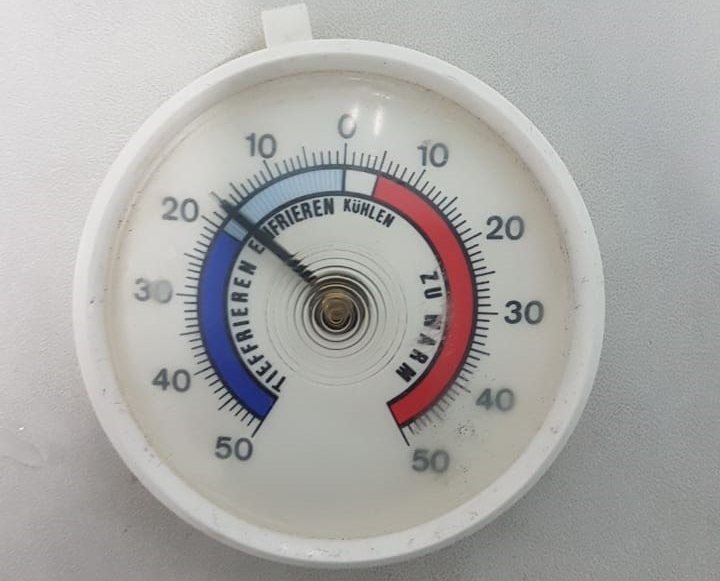
Laboratory Equipment: Thermometer
ContentThermometers are used to measure temperature. There are 4 types of thermometers used in line probe assay (LPA) laboratories:
- Electronic Thermo Hygrometer
- Alcohol Thermometer
- Digital Maxima – Minima Thermometer
- Dial Spring Thermometer
Electronic Max-Min Thermo-Hygrometer
It monitors the temperature and humidity, and has the following features:
- Recording of maximum/minimum humidity and temperature value automatically
- Alarm function
- Calendar function with months and years by pushing ADJ button (optional)
- Each thermometer is provided with a back stand and hanging hole
- Used in expert room and media preparation room

Glass Alcohol Thermometer
It is used for monitoring temperature of refrigerator, incubator, Walk-in Incubator (WII) and Walk-in Cold room (WIC). It has the following features:
- Temperature ranges from 0°C to +100°C
- Accuracy: ±1.0°C or better within the range 0°C to +70°C
- Resolution: ±0.5°C
- Sensor: Coloured alcohol in glass column
- Temperatures displayed in degrees Centigrade
- Casing is always non-corrodible plastics or metal case
- Easily readable centigrade scale

Digital Maxima-Minima Thermometer:
- Resolution: 0.1°C
- Accuracy: ± 0.1°C
- Precision: ± 0.2 % full scale
- Flexible probe (Preferably K type) Thermocouple, waterproof & Heat resistance cable/probe
- Measuring frequency: 3 measuring per second
- Display: Digital LCD display
Digital Maxima:
- Measuring range: -100°C to + 60°C
- It is used for calibration for -80 deep freezer, -20 deep freezer, refrigerator, WIC
Digital minima:
- Measuring range: 0°C to +300°C
- It is used for calibration for Incubator, Oven, WII, Autoclave, GT Blot, Twincubator, Thermocycler
Dial Spring Thermometer:
It is used for calibration for -80 deep freezer, -20 deep freezer, refrigerator, WIC.
- Temperature Range: +50°C to +300°C
- Accuracy: +1% Full Scale. Reading stabilization within 1 min
- Casting Material: Optically clear strong glass cover with stainless surface mount (highly resistance to corrosion)
- Type: Bimetallic dial thermometer
- Easily readable centigrade scale
Maintenance:
- Verify that all thermometers in the laboratory are accurately reflecting the temperature
- Always use calibrated thermometers
- Thermometers that are in use should be calibrated every 6 months and documented
Resources
Kindly provide your valuable feedback on the page to the link provided HERE
-
CDST_LT: LPA procedures
FullscreenSpecimen Preparation for LC and LPA Labs
ContentLiquid Culture (LC) and Line Probe Assay (LPA) specimen processing involves pre-treatment of the sputum specimens.
Digestion and decontamination are usually done using N-acetyl-l-cysteine–sodium hydroxide (NALC- NaOH) method:
- The process is essential to free TB bacilli from the mucus cells/ tissue.
- This also helps in decontamination by killing normal flora that grows more rapidly than the TB bacilli.
NALC-NaOH Method for Sample Processing
Materials required:
• Disposable 50 ml plastic tubes (Falcon tubes)
• Sterile NaOH-NALC-sodium citrate solution/ commercial MycoPrep
• Phosphate buffer pH 6.8 (0.067M)
• Refrigerated centrifuge
• Vortex mixer
• Timer
• Transfer pipettesSteps:
- To the sputum sample in the 50 ml centrifuge tube, add equal volume NaOH-NALC-sodium citrate solution.
- Tighten the cap.
- Vortex lightly or hand mix (15-30 seconds); keep for 15-20 minutes with mixing/ vortexing gently every 5-10 minutes to completely liquify.
- Add phosphate buffer (pH 6.8) up to 50 ml mark of tube; mix well (invert mix/ vortex).
- Centrifuge at 3000 g (15-20 minutes), 4ºC.
- Wait 5 minutes for aerosols to settle, decant supernatant and discard.
- Resuspend sediment in 1-2 ml phosphate buffer (pH 6.8).
- After decontamination, resuspend the pellet in phosphate buffer (1-1.5 ml) and homogenize samples for proper mixing. This should be followed by the preparation of aliquots.
- Use aliquot/ sediment to inoculate Mycobacteria Growth Indicator Tube (MGIT) tubes and for DNA extraction for LPA.
Resources
Kindly provide your valuable feedback on the page to the link provided HERE
Extraction of DNA from Smear Positive Clinical Specimen, LJ and Liquid Media in LPA Lab Settings
ContentPurpose of DNA extraction
- Extract DNA from cellular components
For Line Probe Assay (LPA), DNA is extracted from:
- Clinical specimen
- Culture isolates on Loewenstein-Jensen (LJ) solid medium
- Bacteria growth in liquid media (Mycobacteria Growth Indicator Tube (MGIT), BD Diagnostics)
Extraction of DNA from a clinical specimen and culture isolates (LJ, liquid) is shown in the figure below:
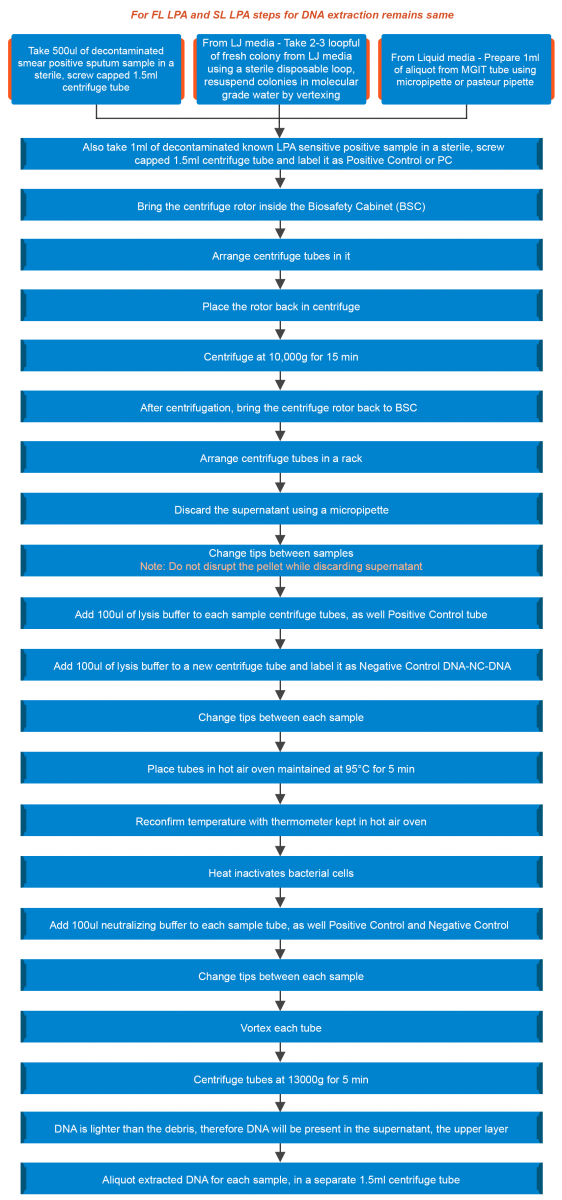
Figure: Extraction of DNA from a Clinical Specimen and Culture Isolates
Resources
- Guidelines for PMDT in India, 2021.
- Challenge TB: LPA - Introduction to Molecular Biology.
- GenoType MTBDR plus ver 2.0 kit, Instructions for Use.
Kindly provide your valuable feedback on the page to the link provided HERE
Contamination Control During DNA Extraction in LPA Lab Settings
ContentContamination of the Polymerase Chain Reaction (PCR) can occur from previously processed specimens. Hence, it is important to take precautions to avoid contamination.
To ensure contamination control during DNA extraction in a Line Probe Assay (LPA) setting, follow the do's and don’ts elaborated below.
DO's
- Label tools and instruments “For use in LPA laboratory only”.
- Do specimen preparation on a separate day (earlier) and store extracted DNA at 2-4°C.
- Proceed with reagent preparation and amplification/detection on the following day.
- Always use Biosafety Cabinet (BSC) for DNA extraction.
- Always use filtered tips.
- Change gloves if contaminated by specimens.
- Clean and disinfect the work area before and after use with disinfectant.
- Establish regular (e.g., weekly) and thorough laboratory cleaning protocols for floors, doors, walls.
DON’Ts
- Instruments used in the LPA laboratory should not be used elsewhere.
- Never take any tools/ instruments used for DNA extraction to Reagent Preparation Area.
- Do not try to put cotton plugs into unfiltered tips.
- Do not use flip-cap tubes, always use screwcap tubes.
Resources
- Molecular Detection of Drug-resistant Tuberculosis by Line Probe Assay.
- GLI Training Package on LPA.
Kindly provide your valuable feedback on the page to the link provided HERE
LPA PCR Reagent Preparation: Test Reagents Kit
ContentTest Reagents Kits Used for First Line (FL) and Second Line (SL) Line Probe Assay (LPA)
- For FL LPA- kit used is MTBDR plus version 2.0
- For SL LPA- kit used is MTBDRsl version 2.0
Components of kits are shown in the following table.
Table: Components of MTBDR plus version 2.0 (FL LPA) and MTBDRsl version 2.0 (SL LPA) kits
COMPONENTS OF FL LPA KIT
COMPONENTS OF SL LPA KIT
Membrane strips coated with specific probes
(MTBDRplus VER 2.0 STRIPS)
Membrane strips coated with specific probes (MTBDRsl VER 2.0 STRIPS)
Denaturation Solution (DEN)
Denaturation Solution (DEN)
Hybridization Buffer (HYB)
Hybridization Buffer (HYB)
Stringent Wash Solution (STR)
Stringent Wash Solution (STR)
Rinse Solution (RIN)
Rinse Solution (RIN)
Conjugate Concentrate (CON-C)
Conjugate Concentrate (CON-C)
Conjugate Buffer (CON-D)
Conjugate Buffer (CON-D)
Substrate Concentrate (SUB-C)
Substrate Concentrate (SUB-C)
Substrate Buffer (SUB-D)
Substrate Buffer (SUB-D)
Tray
Tray
Evaluation sheet
Evaluation sheet
Instructions for use
Instructions for use
Template
Template
Amplification Mix A (AM-A GT MTBDRplus VER 2) contains buffer, nucleotides, Taq polymerase
Amplification Mix A (AM-A GT MTBDRsl VER 2.0) contains buffer, specific primers, nucleotides, Taq polymerase
Amplification Mix B (AM-B GT MTBDRplus VER 2.0) contains salts, specific primers, dye
Amplification Mix B (AM-B GT MTBDRsl VER 2.0) contains buffer, salts, dye
All kits are stored at 2-8°C while Amplification Mix A and B (both kits) are stored at -20°C.
Resources
- GenoType MTBDR plus ver 2.0 kit, Instructions for Use.
- GenoType MTBDRsl VER 2.0 kit, Instructions for Use.
Kindly provide your valuable feedback on the page to the link provided HERE
PCR Reagent Preparation Procedure in the LPA Lab
ContentIn a Line Probe Assay (LPA) lab, subsequent to DNA extraction, reagents are prepared for PCR amplification using the checklist and worksheets.
Preparation Steps
- Prepare a written checklist of materials and tools needed.
- Prepare a worksheet with a list of specimens (identifiers) to be tested.
- Prepare worksheet to calculate the volume master mix ingredients (put on the wall near work area).
Setting up the Workplace
- Put on gloves and lab coat.
- Decontaminate biosafety cabinet and work area (1% Sodium hypochlorite solution, followed by 70% alcohol).
- Cover work area in a biosafety cabinet with clean paper towels.
Calculations for Master Mix Preparation
- Determine the number of specimens and controls.
- Use this number “+” 1 to calculate the volume of different components of the master mix.
- The volume of the master mix is 45 μl per specimen:
- 10 μl AM-A
- 35 μl AM-B
- Prepare the number of tubes required.
Polymerase Chain Reaction (PCR) Reagent Preparation Procedure in Master Mix Room
- Reagent preparation for both First Line - Line Probe Assay (FL-LPA) and Second Line - Line Probe Assay (SL-LPA) remains the same with only difference in the kits used. The master mix must be freshly prepared.

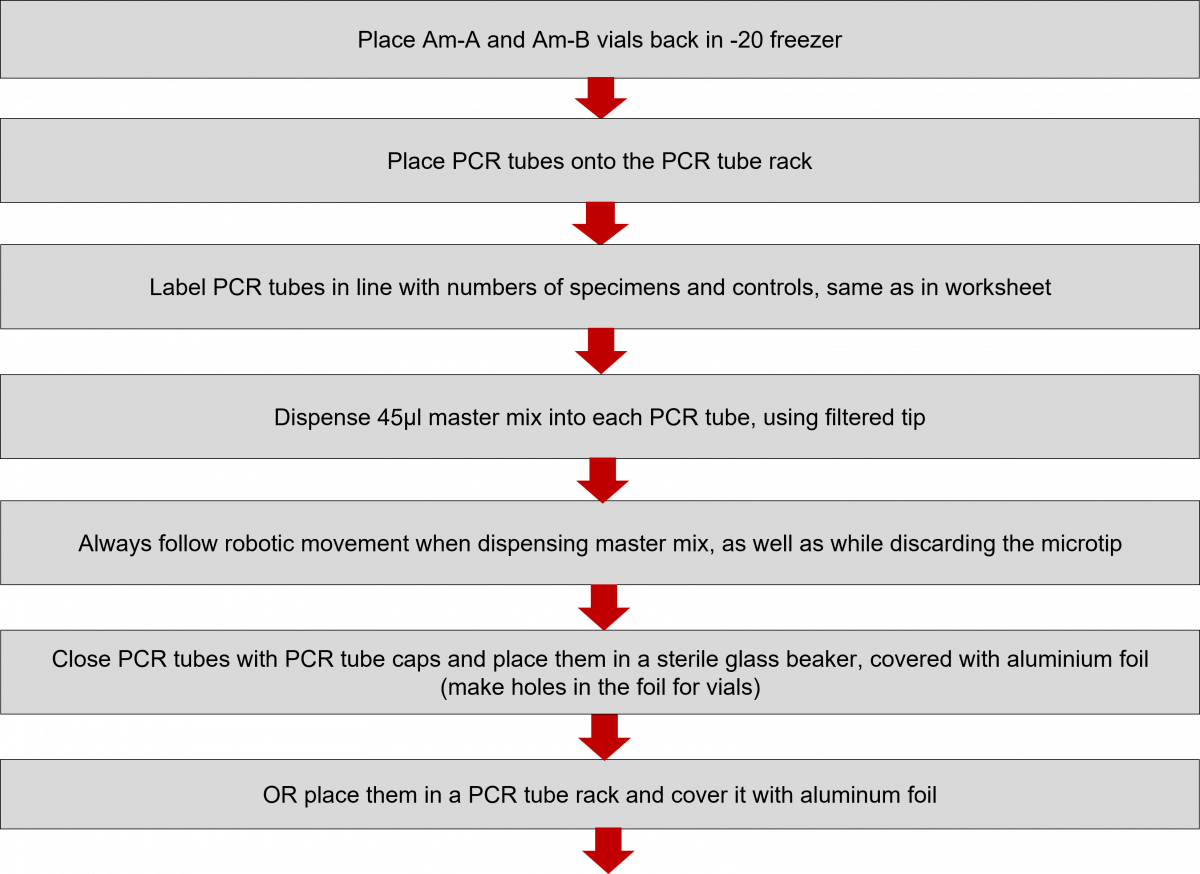

Click the video below to see how to prepare the Master Mix.
Resources
- GenoType MTBDR plus ver 2.0 Kit, Instructions for Use.
- GenoType MTBDRsl VER 2.0 Kit, Instructions for Use.
- GLI Training Package on LPA.
Kindly provide your valuable feedback on the page to the link provided HERE
Contamination Control During PCR Reagent Preparation in the LPA Lab
ContentDuring PCR Reagent preparation, if DNA fragments from the lab environment, such as a DNA template amplified in a previous qPCR experiment, enter the qPCR reaction or reagents (even in small quantities), they can be amplified during the reaction. This contamination and non-specific amplification can cause misleading results, such as false positives. Hence, contamination needs to be rigorously controlled.
Do’s and Don’ts for Contamination Control during PCR Reagent Preparation
Do’s
- Change shoes or use shoe covers, before entering the Reagent Preparation/ Master Mix Room.
- Always clean the work area properly before and after completing the work, using disinfectants.
- Keep master mix reagents in -20°C freezer.
- Label tools and instruments to be used only in Master Mix Room.
- Use 0.5 ml individual PCR tubes.
- Use a PCR hood.
- Decontaminate and calibrate pipettes regularly.
- Always prepare fresh disinfectant (1% sodium hypochlorite solution).
- Establish regular (e.g., weekly) and thorough laboratory cleaning protocols for floors, doors, walls.
Don’ts
- Tools and instruments used in Master Mix Room should not be used elsewhere.
- After working in other areas, do not come back and clean the reagent preparation area.
Resources
- GenoType MTBDR plus ver 2.0 Kit, Instructions for Use.
- GenoType MTBDRsl VER 2.0 Kit, Instructions for Use.
- GLI Training Package on LPA.
Kindly provide your valuable feedback on the page to the link provided HERE
Amplification of Extracted DNA in the LPA Lab
ContentIn the Line Probe Assay (LPA) labs, subsequent to the preparation of the Polymerase Chain Reaction (PCR) Master mix, DNA amplification is carried out.
The DNA amplification steps remain the same in both First Line - Line Probe Assay (FL-LPA) and Second Line - Line Probe Assay (SL-LPA). In DNA amplification, there is the addition of DNA to the master mix, and the amplification of DNA using PCR machine.
The procedure for amplification is shown below. Play the video below to know more.
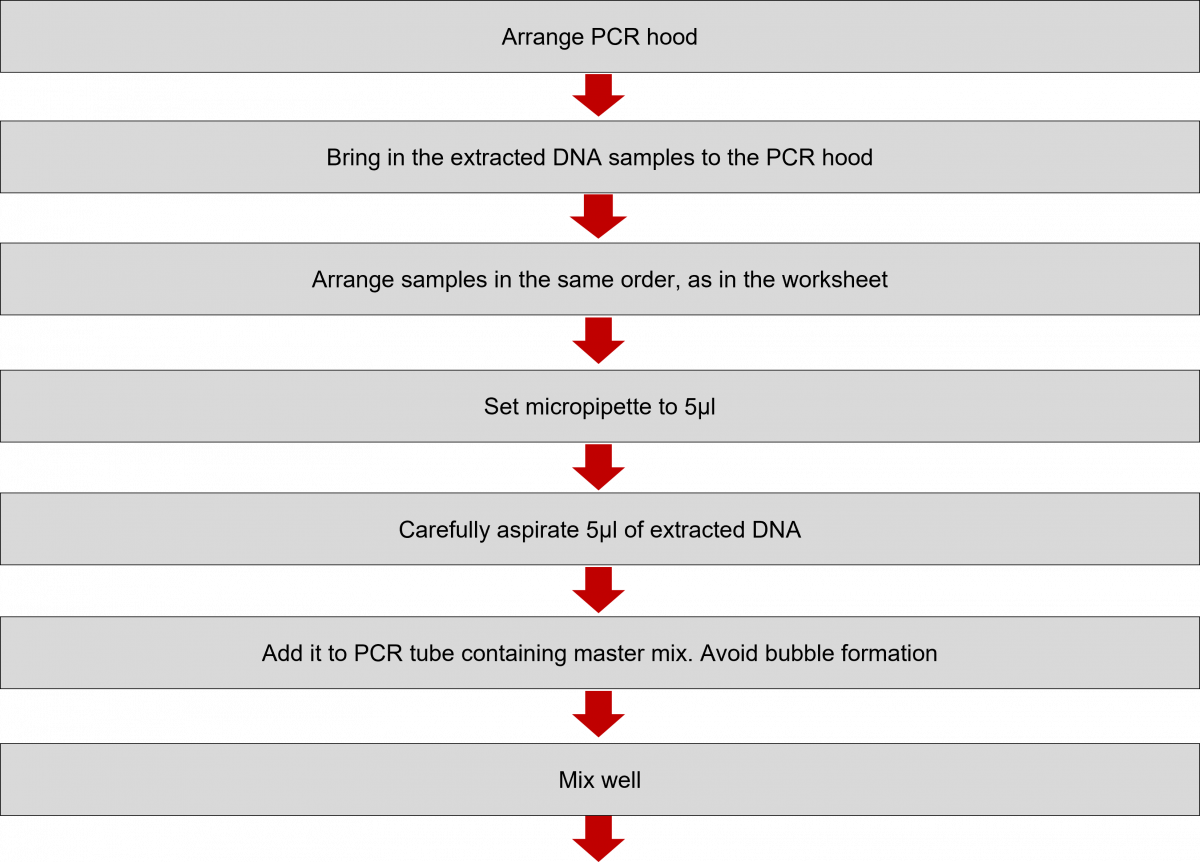

Click the video below to see the procedure for PCR amplification.
Resources
- GenoType MTBDR plus ver 2.0 Kit, Instructions for Use.
- GenoType MTBDRsl VER 2.0 Kit, Instructions for Use.
- GLI Training Package on LPA.
Kindly provide your valuable feedback on the page to the link provided HERE
Contamination Control in the Amplification Room in the LPA Lab
ContentContamination can happen in the amplification room due to exogenous DNA and spillover from last amplification or contaminants or inhibitors entering the reaction tubes.
Do’s and Don’ts for Contamination Control in the Amplification Room
Do’s
- Label tools and instruments “For use in Amplification Room Only”.
- Follow unidirectional work flow.
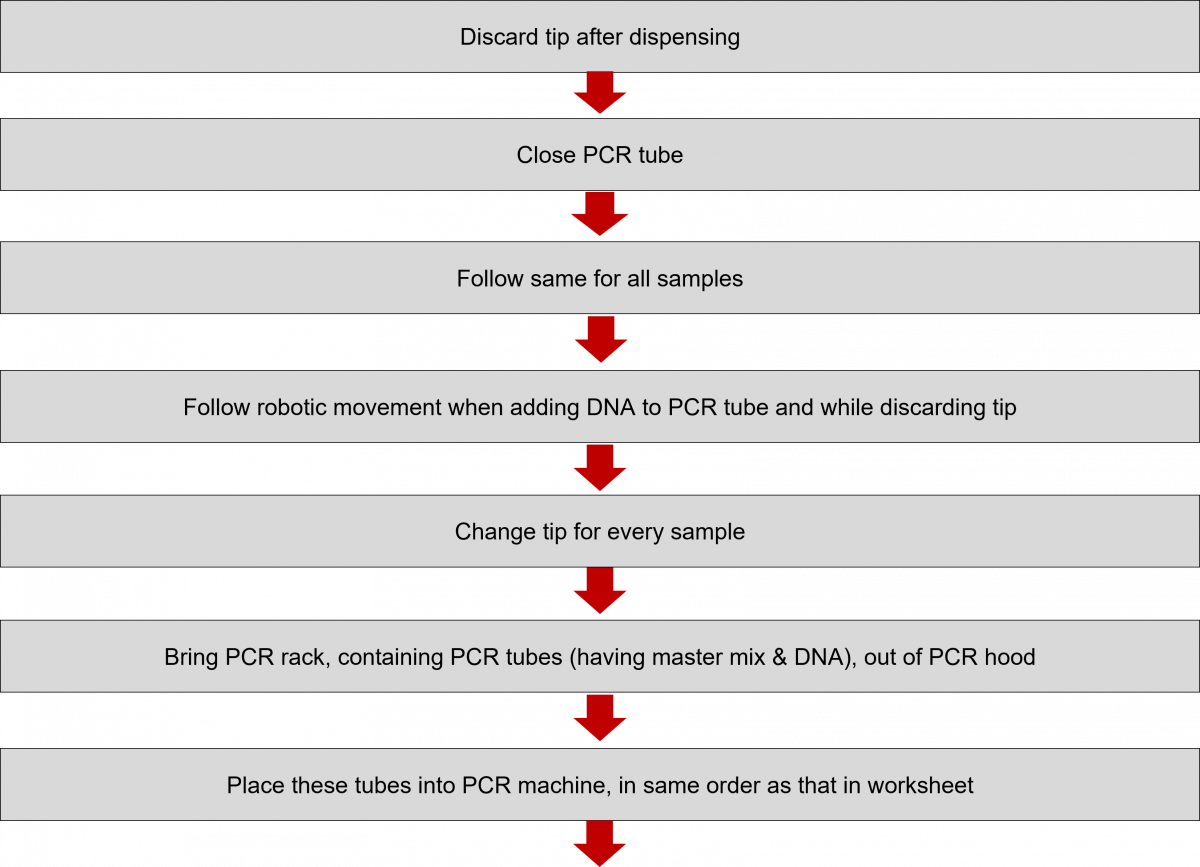
- Add DNA extract to PCR tubes in PCR hood.
- Change gloves if they get contaminated with amplicons.
- Always clean work area properly before and after completion of tasks.
- Establish a regular (e.g., weekly) and thorough laboratory cleaning protocol (floors, doors, walls).
Don’ts
- Tools and instruments used in the amplification room cannot be used elsewhere.
- Never take anything from the amplification room to the reagent preparation area.
Resources
- GenoType MTBDR plus ver 2.0 Kit, Instructions for Use.
- GenoType MTBDRsl VER 2.0 Kit, Instructions for Use.
- GLI Training Package on LPA.
Kindly provide your valuable feedback on the page to the link provided HERE
Overview of Hybridization in Line Probe Assay and Genotypic Drug Sensitivity Testing
ContentDeoxyribonucleic Acid (DNA) hybridization is based on complementary strands of single-stranded DNA (ssDNA) hybridizing or binding to each other to form double-stranded DNA (dsDNA).
- Line Probe Assay (LPA) is based on reverse hybridization between amplicons derived from a multiplex PCR and nitrocellulose-bound probes covering wild-type sequences and specific mutations in Mycobacterium tuberculosis.
- Biotin-labelled amplicons (amplified DNA of the genes of interest generated during amplification of the target DNA) are in a fluidic state.
- Wild-type and/ or mutated probes (reaction zones) are unlabeled and immobilized as bands onto nitrocellulose membrane strips.
- LPA results are based on banding patterns detected on a strip following hybridization with PCR products amplified from target DNA in clinical specimens.
The figure below shows the steps involved in hybridization.
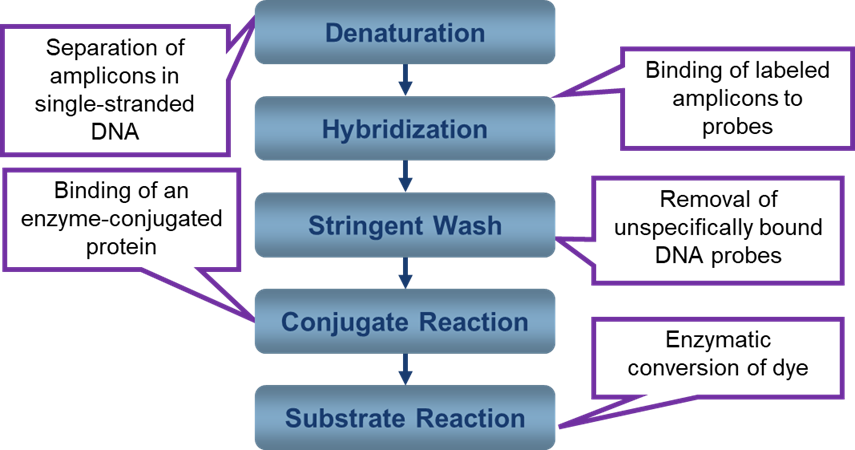
Figure: Steps involved in Hybridization
Resources
- GenoType MTBDR plus ver 2.0 Kit, Instructions for Use.
- GenoType MTBDRsl VER 2.0 Kit, Instructions for Use.
- GLI Training Package on LPA.
Kindly provide your valuable feedback on the page to the link provided HERE
Hybridization Setup in LPA and Genotypic DST
ContentThe steps listed below need to be followed when setting up for the hybridisation procedure.
Workstation Set-up
- Compile all the tools and reagents required for the step.
- Switch on all the equipment and check whether they are in working condition.
- Always connect the Twincubator and GT blot to the UPS.
- Thoroughly clean the workbench and tools with appropriate disinfectant.
- Clean the equipment as suggested by the manufacturer.
- Place an absorbent sheet.
- Bring out the hybridization reagents from the refrigerator.
Reagent Preparation
- Kit Component 1 is used for this step.
- Hybridization reagent preparation and steps involved in hybridization procedure remains the same in First Line (FL) and Second Line (SL) Line Probe Assay (LPA).
- Bring out the reagent kit from the refrigerator.
- Pre-warm the hybridisation and stringent solution in a water bath, as these 2 solutions form crystals due to the kit’s storage at 2 - 8ºC.
Reagents Required for Hybridization
- Hybridization Solution - HYB
- Stringent Solution - STR
- Conjugate Solution - CON
- Substrate Solution - SUB
- RIN Solution - RIN
- Distilled Water - DW
The steps for preparing these reagents are shown in the tables below.
Table 1: Preparation of Hybridization and Stringent Solutions
PREPARATION OF HYBRIDIZATION SOLUTION PREPARATION OF STRINGENT SOLUTION - Pre-warm hybridization solution in a water bath.
- Check the hybridization solution for precipitate.
- If the solution is consistent, without any precipitate, aliquot the calculated amount to a falcon tube and label it as “HYB".
- Remember: Hybridization solution should be warm when adding it to the Hybridization tray.
- Pre-warm stringent solution in a water bath.
- Check the stringent bottle for precipitate.
- If the solution is consistent, without any precipitate, aliquot the calculated amount to a falcon tube and label it as “STR”.
Table 2: Preparation of Conjugate and Substrate Solutions
PREPARATION OF CONJUGATE SOLUTION PREPARATION OF SUBSTRATE SOLUTION - Aliquot calculated conjugate diluent to a 50 ml falcon using a micropipette.
- Add calculated conjugate concentrate to it, using a micropipette.
- Mix well.
- Label it as “CONJUGATE”.
- Aliquot calculated substrate diluent to a 50 ml falcon using a micropipette.
- Add calculated substrate concentrate to it, using a micropipette.
- Mix well.
- Cover the falcon tube with aluminium foil as the substrate is photosensitive.
Table 3: Preparation of RIN Solution and Distilled Water
PREPARATION OF RIN SOLUTION FOR DISTILLED WATER - Aliquot calculated RIN solution to a 50 ml falcon tube.
- Label it as "RIN".
- Aliquot the calculated amount of distilled water required in a falcon tube.
- Label it as "DW".
Please click the video below to see more on hybridization.
Resources
- GenoType MTBDR plus ver 2.0 Kit, Instructions for Use.
- GenoType MTBDRsl VER 2.0 Kit, Instructions for Use.
- GLI Training package on LPA.
Kindly provide your valuable feedback on the page to the link provided HERE
Hybridization Using Twincubator in LPA Lab Settings
ContentGeneral instructions when conducting hybridization using a twincubator are:
- Thoroughly clean the workbench with disinfectant (1% sodium hypochlorite).
- Prepare reagents as per the calculation table.
- Using clean/ new tweezers place strips onto a clean sheet of paper and label them as in the worksheet.
- Use a clean/ new tray.
Steps of Hybridization Using Twincubator
Step-1
- Dispense 20 μl denaturation (DEN) solution in the corner of each trough.
Note: No need to change tips between samples.
Step-2
- Add 20 µl Amplicon to DEN and carefully mix by pipetting up and down.
- Incubate for 5 minutes.
Note: Change tips between samples.
Step-3
- Carefully add 1 ml of pre-warmed hybridization (HYB) buffer to each well, using filtered tips.
Note: Change tips between samples.
- Gently shake the tray to homogenously mix HYB with amplicon.
- Do not spill into neighbouring troughs.
Step-4
- Carefully place numbered strips in each well, strip face side up using clean/ new plastic tweezers.
- Strips must be completely immersed in HYB.
- If strips turn over, reposition them with a fresh pipette tip.
Step-5
- Place tray onto Twincubator and press START.
- Twincubator will then start shaking with a temperature of 45°C.
- This step will be of 30 minutes.
- After 30 minutes, the Twincubator will set off an alarm.
- When the alarm goes off, press the right arrow to stop.
Step-6
- Completely aspirate HYB using transfer pipettes.
Note:
Change pipettes for every sample.
Do not decant the contents of the tray into a sink or jar as this can contaminate the work area.
Wipe off the condensation that forms on the lid of the incubator before every incubation step.
Step-7
- Add 1 ml of STR solution to each well.
- Press start.
- This step will be of 15 minutes at 45°C.
- After 15 minutes, the Twincubator will set off an alarm.
- When the alarm goes off, press the right arrow to stop
Step-8
- Completely aspirate STR solution by transfer pipette.
Note:
Change pipettes for every sample.
Do not decant the contents of the tray into a sink or jar; this can contaminate the work area.
Step-9
- Add 1ml of RIN solution to each well.
- Press start.
- This step will be for 1 minute.
- After 1 minute, the machine will set off an alarm.
- Once the alarm goes off, press the right arrow to stop.
Step-10
- Completely aspirate the RIN solution by transfer pipette.
Note: No need to change pipette between wells.
- From this step, the content of the tray may be decanted into a container with 1% sodium hypochlorite solution.
Step-11
- Add 1 ml of conjugate solution to each well using a micropipette.
Note: No need to change tips for every sample.
- Press start.
- This step will be of 30 minutes.
- After 30 minutes, the machine will set off an alarm.
- Once the alarm goes off, press the right arrow to stop.
Step-12
- Completely aspirate conjugate solution using a transfer pipette, or the content of the tray may be decanted into a container with 1% freshly prepared sodium hypochlorite solution.
Step-13
- Work at room temperature from this step.
- Add 1 ml of RIN solution to each well.
- Press start.
- This step will be for 1 minute.
- After 1 minute, the machine will set off an alarm.
- Once the alarm goes off, press the right arrow to stop.
Step-14
- Completely aspirate the RIN solution using a transfer pipette, or the content of the tray may be decanted into a container with 1% freshly prepared sodium hypochlorite solution.
Step-15
- Repeat step-13.
Step-16
- Repeat step-14
Step-17
- Add 1 ml of distilled water to each well.
- Press start.
- This step will be for 1 minute.
- After 1 minute, the machine will set off an alarm.
- Once the alarm goes off, press the right arrow to stop.
Step-18
- Completely aspirate distilled water using a transfer pipette, or the content of the tray may be decanted into a container with 1% freshly prepared sodium hypochlorite solution.
Step-19
- Add 1 ml of substrate solution to each well.
Note: No need to change tip.
- Cover the machine with aluminium foil as the substrate solution is photosensitive.
- Press start.
- This step may be for 3-5 minutes (depending on the colour that develops).
- The machine will set off an alarm.
- Once the alarm goes off, press the right arrow to stop.
Step-20
- Completely aspirate the substrate solution using a transfer pipette, or the content of the tray may be decanted into a container with 1% freshly prepared sodium hypochlorite solution.
Step-21
- Add 1 ml of distilled water to each well.
- Press start.
- This step will be for 1 minute.
- After 1 minute, the machine will set off an alarm.
- Once the alarm goes off, press the right arrow to stop.
Step-22
- Completely aspirate distilled water using a transfer pipette, or the content of the tray may be decanted into a container with 1% freshly prepared sodium hypochlorite solution.
Step-23
- Repeat step-21.
Step-24
- Do not aspirate distilled water from wells.
Step-25
- Using clean tweezers, remove the strips from the tray and dry them between two layers of absorbent paper
Step-26
- Align strips and paste them on a reporting sheet using cello tape/ scotch tape.
Resources
- GenoType MTBDR plus ver 2.0 Kit, Instructions for Use.
- GenoType MTBDRsl VER 2.0 Kit, Instructions for Use.
- GLI Training Package on LPA.
Kindly provide your valuable feedback on the page to the link provided HERE
Hybridization Using GT BLOT in LPA Lab Settings
ContentGeneral Instructions
- Thoroughly clean the work bench with 1% sodium hypochlorite solution.
- Run the wash cycle A and B in GT Blot.
- After cleaning, prepare reagents as per the calculation table.
- Pour prepared reagents into reagent bottles provided with GT Blot.
- Place GT Blot reagent bottles back to machine.
- Cover the bottles with a tubed lid.
- Using clean/ new tweezers, place strips onto a clean sheet of paper and label them same as that in the work sheet.
- Use a clean/ new tray, check for any wear/ tear.
Steps for hybridization using twincubator are shown in the table below.
Table: Hybridization Steps using Twincubator
STEP-1
DISPENSE 20ΜL DENATURATION (DEN) SOLUTION IN A CORNER OF EACH WELL
NOTE: NO NEED TO CHANGE TIPS
Step-2
- Add 20µl amplicon to DEN and carefully mix by pipetting up and down
- Incubate for 5 min
- Change tips for every sample
- Carefully place the tray in GT Blot
- Close the GT Blot lid
- Press start
- Select no. of wells (always in even numbers)
- Press start
Note: Change tips between samples
Step-3
- The instrument will automatically dispense hybridization solution to each well selected
- Message – ‘Add amplicon’ will be displayed
Step-4
- Carefully place numbered strips in each well, up (face-side), using clean/ new plastic tweezers
- Close the lid of GT Blot
- Press start
- All the subsequent steps will be carried out automatically in a fully automated GT Blot machine
Resources
- GenoType MTBDR plus ver 2.0 kit, Instructions for Use.
- GenoType MTBDRsl VER 2.0 kit, Instructions for Use.
Kindly provide your valuable feedback on the page to the link provided HERE
Contamination Control in the Hybridization Area in LPA Lab Settings
ContentDo’s and Don’ts for Contamination Control
DO’s
- Label the tools and instruments “For use in Hybridization Area”.
- Change gloves if they get contaminated amplicon.
- Decontaminate trays before reuse.
- Keep cleaned strip trays and tweezers in a clean and sealed plastic bag.
- Always clean work bench and tools with 1% freshly prepared sodium hypochlorite solution followed by 70% alcohol.
- Establish weekly laboratory cleaning protocols for floors, doors, walls.
DON’Ts
- Tools and instruments used in hybridization area should not be used elsewhere.
- Never take anything from hybridization area to reagent or specimen preparation area.
- Do not reuse falcon tubes for conjugate and substrate preparation.
- Do not decant the content of the strip tray into the sink or any other container during the Hybridisation (HYB) and Stringent (STR) steps. This will contaminate the work area.
Resources
- GenoType MTBDR plus ver 2.0 kit, Instructions for Use.
- GenoType MTBDRsl VER 2.0 kit, Instructions for Use.
Kindly provide your valuable feedback on the page to the link provided HERE
-
CDST_LT: LPA Recording, interpretation and reporting
FullscreenInterpretation of FL-LPA: Examples of Test Results Interpretation
Contentxamples of banding patterns for First Line - Line Probe Assay (FL - LPA) are shown in figure below.
Description
- All wild type bands display signal, mark as “+” against Wild Type (WT) column of the respective gene
- If at least one of the wild type bands is absent, mark as “-“ against WT column
- Similarly, “+” or “-” for Mutation (MUT) probes
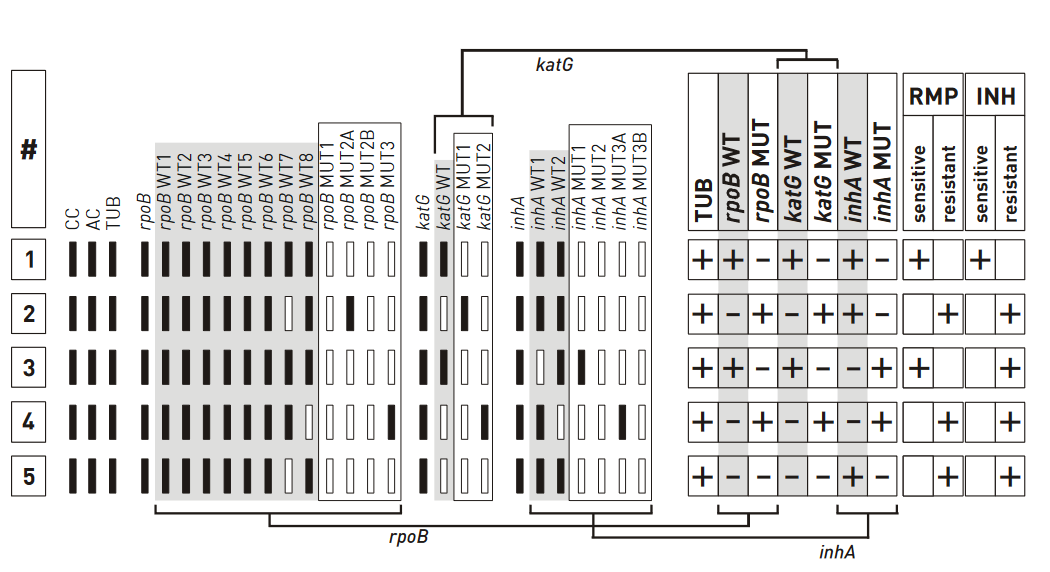
Figure: Banding patterns examples for Rifampicin and Isoniazid resistance; Source: GenoType MTBDR plus ver 2.0 kit, Instructions for Use.
Example #1
- The wild type banding pattern
- All wild type probes, but none of the mutation probes display a signal; hence, the evaluation chart shows “+”
- Three wild type columns and “–” in three mutation columns; hence “rifampicin (rmp) sensitive” and “Isoniazid (INH) sensitive” are marked “+”
Example #5
- One rpob and katg wild type probes missing; hence, the boxes for “rpob WT” and “katg WT” are marked with “–”
- No mutation probes developed; boxes are marked “–”
- inhA promoter region does not deviate from the wild type pattern, hence strain is evaluated as resistant to RMP and INH
Resources
Kindly provide your valuable feedback on the page to the link provided HERE
Evaluation of First-line Line Probe Assay Strip
ContentEach strip for First Line – Line Probe Assay (FL - LPA) has a total of 27 reaction zones (Figure below).
The Key Zones Include:
Conjugate Control (CC)
- Indicates the efficiency of conjugate binding and substrate reaction
Amplification Control (AC)
- Develops when control amplicon binds indication correct procedure was followed
- The absence of AC zone indicates an invalid test
M. tuberculosis Complex (TUB)
- Hybridizes with amplicons generated from Mycobacterium tuberculosis complex
- The absence of TUB zone indicates the absence of M. tuberculosis complex
Locus Controls (rpoB, katG, and inhA)
- Detect gene region specific for genes rpoB/ katg/ inhA
Wild-type Probes
- Comprise the resistance regions of respective genes (rpoB/ katg/ inhA)
- The absence of signal for at least one of the wild type probes indicates the resistance of the tested strain to the respective antibiotic
Mutation Probes
- Detect most common resistance-mediating mutations (rpoB/ katg/ inhA)
- Each pattern deviating from the wild-type pattern indicates resistance
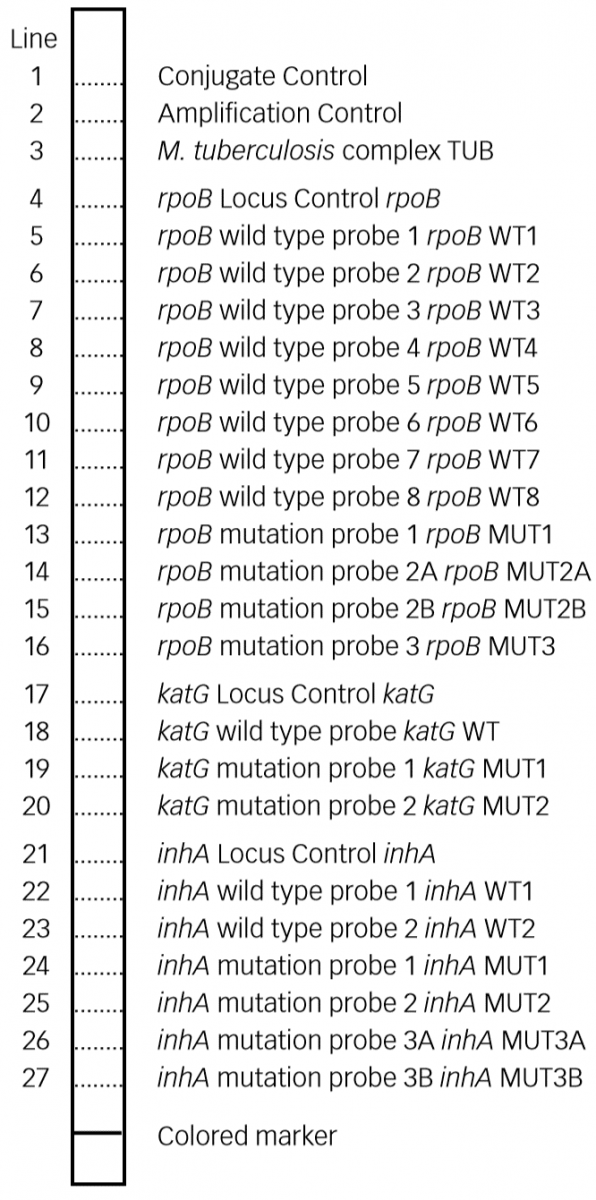
Figure: Key Zones of FL - LPA Evaluation Strip; Source: GenoType MTBDR plus ver 2.0 kit, Instructions for Use.
Evaluation of Assay Strip for FL - LPA Zones:
- The resistance status is determined and noted for each respective column.
- Distances between single probes on the strips may vary slightly.
- Not all bands of a strip have the same signal strength.
- The DNA strip should only be interpreted when:
- AC, CC and TUB bands are present
- Along with the presence of locus control bands for rpoB, katG and inhA
- Only those bands whose intensities are about as strong as, or stronger than that of the AC zone are to be considered.
- Bands whose intensities are about as strong as or stronger than that of the AC zone are considered.
Important: For an accurate evaluation, align provided template separately for each locus with the respective Locus Control band.
Resources
Kindly provide your valuable feedback on the page to the link provided HERE
Evaluation of Second-line Line Probe Assay Strip
ContentEach strip for Second Line - Line Probe Assay (SL - LPA) has a total of 27 reaction zones (Figure below).

Figure: Key Zones of SL - LPA Evaluation Strip; Source: GenoType MTBDRsl VER 2.0 kit, Instructions for Use.
Evaluation of Assay Strip for SL- LPA Zones:
- Evaluation of Conjugate Control (CC), Amplification Control (AC), M. tuberculosis complex (TUB) are the same as described for First Line - LPA.
- Locus Controls (gyrA, gyrB, rrs, eis)
- Detect gene region specific (gyrA/ gyrB/ rrs/ eis)
- Wild type probes
- Comprise the resistance regions of respective genes (gyra/ gyrb/ rrs/ eis)
- Absence of signal for at least one of the wild-type probes indicates resistance of the tested strain to the respective antibiotic
- Mutation probes
- Detect most common resistance-mediating mutations (gyra/ gyrb/ rrs/ eis)
- Each pattern deviating from the wild type pattern indicates resistance
Important: For an accurate evaluation, align provided template separately for each locus with the respective Locus Control band.
Resources
Kindly provide your valuable feedback on the page to the link provided HERE
Interpretation of FL-LPA: Predicting TB Drug-resistance
ContentZone developed/ not developed (failing) in Wild Type (WT) and Mutation (MUT) probes are used to predict drugs resistance in First Line - Line Probe Assay (FL-LPA).
For Rifampicin
Table 1 shows mutations in rpoB gene and corresponding WT, MUT and responsible codons and mutations.
- rpoB WT1-8: rpoB wild type probes
- rpoB MUT1-3: rpoB mutation probes
Table 1: Mutations in the rpoB gene and corresponding wild type and mutation band; Source: GenoType MTBDR plus ver 2.0 kit, Instructions for Use.
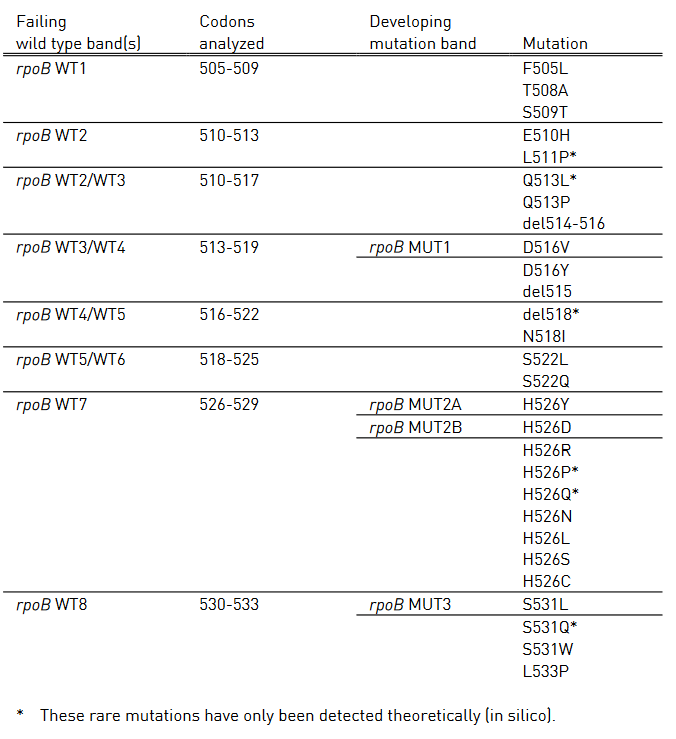
For Isoniazid
Table 2 and Table 3 show mutations in katG gene and inhA promoter region, respectively and the corresponding WT and MUT bands.
- katG WT: katG wild type probe
- katG MUT 1-2: katG mutation probe
- inhA WT 1-2: inhA wild type probe
- inhA MUT 1-2, MUT 3A, MUT 3B: inhA mutation probe
Table 2: Mutations in katG gene and corresponding WT, MUT bands and responsible codons and mutations; Source: GenoType MTBDR plus ver 2.0 kit, Instructions for Use.

Table 3: Mutations in inhA promoter region and corresponding WT, MUT bands and responsible codons and mutations; Source: GenoType MTBDR plus ver 2.0 kit, Instructions for Use.
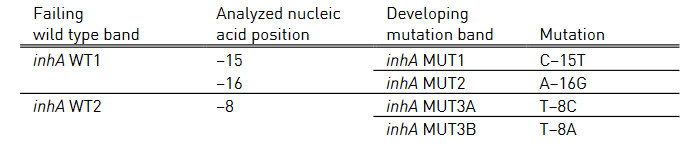
Resources
- GenoType MTBDR plus ver 2.0 kit, Instructions for Use.
- GLI Line Probe Assays for Drug-resistant Tuberculosis Detection.
Kindly provide your valuable feedback on the page to the link provided HERE
Interpretation of FL-LPA: Predicting Drug-resistance in Special Cases
ContentPredicting Drug Resistance in Special Cases
- When specimen tested contains a hetero resistant strain:
- Mutated as well as a wild-type sequence can be detected
- One of the mutation probes as well as corresponding wild type probe may stain positive on the respective strip
- Whether the respective resistance becomes phenotypically evident, depends on the ratio of mutated and nonmutated sequences
- The tested specimen contains more than one M. tuberculosis complex strain (due to mixed culture or contamination):
- One of these strains harbors a mutation, one of the mutation probes as well as the corresponding wild type probe may stain positive.
- Whether the respective resistance becomes phenotypically evident, depends on the ratio of the resistant and sensitive strain
- Due to mixed infection with M. tuberculosis complex strain and a nontuberculous mycobacterium:
- The TUB band may be missing
- If resistance pattern develops, presence of M. Tuberculosis complex must be suspected and repeat test
- All bands of a gene locus (including the Locus Control band) missing completely on a test strip:
- DNA concentration below the limit of detection or indicates the presence of interfering substances
- Repeat test
- If cultivated sample generates result with complete katG locus missing
- Indicates Isoniazid resistance
Resources
- GenoType MTBDR plus ver 2.0 kit, Instructions for Use.
- GLI Line Probe Assays for Drug-resistant Tuberculosis Detection.
Kindly provide your valuable feedback on the page to the link provided HERE
- When specimen tested contains a hetero resistant strain:
Interpretation of FL-LPA: Examples of Test Results Interpretation
Contentxamples of banding patterns for First Line - Line Probe Assay (FL - LPA) are shown in figure below.
Description
- All wild type bands display signal, mark as “+” against Wild Type (WT) column of the respective gene
- If at least one of the wild type bands is absent, mark as “-“ against WT column
- Similarly, “+” or “-” for Mutation (MUT) probes
Figure: Banding patterns examples for Rifampicin and Isoniazid resistance; Source: GenoType MTBDR plus ver 2.0 kit, Instructions for Use.
Example #1
- The wild type banding pattern
- All wild type probes, but none of the mutation probes display a signal; hence, the evaluation chart shows “+”
- Three wild type columns and “–” in three mutation columns; hence “rifampicin (rmp) sensitive” and “Isoniazid (INH) sensitive” are marked “+”
Example #5
- One rpob and katg wild type probes missing; hence, the boxes for “rpob WT” and “katg WT” are marked with “–”
- No mutation probes developed; boxes are marked “–”
- inhA promoter region does not deviate from the wild type pattern, hence strain is evaluated as resistant to RMP and INH
Resources
Kindly provide your valuable feedback on the page to the link provided HERE
Limitations of First-line Line Probe Assay [FL-LPA]
ContentFirst Line - Line Probe Assay (FL - LPA) can detect the mutations that are most frequently identified in resistant strains.
However, there are certain limitations of the test as follows:
- Some mutations that confer resistance are outside the regions covered by the test. Therefore, resistance cannot be completely excluded even in the presence of all wild type (WT) probes. Thus, in some cases, additional phenotypic Drug Sensitivity Testing (DST) may be necessary to provide a full assessment.
- Some mutations are identified specifically by mutation (MUT) probes, whereas others are only inferred by the absence of binding of the amplicons to WT probes. This lack of binding of a WT probe, without simultaneous binding of a MUT probe, is likely caused by the presence of a resistance mutation.
- Systematic errors are possible due to synonymous and non-synonymous mutations (e.g., phylogenetic mutations). Globally, this is rare (<1% of isolates), but these isolates can be frequent locally.
- LPA is less efficient than conventional culture-based methods in finding resistance in samples harbouring both drug-susceptible and resistant bacteria (i.e., hetero-resistance).
- More specifically, with LPA, it is possible to detect resistant bacteria with mutations detected by the MUT probes, if resistant bacteria represent at least 5% of the total population.
- However, resistant bacteria with mutations inferred by the absence of WT probes would probably be missed, if the resistant population is less than 95% of the total bacterial population.
Resources
Kindly provide your valuable feedback on the page to the link provided HERE
Reporting First-line Line Probe Assay [FL-LPA] Results
ContentResults of the First-line Line Probe Assay (FL-LPA) are entered in Nikshay and downloaded as the culture and drug susceptibility test (CDST) register.
Information on the patient, facility, reason for testing and test results are captured, and are shown in the table below.
DETAILS
TEST RESULTS
TestID
Visual_appearance_of_Sputum
DateOfTestUpdatedInNikshay
Sample
DateTested
TUB_Band
DateReported
RpoB_Locus_Control
TestStatus
RpoB_Wt1
Typeofspecimen
RpoB_Wt2
Dateofspecimencollection
RpoB_Wt3
StateName
RpoB_Wt4
DistrictName
RpoB_Wt5
TBUnit
RpoB_Wt6
PHINameLab
RpoB_Wt7
LabType
RpoB_Wt8
PatientId
RpoB_MUT1(D516V)
EpisodeID
RpoB_MUT2A(H526Y)
Name
RpoB_MUT2B(H526D)
Gender
RpoB_MUT3(S531L)
Age
KatG
PrimaryPhone
KatG WT1
Address
KatG MUT1
ResidentialState
KatG MUT2
ResidentialDistrict
InhA
TypeofCase
InhA WT1
ReasonforTesting
InhA WT2
TreatmentStatus
InhA MUT1
DiagnosisDate
InhA MUT2
TBTreatmentStartDate
InhA MUT3A
CurrentFacilityState
InhA MUT3B
CurrentFacilityDistrict
Final_Interpretation
CurrentFacilityTU
CurrentFacilityPHI
CurrentFacilityPHIType
ReasonforTesting1
PredominantSymptom
Predominantsymptom_duration
HistoryATT
No_of_HCP_visited_before_diagnosis_of_current_episode
Resources
- Guidelines for Programmatic Management of Drug-resistant TB, 2021
- Nikshay Reports CDST Test Register
Kindly provide your valuable feedback on the page to the link provided HERE
Reporting the Result of First-line Line Probe Assay [FL-LPA] in Special Cases
ContentReporting Drug-resistance in Special Cases
- When specimen tested contains hetero resistant strain:
- Strips contain both wild type and mutant probes for three genes known for resistance to Rifampicin and Isoniazid
- Bands to be interpreted as indicating resistance to a particular drug; should be reported as such
- Example of hetero resistant strain: rpoB WT 8 and rpoB MUT 3 bands are present
- Strips contain both wild type and mutant probes for three genes known for resistance to Rifampicin and Isoniazid
- The tested specimen contains more than one Mycobacterium tuberculosis complex strain (due to mixed culture/ non-tuberculous mycobacterium or contamination):
- If any strains harbor mutation, one mutation probe, as well as the corresponding wild type probe, may stain positive; ascertain the presence of TUB band
- Repeat test or phenotypic testing to confirm resistance
- Presence of non-tuberculous mycobacterium:
- TUB band missing; not be reported as M. tuberculosis
- TUB band absent but random banding patterns visible, eg: bands at rpoB WT 1, 4, 5 or 8; not be reported as M. tuberculosis
Resources
- GenoType MTBDR plus Ver 2.0 Kit, Instructions for Use.
- Line Probe Assays for Drug-resistant Tuberculosis Detection, GLI.
- Molecular Detection of Drug-resistant Tuberculosis by Line Probe Assay.
Kindly provide your valuable feedback on the page to the link provided HERE
- When specimen tested contains hetero resistant strain:
Interpretation of SL-LPA: Predicting Drug Resistance
ContentZone developed/ not developed (failed) in Wild Type (WT) and Mutation (MUT) probes are used to predict drugs resistance in Second Line - Line Probe Assay (SL - LPA).
For Fluoroquinolones (FLQ)
Tables 1 and 2 show mutations in gyrA, gyrB genes and corresponding WT, MUT and responsible codons and mutations:
- gyrA WT1-3: gyrA wild type probes; gyrA MUT1-2, 3A-3D: gyrA mutation probes
- gyrB WT: gyrB wild type probes; gyrB MUT1-2: gyrB mutation probes
Table 1: Mutations in gyrA gene and corresponding wild type and mutation band; Source: GenoType MTBDRsl Ver 2.0 Kit, Instructions for Use.
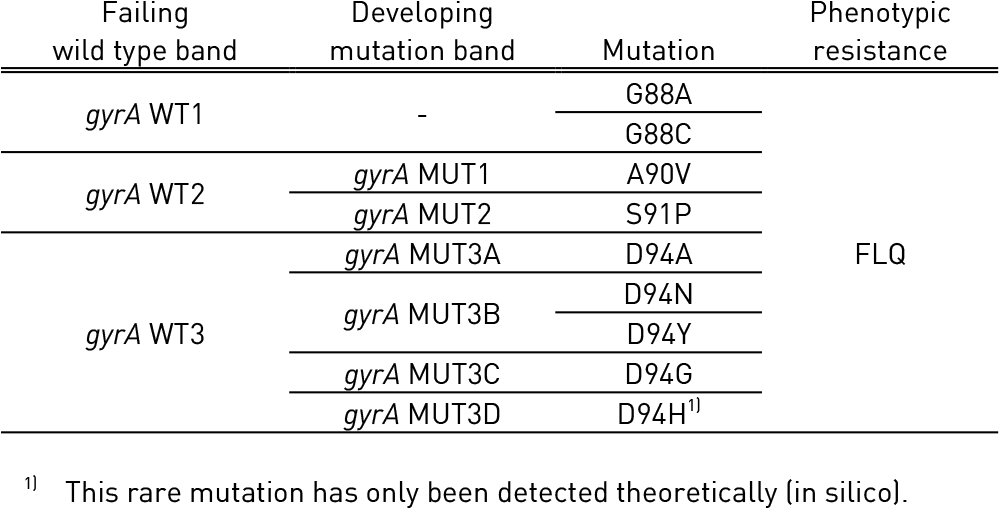
Table 2: Mutations in gyrB gene and corresponding wild type and mutation band; Source: GenoType MTBDRsl Ver 2.0 Kit, Instructions for Use.

For Second Line Injectable Drugs - Kanamycin (KAN), Amikacin (AMK), Capreomycin (CAP)
Tables 3 and Table 4 show mutations in rrs gene and eis gene respectively and corresponding WT and MUT bands:
- rrs WT 1-2: rrs wild type probe; rrs MUT 1-2: rrs mutation probe
- eis WT 1-3: eis wild type probe; eis MUT 1: eis mutation probe
Table 3: Mutations in rrs gene and corresponding WT, MUT bands and responsible codons and mutations; Source: GenoType MTBDRsl Ver 2.0 Kit, Instructions for Use.

Table 4: Mutations in eis gene and corresponding WT, MUT bands and responsible codons and mutations; Source: GenoType MTBDRsl Ver 2.0 Kit, Instructions for Use.

Resources
- GenoType MTBDRsl Ver 2.0 Kit, Instructions for Use.
- Line Probe Assays for Drug-resistant Tuberculosis Detection, GLI.
Kindly provide your valuable feedback on the page to the link provided HERE
Interpretation of SL-LPA: Predicting Drug resistance in Special Cases
ContentNotes
- Bands with intensities similar or better than Amplification Control (AC) zone are considered.
- Not all bands of strip show same signal strength
Special Scenarios
- Both mutation probe and corresponding wild type probe are developed, represents a valid result
- Possible reasons:
- The tested specimen contains hetero-resistant strain
- The tested specimen contains more than one M. tuberculosis strain (mixed infection)
- Possible reasons:
- Resistance with wild type pattern
- Possible reasons:
- The tested specimen contains hetero-resistance strain; caused by mutation not covered by mutation probes
- The tested specimen contains the wild type and resistant strain (mixed infection); mutation not covered by mutation probes
- Possible reasons:
- Complete gene locus (all bands including Locus Control band) missing, invalid result
- Possible reason:
- DNA concentration below the limit of detection
- Possible reason:
Resources
Kindly provide your valuable feedback on the page to the link provided HERE
Interpretation of SL-LPA: Interpretation Examples
Contenthe examples of banding patterns for Second Line - Line Probe Assay (SL - LPA) are shown in the figure below.
Description
- All wild type bands display signal, mark as “+” against Wild Type (WT) column of the respective gene.
- If at least one of the wild type bands is absent, mark as “-“ against WT column. Similarly, “+” or “-” for Mutation probes (MUT).
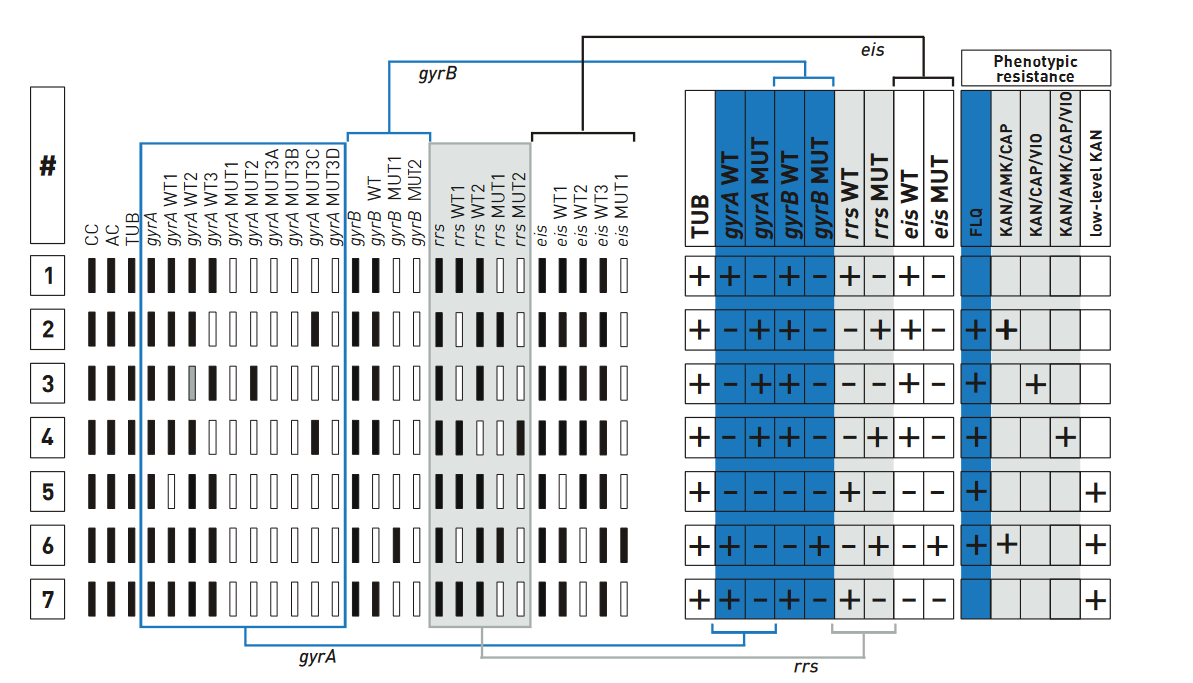
Figure: Examples for banding patterns for SL - LPA; Source: GenoType MTBDRsl Ver 2.0 Kit, Instructions for Use.
Example #1
- The wild type banding pattern.
- All wild type probes, but none of the mutation probes display a signal; hence, evaluation chart shows “+”.
- Four wild type columns and “–” in the four mutation columns; hence, no entry made in the fields of resistance columns.
Example #7
- gyrA locus and gyrB locus show wild type pattern; hence, evaluation chart shows “+” for fluoroquinolone (ofloxacin) resistance.
- rrs locus shows wild type pattern; hence, evaluation chart shows “+” for Kanamycin.
- eis wild type bands are present and “eis MUT” is absent; low-level Kanamycin resistance is assigned to the test.
Resources
Kindly provide your valuable feedback on the page to the link provided HERE
Limitations of Second-line Line Probe Assay [SL-LPA]
ContentThe limitations of Second Line Probe Assay (SL-LPA) are:
- It detects resistance due to mutation in gyrA, gyrB, rrs, and eis genes; resistances originating from mutations of other genes or gene regions as well as other drug resistance cannot be determined.
- Individual strains in mixed samples cannot be differentiated, which hampers the interpretation of the test.
- It cannot be used to monitor drug treatment, as DNA is detected from viable and non-viable bacteria.
- The results are qualitative, the intensity of bands does not give an estimate of bacterial load in the sample.
Resources
Kindly provide your valuable feedback on the page to the link provided HERE
Reporting Second Line-Line Probe Assay [SL-LPA] Results
ContentThe Results for Second Line Probe Assay (SL LPA) are entered in:
- Culture and Drug Susceptibility testing (CDST) register
- Nikshay-CDST module
- Request Form for examination of biological specimen for TB
- The fields entered are shown in Figure 1
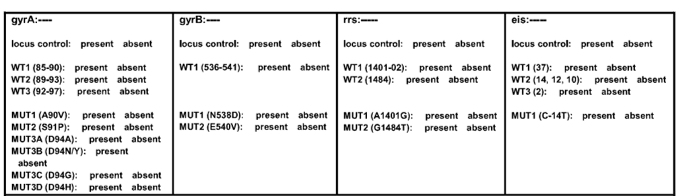
Figure 1: Result entry for Second Line LPA
Source: TOG Annexure- The final results are entered as:
- Select MTB Result: MTB Positive, MTB Negative
- Select Quinolone: Sensitive, Resistant, Indeterminate
- Select SLID (Second Line Injectable Drug): Sensitive, Resistant, Indeterminate
- Date result
- Date reported
- Reported by (name and signature)
Resources
- Challenge TB: LPA - Interpretation and reporting SL-LPA
- Guidelines for PMDT in India, 2021
- TOG Annexure
Kindly provide your valuable feedback on the page to the link provided HERE
-
CDST_LT: LPA Troubleshooting and quality assurance
FullscreenLPA Troubleshooting for No Signal
ContentThere could be overall weak or no signals on the strip including or except for the conjugate control zone.
Weak or no signal including conjugate control (CC) zone could be due to:
- Too low room temperature
- Reagents not equilibrated to room temperature (20-22°C)
- Hybridization solutions not pre-warmed
- Too high or too low incubation temperature
- No or too little amount of CON-C and/or SUB-C used
Solution: Repeat reverse hybridization.

Figure: No Signal including CC Zone
Points to Note
- A higher incubation temperature may prevent the binding of the amplicons to the probes.
- A higher temperature during the stringent wash step may result in weak intensities of the banding patterns.
- The temperature of the hybridizer should be monitored if such problems are seen.
- If the problem persists and the thermostat on the hybridizer gives an appropriate reading of 45ºC, and a digital thermometer reads a different temperature that is above or below 45ºC; the problem is likely with the machine’s internal temperature probe and should be reported to the manufacturer and corrected.
Do’s and Don'ts to Avoid Weak or No Signals
- Perform LPA at the appropriate room temperature.
- Bring reagents to room temperature before use (20-22°C).
- The green and red hybridization solutions must be pre-warmed to 45ºC.
- Follow instructions to add the exact volume of reagents.
- The central heating/cooling thermostat must be appropriately adjusted.
- Do not use pipettes that are not calibrated.
- Do not miss any step in the hybridization process.
Resources
- GenoType MTBDR plus ver 2.0 Kit, Instructions for Use.
- GenoType MTBDRsl VER 2.0 Kit, Instructions for Use.
- GLI Training Package on LPA.
Kindly provide your valuable feedback on the page to the link provided HERE
LPA Troubleshooting for No Signal Except Conjugate Control [CC]
ContentThere could be overall weak or no signals on the strip, including or except, the Conjugate Control (CC) zone.

Figure: LPA showing No Signal Except CC
Reasons and Troubleshooting for No Signal Except CC are given in the table below:
Table: Reasons and Troubleshooting for No Signal Except CC
REASON FOR ERROR
SOLUTION
The quality of extracted DNA does not allow efficient amplification
Repeat the extraction step
Amplification Mixes (AM-A and AM-B) were either not mixed properly or were added in the wrong amounts
Prepare a new master mix and repeat the test
The incubation temperature was too high
Repeat reverse hybridization
The extracted bacterial species cannot be detected by the Universal Control
Use an alternative identification method Resources
- GenoType MTBDR plus ver 2.0 kit, Instructions for Use.
- GenoType MTBDRsl VER 2.0 kit, Instructions for Use.
Kindly provide your valuable feedback on the page to the link provided HERE
LPA Troubleshooting for Uneven Staining
ContentDuring hybridization, single-stranded amplicons bind to probes and highly specific binding is ensured to produce even staining in the presence of stringent buffer and temperature conditions. However, uneven staining can occur due to the following reasons:
- Strips not completely immersed in reagents during incubation steps.
- Tray not shaken properly.
- Denatured amplicons were not properly mixed with the hybridization buffer before adding the strip to the well.
- The reusable tray had not been properly cleaned so residual amplicons remained.
Solution: Repeat reverse hybridization step.

Figure: Uneven Staining of the Strip
Points to Note
- The strips must be checked to ensure that they are fully immersed after the addition of each reagent. If necessary, a pipette tip can be placed on top of a strip to keep it submerged. Care must be taken so that buffer from a well with a problematic strip does not spill into any of the other wells.
- Before adding the strip to the well, the purple solution containing the denatured amplicons should be completely diffused into the green hybridization buffer.
- The instruments should be checked to ensure that the Twincubator is shaking at 300 rpm and the GT-Blot 48 is oscillating properly.
- The trays must be thoroughly washed and rinsed after each use.
Do’s and Don’ts
- Gently shake the tray until the solution has homogenous colour.
- Do not spill solution into the neighboring wells.
- Tray must be dipped into the water to at least 1/3rd of its height.
- Use washed and clean trays.
Resources
- GenoType MTBDR plus ver 2.0 Kit, Instructions for Use.
- GenoType MTBDRsl VER 2.0 Kit, Instructions for Use.
- GLI Training Package on LPA.
Kindly provide your valuable feedback on the page to the link provided HERE
LPA Troubleshooting for High Background Colour
ContentDuring hybridization, single-stranded amplicons bind to probes and highly specific binding is ensured to produce even staining in the presence of stringent buffer and temperature conditions. However, high/ dark backgrounds in strips may be due to the following reasons:
- CON-C and/or SUB-C used too concentrated
- Washing steps not performed with necessary care
- Wash solutions were too cold
Solution: Repeat reverse hybridization step.

Figure: Dark background in the LPA Strip
Points to Note
- The rinse step should be done carefully to remove excess conjugate buffer followed by a wash with deionized water to remove salts in the rinse buffer.
- Post-substrate development, wash with deionized water is essential to stop colorimetric reaction and to remove excess substrate buffer.
- Reagents should always be warmed before use.
Resources
- GenoType MTBDR plus ver 2.0 Kit, Instructions for Use.
- GenoType MTBDRsl VER 2.0 Kit, Instructions for Use.
- GLI Training Package on LPA.
Kindly provide your valuable feedback on the page to the link provided HERE
LPA Troubleshooting for Other Possible Reasons
ContentIssue #1:
Absence of Conjugate Control (CC) and Amplification Control (AC) in a negative control (Figure 1).

Figure 1: Absence of CC and AC in a Negative Control
Table 1 below lists the reasons and troubleshooting for the absence of CC and AC in a negative control.
Table 1: Reasons and troubleshooting for the absence of CC and AC in a Negative Control
REASONS
TROUBLESHOOTING
Mistakes during setup
The test is invalid – Repeat test
Performance of amplification reaction
Presence of amplification inhibitors
Issue 2:
Absence of locus control for a specific drug, with presence of CC and M. tuberculosis complex (TUB) band (Figure 2).

Figure 2: Absence of locus control for a specific drug, with presence of CC and TUB band
Table 2 below lists the reasons and troubleshooting for the absence of locus control for a specific drug, with the presence of CC and TUB band.
Table 2: Reasons and troubleshooting for the absence of locus control for a specific drug, with the presence of CC and TUB band
REASONS
TROUBLESHOOTING
Mutation or deletions in locus control region
- The test is indeterminant - Repeat test
- Sequencing may be requested to identify the specific mutation
Complete or partial deletion of a target gene
Resources
- GenoType MTBDR plus ver 2.0 kit, Instructions for Use.
- GenoType MTBDRsl VER 2.0 kit, Instructions for Use.
Kindly provide your valuable feedback on the page to the link provided HERE
LPA Quality Assurance [QA] Including Quality Control
ContentThe quality concepts of the Line Probe Assay (LPA) laboratory include:
- Infrastructure
- Dedicated areas for different steps of the procedure.
- Colour code/ label for different rooms:
- Red for pre-amplification area
- Green for DNA extraction area
- Blue for amplification area
- Yellow for post-amplification area.
- Unidirectional workflow for reduced risk of contamination. Under no circumstances should:
- Anything from the specimen preparation area be taken into the reagent preparation area
- Anything from amplification and hybridization/detection areas be taken into specimen or reagent preparation areas.
- Safety in the laboratory.
- Proper functioning instruments.
- Manpower
- Trained and competent staff.
- Maintained laboratory turn-around-time (sample receipt to reporting results).
- Documentation and Records: There is a need to have documents/records on the following:
- Standard Operating Procedures (SOPs)
- Laboratory Information Management System (LIMS): Worksheet, recording and reporting results
- Reagent manuals: Manufacturers’ instructions and specifications manuals
- Daily usage logs, corrective action logs, calibration, repair and maintenance records for instruments
- Safety aspects.
Quality Assurance including Quality Control (QC) includes:
Reagent QC: The following should be done:
- Testing of all lots of reagents
- Integrity testing upon receipt (e.g., Tag polymerase).
- Stock rotation
- Storage at the appropriate temperature
- Supply chain and inventory management.
- Expiry prevention
Equipment QC: This includes:
- Calibration
- Maintenance
- Validation
- Corrective actions for QC failures
- Knowledge to operate
- Service and repairs
- Manuals.
Resources
Kindly provide your valuable feedback on the page to the link provided HERE
- Infrastructure
LPA Procedural Quality Control
ContentA batch of samples is defined as a group of samples that are processed, amplified and hybridized:
- At the same time
- Under the same conditions
- Using the same PCR master mix, thermal cycler and hybridization solutions
- On the same hybridization platform.
QC during the DNA extraction procedure
- Use two sets of 1.5 ml tubes are foreach specimen.
- Mark and label the tubes according to the organization of the batch on the worksheet.
- The first tube in every batch should be labelled with a coloured sticker.
- Check the functionality of the instruments prior to processing.
- Use calibrated pipettes.
QC during the preparation of the master mix
Use homogenous reagents and thaw them properly to ensure even distribution of contents.
- Use calibrated pipettes.
- Set functional refrigerator/freezer at -20ºC.
- Verify addition of DNA polymerase visually.
- Document lot numbers and expiration dates of reagents.
- Test quality control specimens with a new lot of DNA polymerase.
QC during DNA template addition
- Select thermal cycler program based on the type of specimen to be amplified.
- Check that the caps of PCR tubes do not contain any liquid when loaded into the thermal cycler (to prevent dilution of the reaction mixture).
- Check the PCR reaction tubes for any bubbles (prevent uneven temperature distribution).
QC during the hybridization and detection procedure
- Maintain consistency in the numbering process. For example, strip marked number 1 must correspond with the first specimen extracted, amplified and added to denaturing buffer in hybridization well.
- Use dedicated pair of forceps to handle unhybridized strips.
- Avoid strips sticking together into the same well.
- If an automated hybridiser is used for less than 48 specimens, the rest of the wells should be filled with distilled water to ensure an even temperature across the heating platform.
- TwinCubator (12 strip capacity) should be used with one or two hybridization runs depending on the number of specimens.
- Use a clean tray in the TwinCubator.
Use of positive and negative controls
To demonstrate competency for the line probe assay (LPA), positive and negative quality control (QC) samples must be performed on a routine basis, for each batch of specimens as shown in Figure 1. The overview of the use of positive and negative quality control is shown in Figure 2.
Each batch of specimens tested with the LPA must have an “extraction positive control” (ATCC strain H37Rv), an “extraction negative control”, and a “PCR master mix negative control” (Figure 1).
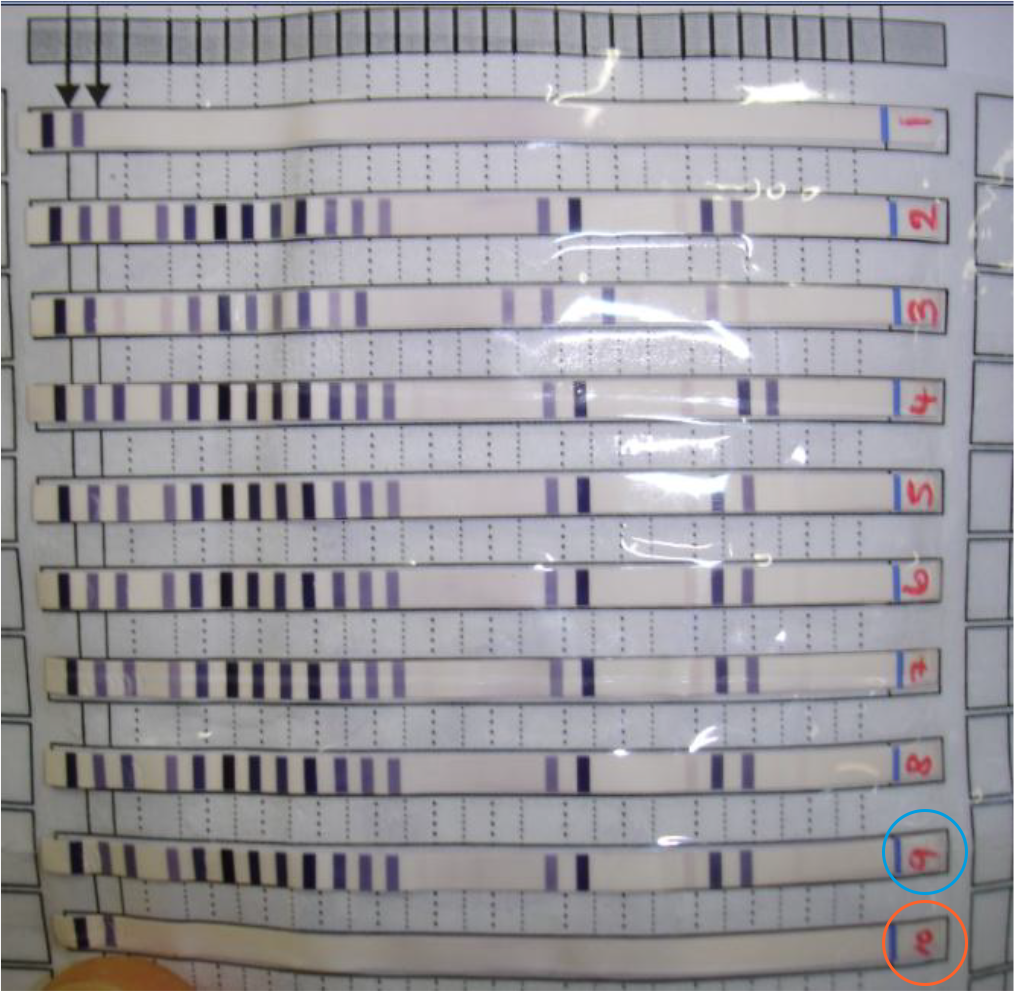
Figure 1: The H37Rv extraction positive control shown in strip number 9 (circled in blue) and the extraction negative control is shown in strip number 10 (circled in red); Source: LPA Laboratory Manual, FIND
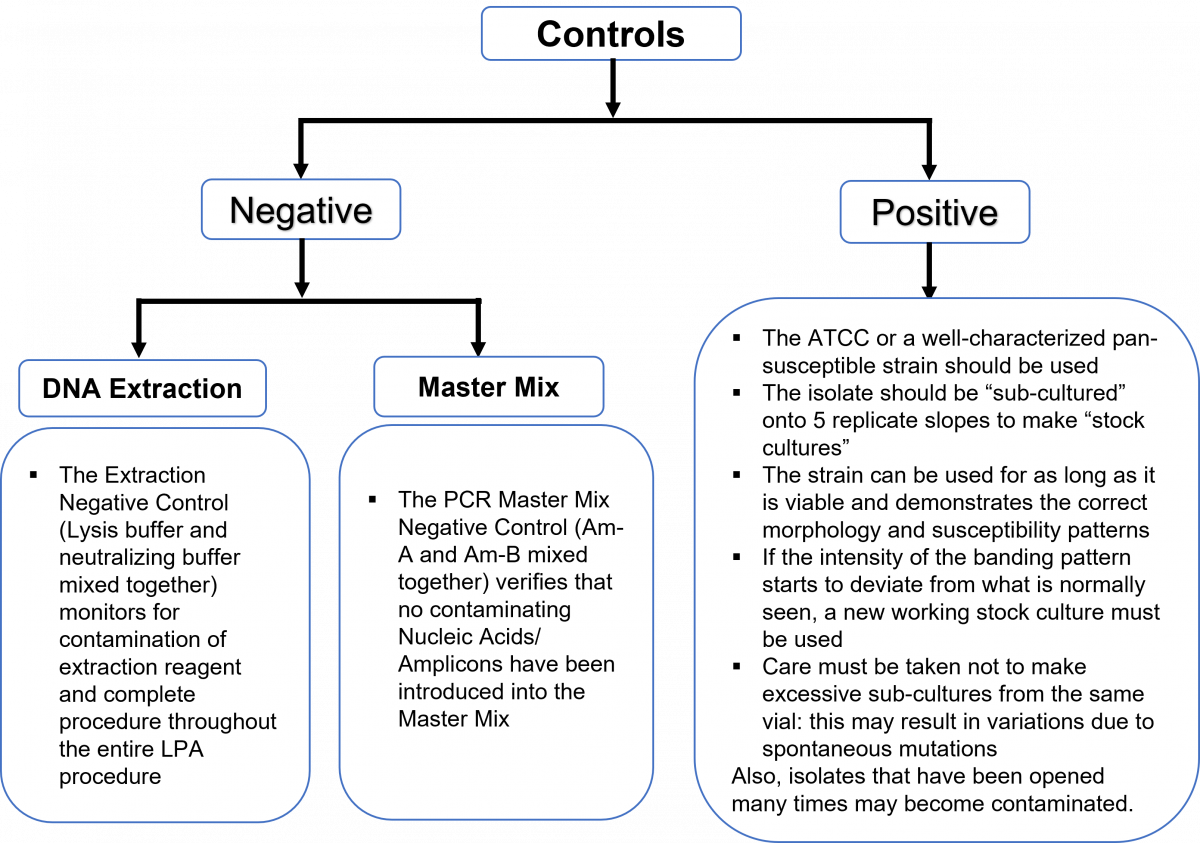
Figure 2: Overview of positive and negative controls
Amplification Control (AC) on the LPA strip functions as both:
The internal “PCR Positive Control”
Amplification control (AC) band indicates that the DNA extraction and PCR procedures were carried out successfully (Figure 3).
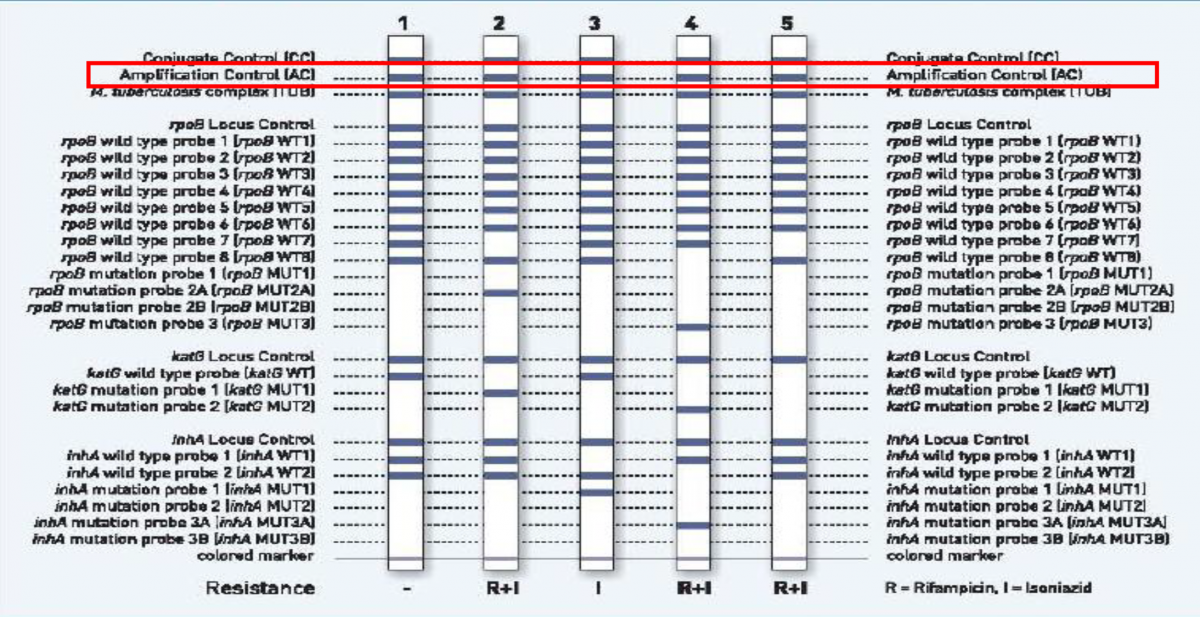
Figure 3: Amplification Control (highlighted in red) as seen on the Genotype MTBDRplus test strip; Source: LPA Laboratory Manual, FIND.
The “Inhibition Positive Control”
- The AC band will not appear if there are PCR inhibitors in the extracted material.
- The strips for the two negative controls must be positive only at the Conjugate Control (CC) and AC bands.
Resources
Kindly provide your valuable feedback on the page to the link provided HERE
LPA Quality Assurance: Proficiency Testing
ContentSteps Involved in Proficiency Testing (PT):
- Each new laboratory undertakes line probe assay (LPA) testing for 50 smear-positive TB affected patients.
- The specimen is anonymized (stripped of name and any personal identifiers), assigned a number, and processed by N-acetyl L-cysteine- Sodium Hydroxide (NALC-NaOH) method.
- Processed sputum deposit, DNA extracts and PCR products are stored at -20oC.
- High resolution scanned images of the ‘line probe result form’ and the line probe assay result strips (scotch-taped onto separate LPA – run form) are sent to the Central TB Division/National Reference Laboratory (NRL).
- 20 DNA extracts are randomly selected by the NRL for testing concordance.
- The extracts are sent by express courier to the NRL.
- Blinded LPA testing on the 20 DNA extracts is done at NRL.
- Once the pilot and proficiency phase has been satisfactorily completed, the LPA laboratory is assessed for proficiency, based on the following indicators:
- The proportion of invalid LPA results; PT benchmark: less than 10%
- Contamination of negative controls; PT benchmark: Clean in all runs
- Internal concordance: concordance of results between 1st and 2nd tested parts for each specimen; PT benchmark: should be >95%
- External concordance: concordance of results of randomly selected specimens with the reference site; PT benchmark: should be >95%.
Steps involved in Annual Proficiency Testing:
- Every NRL sends 30 cultures to the LPA laboratory.
- Cultures are taken for LPA procedures. DNA extraction is followed by:
- Master mix preparation, amplification and hybridisation.
- The results are then shared with the respective NRL, who asses the results based on the following indicators:
- The proportion of invalid LPA results; PT benchmark: less than 10%
- Contamination of negative controls; PT benchmark: Clean in all runs
- External concordance; PT benchmark: should be >95%.
Resources
Kindly provide your valuable feedback on the page to the link provided HERE
- Each new laboratory undertakes line probe assay (LPA) testing for 50 smear-positive TB affected patients.
LPA Quality Assurance: Cleaning of Lab
ContentGeneral Instructions
- Dedicated cleaning supplies, brooms required for different areas.
- Cleaning should be done by trained Polymerase Chain Reaction (PCR) laboratory staff, not by general cleaning personnel.
- Meticulous cleaning of the work area, surfaces, racks, pipettes and instruments should be done before and after performing each procedure with disinfectants (freshly prepared 1% sodium hypochlorite, followed by 70% alcohol).
- Use dedicated spray flasks/ containers for disinfectants.
- Clean paper towels (not cloth) should be used to decontaminate surfaces and equipment.
- Walls should have high-gloss enamel/ gloss-based paint for easy cleaning.
- Floors must be covered with vinyl, linoleum or ceramic tiles.
- Bench-tops must be made of impermeable melamine to eliminate crevices.
- Instruments should be cleaned and maintained daily/ weekly as described in the equipment training content.
- Cleaning and maintenance log sheets of all areas should be maintained.
Area-wise Cleaning
Weekly meticulous cleaning once; clean top-to-bottom, starting with bench tops and finishing with mopping the floor with disinfectants.
Area 1: DNA extraction room
Clean and maintain instruments (pipettes, biosafety cabinet, centrifuge and water bath) daily/ weekly.
Area 2: Pre-amplification room
Clean and maintain instruments (pipettes, PCR equipment) daily/ weekly.
Area 3: Amplification room
Clean and maintain instruments (thermal cycler, pipettes, PCR equipment) daily/ weekly.
Area 4: Hybridization room
Clean and maintain instruments (GT-Blot, Twincubator, pipettes, GT-Blot hybridization machine) daily/ weekly.
Resources
- Line Probe Assays for Drug-resistant Tuberculosis Detection, GLI.
- Molecular Detection of Drug-resistant Tuberculosis by Line Probe Assay, FIND.
Kindly provide your valuable feedback on the page to the link provided HERE
Fullscreen
