Process of Reading a Smear
ContentThe manner and quality of smear reading has a major impact on the result of sputum smear microscopy and case detection. Each slide needs to be examined for at least 5 full minutes or 100 fields need to be examined.
The overall process of reading a smear is outlined in the figure below:

Figure: Process of reading a smear
Resources:
- AFB Smear Microscopy, Trainer Notes.
- Module for Laboratory Technicians.
- Laboratory Diagnosis of Tuberculosis by Sputum Microscopy.
Assessment
Question
Answer 1
Answer 2
Answer 3
Answer 4
Correct answer
Correct explanation
Page id
Part of Pre-test
Part of Post-test
What is the minimum time to be spent by an LT when examining a smear under the microscope?
30 minutes
5 minutes
2 minutes
30 seconds
2
Even the most experienced microscopist needs to examine each slide for at least 5 full minutes.
Oil immersion and focusing
ContentThe following are the measures to be kept in mind when adding immersion oil to the slide:
- Before adding immersion oil to the slide, ensure that the smear is facing upwards (Figure 1).
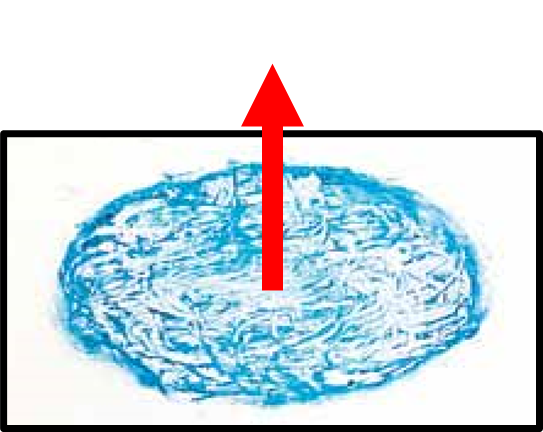
Figure 1: Slide should Face Upwards when Mounted on the Microscope Stage
- Add a drop of immersion oil, using the applicator (dropper bottle).
- The drop must fall freely onto the smear, so that the oil applicator does not touch the slide and get contaminated (Figure 2).
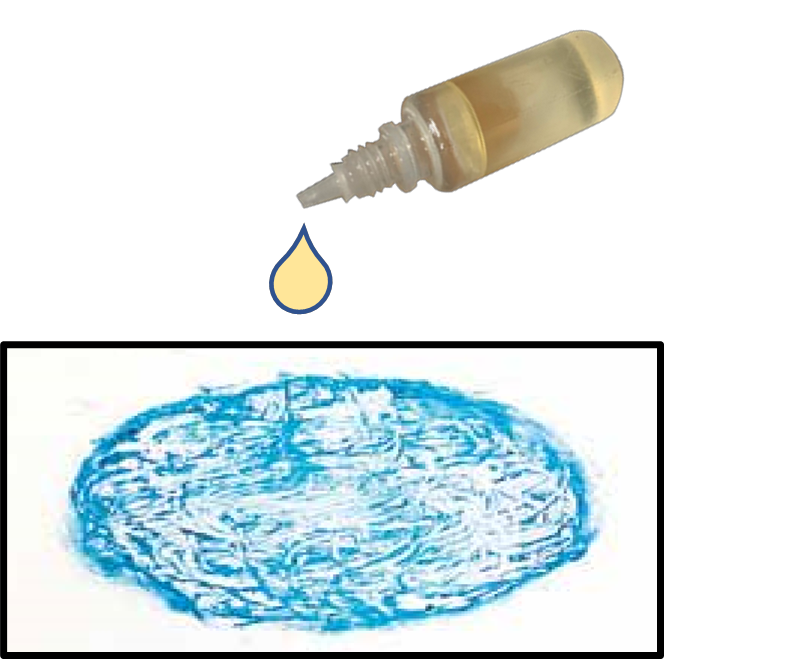
Figure 2: Oil Dropped onto Slide with an Applicator
- Mount the slide on the microscope and use the 10X objective lens to focus the smear, scan and look for mucoid material.
- Carefully rotate the 100X objective lens over the slide, adjust, sharp focus and observe under immersion oil.
Do’s and Don’ts:
- The 100X objective is the only lens requiring immersion oil.
- Keep the immersion oil away from other lenses.
- Use a good quality immersion oil.
- The immersion oil must have a medium viscosity and a refractive index (RI) greater than 1.5.
- Never allow the oil applicator to touch the slide.
- Do not use cedar wood oil diluted with xylene as it leaves a sticky residue on the lens and destroys the lens over time.
Resources
- Guidelines for Laboratory Consumables, Central TB Division, 2019.
- Laboratory Diagnosis of Tuberculosis by Sputum Microscopy, GLI Initiative.
Kindly provide your valuable feedback on the page to the link provided HERE
Reading a ZN stained smear
ContentImage
Resources
- AFB Microscopy Trainer Notes
- Module for Laboratory Technicians
- Laboratory diagnosis by sputum smear microscopy
Kindly provide your valuable feedback on the page to the link provided HERE
Reading a Fluorescent Stained slide
ContentSmears stained with the fluorescent dye, Auramine, are read with a Light Emitting Diode Fluorescence Microscope (LED-FM).
- The fluorescent-stained smears are to be read within 24 hours of staining in a dark room as the fluorescent stain fades on exposure to light.
- The slides are to be stored in the slide box to avoid exposure to light. Alternatively, they may be stored wrapped in brown or black paper and kept away from light.
- The slides should not be stored in a fridge as 4°C does not prevent or delay fading of fluorescent dye.
After fluorescent staining, smears are examined at much lower magnifications (typically 200x) than used for Ziehl Neelsen (ZN)-stained smears (1000x). Each field examined under fluorescence microscopy, therefore, has a larger area than that seen with bright field microscopy.
Examination Procedure
The steps include:
1. Switch on the LED-FM in a dark room.
2. Focus the stained slide using a 20x or 40x objective lens and view through the 10x eyepiece (magnification of 200x or 400x).
- Does not require the use of oil immersion.
3. Read smear in a linear pattern.
4. Count bacilli that appear as slender bright yellow fluorescent rods against a dark background in 30-50 fields. Rule out any artefact.
- For a trained and experienced Lab Technician (LT), each smear would take approximately 2 minutes for 30-50 fields or three horizontal sweeps.
Reporting Procedure
The smears are reported as negative/ scanty/ 1+/ 2+/ 3+ per the grading scale (Table).
Table: A Comparison between ZN (1000x) and FM (400x and 200x) for Grading of Smears at Different Magnifications
Result
1000 x magnification
1 length=100 HPF
400x magnification
1 length= 40 fields= 200 HPF
200x magnification
1 length=30 fields=300 HPF
Negative
Zero AFB/1 length
Zero AFB/1 length
Zero AFB/1 length
Scanty
1-9 AFB/1 length or 100 HPF
1-19 AFB/1 length
1-29 AFB/1 length
1+
10-99 AFB/1 length or 100 HPF
20-199 AFB/1 length
30-299 AFB/1 length
2+
1-10 AFB/1 HPF on average
5-50 AFB/1 HPF on average
10-100 AFB/1 field on average
3+
>10 AFB/1 HPF on average
>50 AFB/1 HPF on average
>100 AFB/1 field on average
Abbr: AFB: Acid Fast Bacilli; HPF: High Power Field
Resources
- Training Module (1-4) for Programme Managers and Medical Officers, NTEP, MoHFW, 2020.
- Manual for Sputum Smear Fluorescence Microscopy, RNTCP, MoHFW, 2007.
- Fading of Auramine-stained Mycobacterial Smears and Implications for External Quality Assurance.
Assessment
Question
Answer 1
Answer 2
Answer 3
Answer 4
Correct answer
Correct explanation
Page id
Part of Pre-test
Part of Post-test
Immersion oil is used to view fluorescent-stained smears.
True
False
2
Immersion oil is not required to view fluorescent-stained smears as they are observed with 20x or 40x objective lens.
Yes Yes Reporting and Recording results of Smear Microscopy (On paper)
ContentEach Designated Microscopic Center (DMC) needs to maintain a National TB Elimination Program TB (NTEP) Laboratory Register which collects information of all presumptive TB patients who undergo tests or confirmed patients who undergo follow-up tests.
- After doing the Acid-fast Bacilli (AFB) test, the laboratory technician needs to ensure that all the microscopy test results are entered against the name and the serial number of the presumptive/ confirmed TB patients.
- The result needs to be mentioned in terms of positive or negative test results along with the AFB grading.
- It is expected that the positive results are written in RED and negative in BLUE point pens.
- The AFB results can be mentioned for newly diagnosed TB patients for both spot as well as morning sample and must include the Nikshay ID of the patient as well as the test date and result.
- In case, the sample is repeated, the same is also mentioned.
- All the information also needs to be entered into NTEP Nikshay online application using a tablet or mobile phone.
- In a setting where Nucleic Acid Amplification Test (NAAT) is co-located, another sample needs to be tested for Rifampicin (Rif)-resistance and the same result also needs to be noted into the TB laboratory register.
- The performance of each laboratory is also entered into the monthly DMC extract called Annexure M which is consolidated for all DMCs by the concerned Senior TB Laboratory Supervisor (STLS).
- HIV and diabetes tests are also offered to each confirmed TB case and the details of the same are also part of the TB laboratory register.
- Patients who have been tested also need to be provided with the test results in a hard copy apart from the provision of information to the treating clinician of the health facility.
Resources
Kindly provide your valuable feedback on the page to the link provided HERE
Reporting results of Microscopy (Digitally)
ContentResults of Ziehl–Neelsen (ZN) and Fluorescence Microscopy (FM) are added to Nikshay Diagnostic Module. After a patient is registered, test details are added which then leads to the page to add details on sample type, facility and test results (Figures 1-6).
Features of Nikshay Diagnostic Module
- A simplified user workflow for adding and updating test requests and results.
- Tests can be added and all the added tests’ history is available.
- Ability to map samples to one or more tests within Nikshay.
- A “Workbench” view is available to provide a single interface to view/ print/ copy the Test Summary, Add/ View Sample Details and Update/ View Result details.

Figure 1: Nikshay Screenshot to Add Tests under Diagnostics Module.
To add results for ZN/FM, the test types either Microscopy ZN or Microscopy Fluorescence should be selected from the drop-down menu (Figure 2).

Figure 2: Nikshay Screenshot to Add Reasons for Test under Diagnostics Module.
In case of follow-up with ZN/FM Microscopy, the reason for follow-up should be selected (Figure 3).

Figure 3: Nikshay Screenshot to add Follow-up ZN/FM Microscopy Test under Diagnostics Module.

Figure 4: Nikshay Screenshot to add Test Type for ZN/FM Microscopy and Facility Details under Diagnostics Module.
Details on sample type and sample description (mucopurulent/ blood-stained/ saliva) are added (Figure 5).

Figure 5: Nikshay Screenshot to add Sample Details and Description for ZN/FM Microscopy under Diagnostics Module.
Under test results, as shown in Figure 6, details of lab serial number, sample number, test date, test reported date and final interpretation of results are added based on the selection from a drop-down menu that includes options for:
- Negative
- Positive (1+, 2+, 3+)
- Positive (Scanty 1-9)
Figure 6: Nikshay Screenshot to add Test Results for ZN/FM Microscopy under Diagnostics Module.
Resources
Assessment
Question
Answer 1
Answer 2
Answer 3
Answer 4
Correct answer
Correct explanation
Page id
Part of Pre-test
Part of Post-test
What sample descriptions are added in Nikshay for ZN/FM Microscopy under Diagnostics Module?
Mucopurulent
Blood-stained
Saliva
All of the above
4
Sample descriptions (mucopurulent/ blood-stained/ saliva) are added in Nikshay for ZN/FM Microscopy under Diagnostics Module.
Yes
Yes
Generating the DMC Laboratory Register from Nikshay
ContentThe DMC lab register can be generated from Nikshay as a spreadsheet and stored electronically or printed for paper records.
Steps for generating DMC Register from Nikshay:
- Login to Nikshay Reports using your login ID and password.
- Under Reports, click on ‘Patient wise List’ and select the option for ‘DMC Register’ (see screenshot below)


Figure: Screenshot of Nikshay Reports to generate DMC Register
A few filters need to be selected to generate the register.
- First is the geographic location (State/ District/ TU/PHI); most of these are preselected.
- This is followed by a selection of the period for which the register has to be generated. This includes selection of ‘Frequency’ (either monthly or annually)of the report and the month or quarter for which the report is required.
- Click on the ‘Generate Excel’ button and it will lead you to a page from which you can download the register.
Things to remember:
- You can generate a DMC register for facilities below your login level (e.g., a district can generate a DMC register of a TB Unit or DMC of the same district. and a State can generate a register for any District under it)
- The data included in the register is based on the "Date reported" of a test.
Video fileVideo: Steps to access the DMC Register in Ni-kshay
Resource
Assessment
Question Answer 1 Answer 2 Answer 3 Answer 4 Correct answer Correct explanation Page id Part of Pre-test Part of Post-test Where do you find the option to generate a DMC Register? In Nikshay under the "Admin" tab In Nikshay under the Others tab In Nikshay Reports under the "Patient wise List" tab In Nikshay Reports under the "Reports" tab 3 The option to generate a DMC Register is available under the Nikshay reports tab under the "Patient wise List" tab. Yes Yes Tuberculosis Laboratory Register
ContentThe Tuberculosis (TB) Laboratory Register is a paper-based recording register kept in all National TB Elimination Programme (NTEP) laboratories for recording details of diagnostic services offered to TB patients referred from both private and public health facilities.
The register is maintained in the Designated Microscopy Centre (DMC). It is the only register used for recording the details of specimen smear examinations. The Laboratory Technician (LT) is responsible for maintaining and updating the laboratory register.
There are two portions in the TB lab register and the table below shows the details captured in each portion.
Table: Pages and Information Covered in the TB Laboratory Register; Source: NTEP Training Module 2 for Programme Managers & Medical Officers
PORTION
DETAILS CONTAINED
Left-hand Portion
Lab serial number assigned by the LT
Date of the sample collection
Patient details such as name, sex, age, address, and contact number
Information on if the patient is from a key population
Referring health facility details
Reasons for examination
Right-hand Portion
Details on the type of specimen
Visual appearance results along with dates
Comorbidity status (HIV and Diabetes)
Details of drug susceptibility testing
Nikshay ID / Notification
Treatment initiation details
The last two columns are for the LT’s signature and remarks by the LT or supervisor
Important Points to Note
- Duplicate registers should not be maintained.
- LTs should ensure that the correct laboratory serial number is recorded.
- Laboratory serial number is given to the patient and not to the sample. A new number should be assigned to every presumptive TB case whose sputum is to be examined.
- All smear-positive (including scanty) results should be recorded in red ink.
- No over writing or manipulation in already entered data should be done.
The figure below shows the left-hand portion of the TB lab register. Click here to access the full form in the NTEP Training Module 2 for Programme Managers & Medical Officers, p. 219.
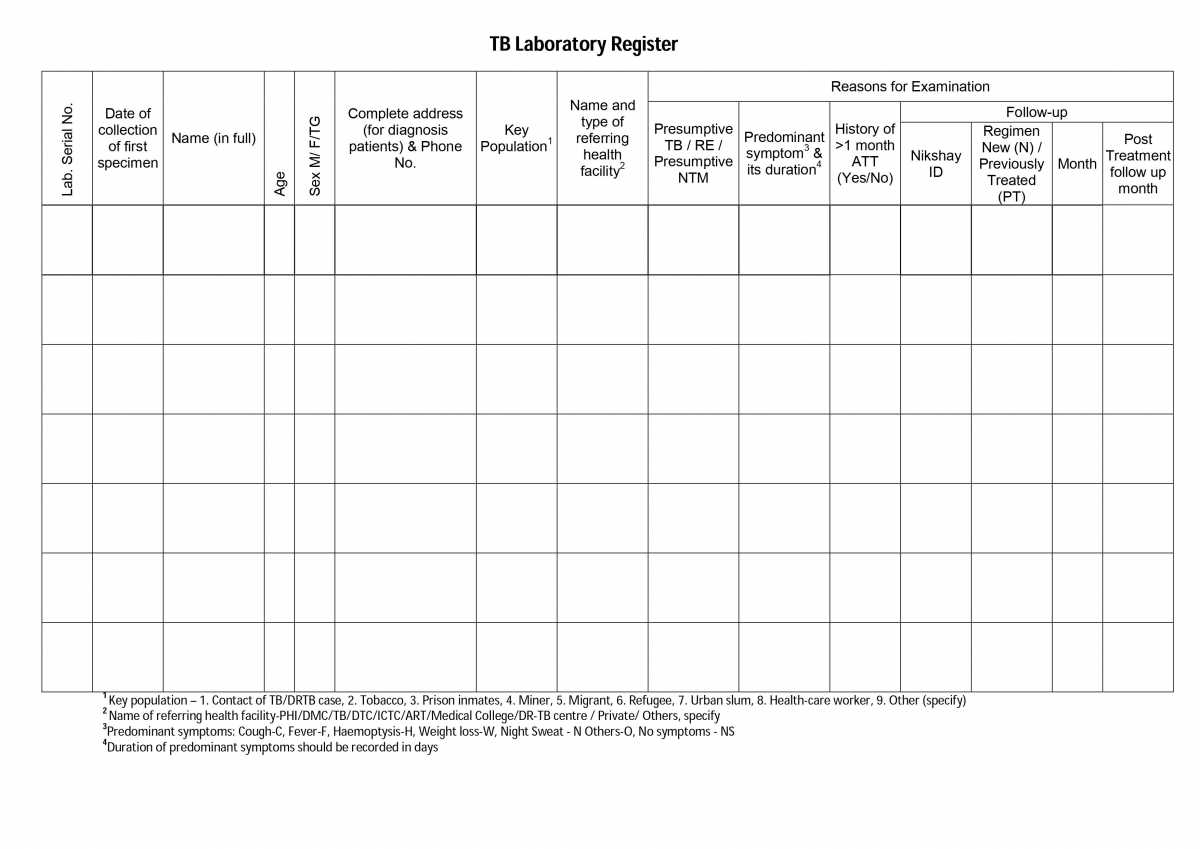
Figure: First Page of the TB Laboratory Register; Source: NTEP Training Modules 1-4 for Programme Managers & Medical Officers, p. 219
Resources
Kindly provide your valuable feedback on the page to the link provided HERE
Fullscreen