Maintenance of CBNAAT Instrument under NTEP
ContentMaintenance of the CBNAAT instrument is an essential activity to be performed in the laboratory setting and involves:
Preventive Maintenance Tasks
- Performed regularly by the user
- Ensure the good performance of the system
- Avoid problems of malfunction
Need-based Maintenance Tasks
- Performed in specific situations
- Performed or guided by manufacturer representatives
Frequency-based Tasks for the CBNAAT Instrument
DAILY WEEKLY MONTHLY ANNUAL OR AFTER 2000 TESTS PER MODULE - Remove and properly dispose off cartridges
- Clean and disinfect the work area
- Put on a dust cover when the instrument is not in use
- Disinfect the instrument’s surface
- Disinfect cartridge bay interior and plunger rod
- Filter cleaning
- Disinfect cartridge bay interior and plunger rod
- Clean instrument filter
- Archive and back-up test results
- Filter cleaning
Module Xpert Check (calibration) and maintenance of the module
Materials Required for CBNAAT Instrument Maintenance
- Freshly prepared 1% sodium hypochlorite solution
- 70% Ethanol
- Wipes, tissues, or cotton
- Disposable gloves
- Clean water and soap (for washing the filters)
- Replacement filters for the fan (available from the manufacturer).
Resources
CBNAAT Instrument Installation Criteria
ContentIt is important to adhere to the manufacturer's installation guide for optimal performance of the Cartridge-based Nucleic Acid Amplification Test (CBNAAT) machine. This guide should be kept in the laboratory. It is important to thoroughly read the instalment steps given in the brochure supplied with the machine.
Strict monitoring of these criteria should be carried out by the laboratory personnel:
- The instrument should not be kept directly under an air-conditioning vent or window. Direct sunlight should also be avoided.
- The instrument's room should have temperature control (15-30°C).
- The instrument needs to be installed on a vibration free/ stable workbench with no centrifuge adjacent to it.
- There is a need for a stable electricity supply (for added safety, the instrument must be connected to an Uninterruptible Power Supply (UPS) or surge protector).
For safety purposes, one needs to provide 10 - 15 cm of clearance on each side of the instrument.
Compliance with equipment installation criteria is necessary. The Instrument Qualification Documents include:
- Installation Qualification - IQ
- Operational Qualification - OQ
- Performance Qualification - PQ
Installation Qualification
IQ provides evidence for the delivery, installation and configuration of the instrument as per the manufacturer’s standards using an installation checklist.
Operational Qualification
OQ is a collection of test cases used to verify the proper functioning of a system before the instrument is released for use.
Performance Qualification
PQ is a collection of test cases used to verify that the system performs as expected under simulated real-world conditions.
Video fileVideo : CBNAAT Instrument Installation Criteria
Resources
Daily Maintenance of the CBNAAT Instrument
ContentDaily maintenance tasks of the CBNAAT instrument include:
At the end of the day:
- Turn off the computer
- Turn off the CBNAAT instrument
At the beginning of the day:
- Turn on the CBNAAT instrument
- Turn on the computer
Daily Maintenance Tasks
- After testing, remove the cartridges from the instrument.
- Dispose off cartridges in the appropriate biohazard waste container.
- Remove clutter from the work area.
- Disinfect the work area (1% hypochlorite solution or 70% ethanol).
- Put on the dust cover when the instrument is not in use.
- Switch off the machine at the end of the day.
- Do not turn off the UPS power supply.
It is essential to wear disposable gloves for the cleaning procedure. Wearing gloves prevents one from being exposed to biologically hazardous samples.
Video fileVideo : Daily Maintenance of CBNAAT Instrument
Resources
Monthly Maintenance of the CBNAAT Instrument
ContentMonthly maintenance tasks of the CBNAAT instrument include:
Cleaning of the Cartridge Bay and Plunger Rod
The CBNAAT manufacturer recommends monthly cleaning of the cartridge bay and plunger rod. However, if the sample load is high, this task can be carried out on a weekly basis.
Cleaning of Module PCR Slot (Figure 1)
- Wear laboratory gloves.
- Remove cartridges from the modules.
- Make sure that all the bristles are fully inserted (up to the shoulder of the plastic shank of the brush).
- Brush the inside of the slot with up and down movements.
- Rotate the brush for approx. 180º and back, then repeat the previous step 2 times.
- Clean each module for at least 30 seconds.

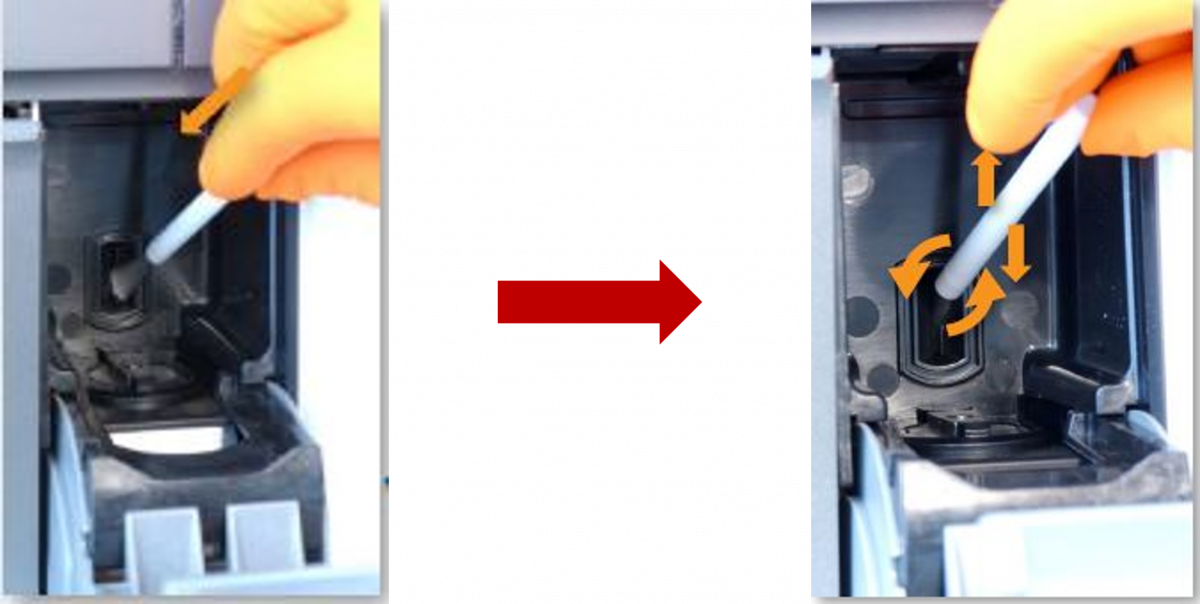
Figure 1: Cleaning of Module PCR Slot
Plunger Disinfection (Figure 2-7)
Plunger maintenance is initiated using the CBNAAT software. While cleaning, care should be taken not to touch the slit on the I-CORE module into which the cartridge reaction tube is inserted. Make sure that the cleaning cloth is damp but not dripping with disinfecting liquid.
1. To initiate the task, click on the “Maintenance” icon on the toolbar (Figure 2).

Figure 2: "Maintenance" icon on the toolbar
2. On the Maintenance menu, select “Plunger Maintenance” (Figure 3).

Figure 3: "Plunger Maintenance" in the Maintenance Menu

3. In the “Plunger Maintenance” window, select a module to clean or select “Clean All” (Figure 4).
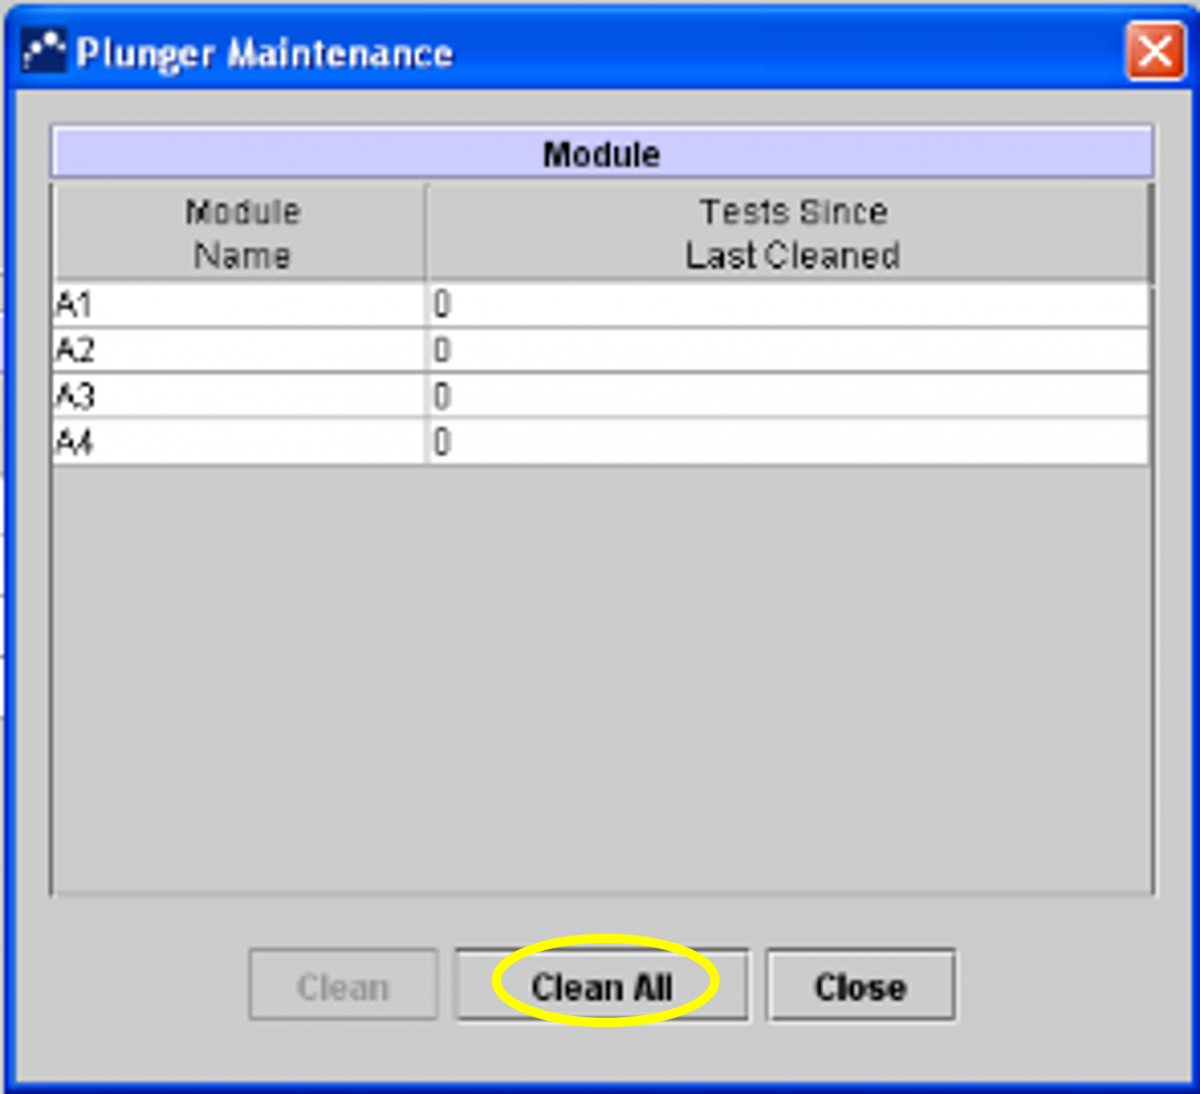
Figure 4: Selecting "Clean All" in the Plunger Maintenance Window
4. Follow the instructions in the Dialog box.
5. Click “OK” (Figure 5).
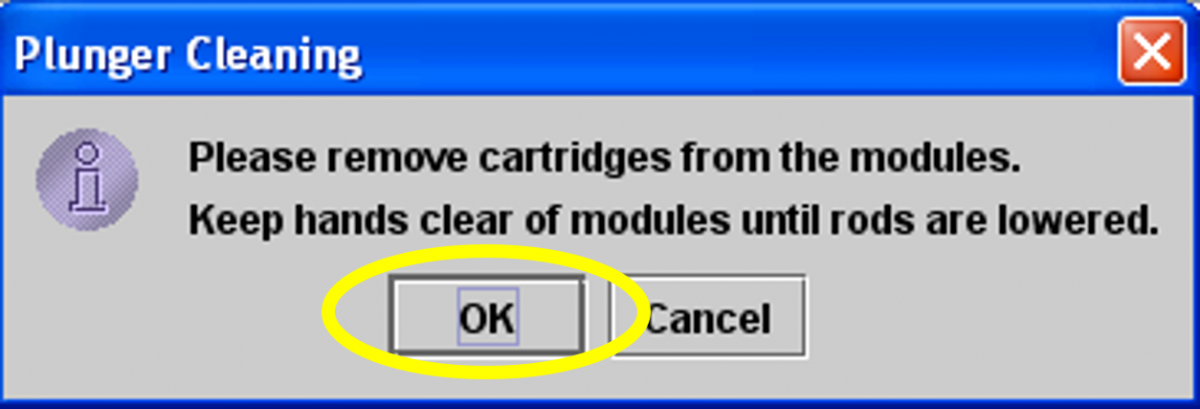
Figure 5: Click "OK" after following instructions in dialog box
6. The plunger rod in the chosen module will be automatically lowered (Figure 6).
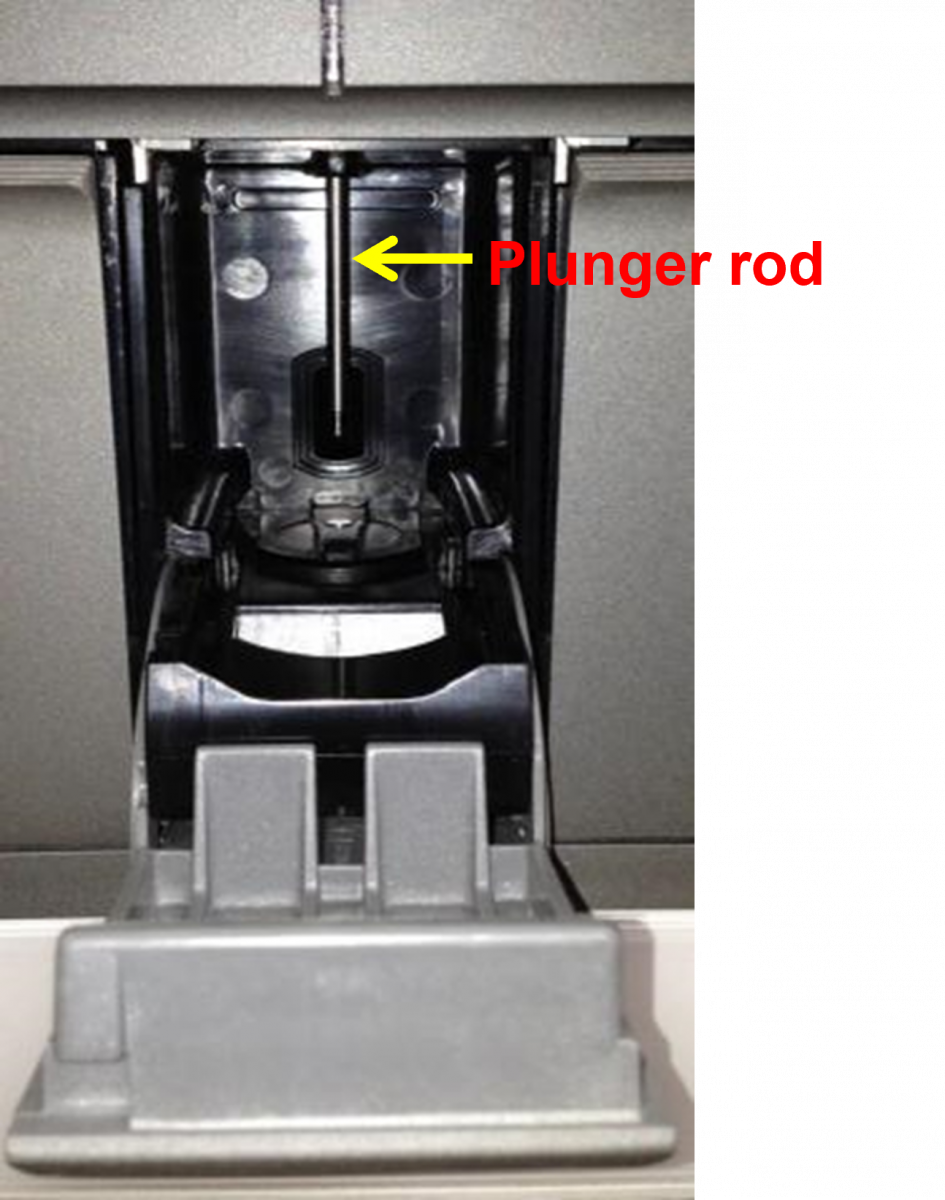
Figure 6: Plunger Rod of Module
7. After cleaning the plungers, click on “Move Up All” and the plungers will return to their original position (Figure 7).
8. Click “Close”.

Figure 7: Click "Move Up All" and then "Close" after cleaning the plungers
Replacing and Cleaning the Fan Filters (Figure 8)
Clean the fan filters weekly if you operate in an area of high pollution, dust or smoke, otherwise monthly/ quarterly is sufficient.
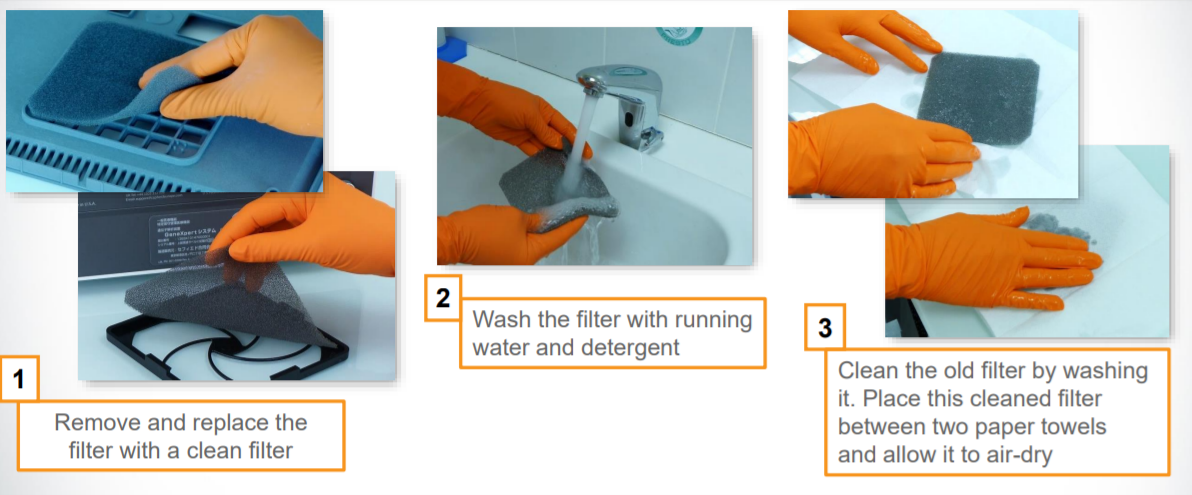
Figure 8: Steps for removing and replacing the filters
General Cleaning Procedure Outline


Make sure you wear disposable gloves for the cleaning procedure. Wearing gloves prevents you from being exposed to biologically hazardous samples.
Items required for cleaning:
- 1% Sodium hypochlorite solution (prepared within one day)
- 70% Ethanol
- Cotton swabs
- Disposable gloves
- Optical brush
Note: The current guidelines from the manufacturer suggest the use of freshly prepared 1% sodium hypochlorite (or 1:10 solution of household chlorine bleach).
- Dampen wipe/ swab with freshly prepared 1% sodium hypochlorite.
- Wipe the surface/ element.
- Discard the used wipe/ swab.
- Wait for 2 minutes.
- Dampen wipe/ swab with 70% Ethanol.
- Wipe the surface/ element.
- Repeat steps 5-7 three times.
Video fileVideo : Monthly Maintenance of the CBNAAT Instrument
Resources
CBNAAT Monthly Data Archive and Data Back-up Process
ContentThe Cartridge-based Nucleic Acid Amplification Test (CBNAAT) files should be archived and saved to a CD or other appropriate external media (preferably an external drive), at least once a month to ensure that no test data are lost.
Archiving tests creates copies of the test data in “gxx” files.
Importance of Archiving and Back-up
Archiving allows you to:
1. Back-up data to ensure it will not be lost if the computer breaks down.
2. Create a copy of the data to be sent to the manufacturer for assistance in troubleshooting problems.
How to Archive Results
1. Click “Data Management” (Figure 1).
2. Click on “Archive Test” (Figure 1).
3. Choose the tests that need to be archived (or “Select All”) (Figure 1).
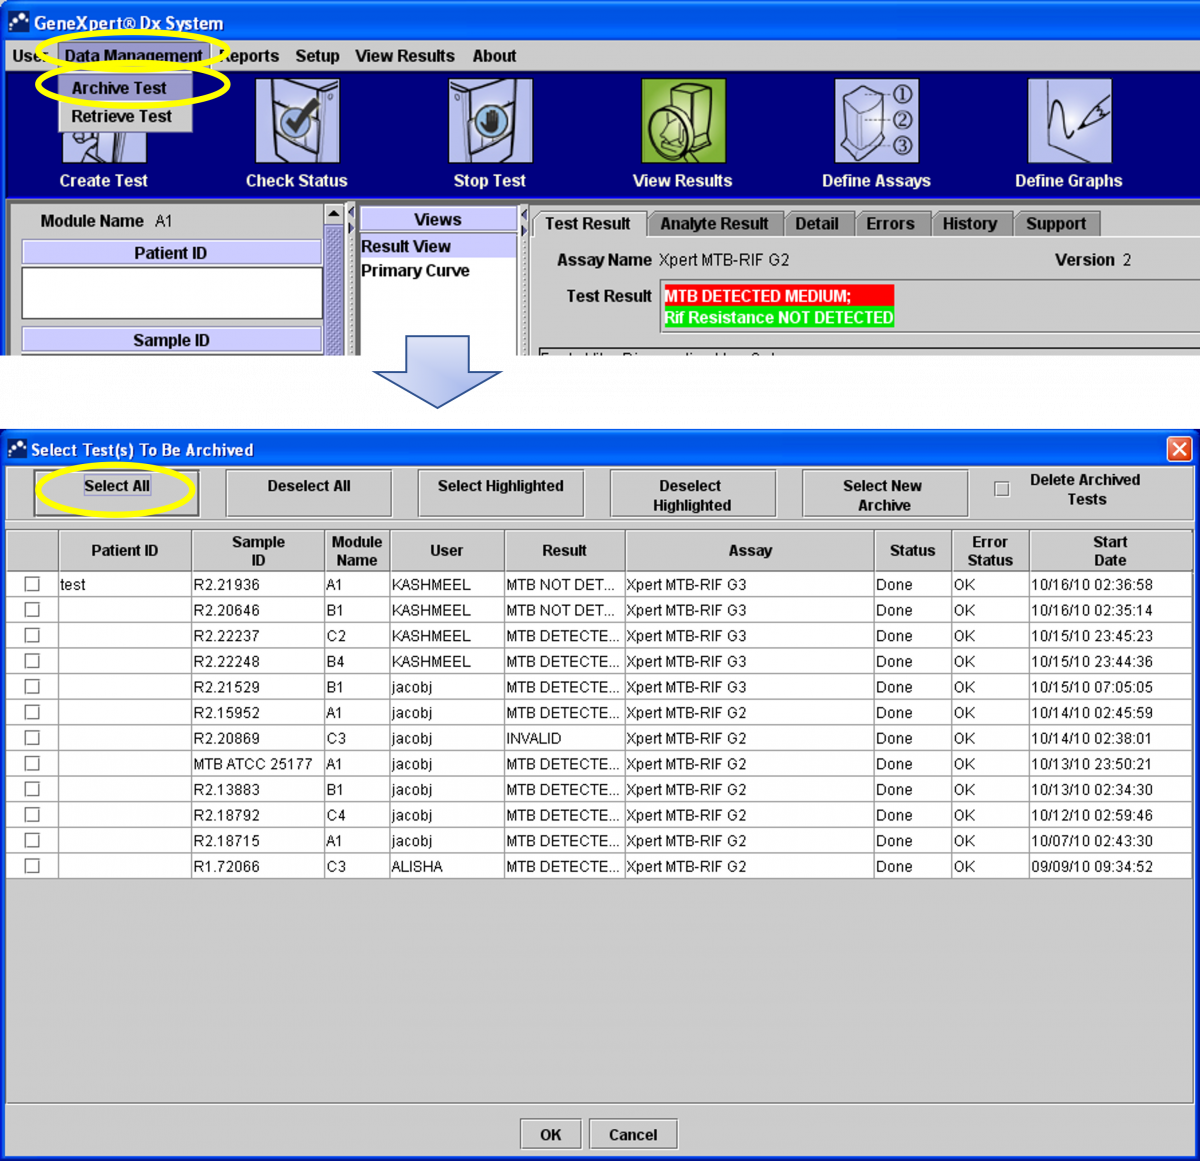
Figure 1: Steps to archive results
4. In the next dialogue box click “Proceed” (Figure 2).
5. The files will be saved in the folder “Export”. In the file name, you will see the date of archiving (Figure 2).
6. Click on “Save” (Figure 2).
7. Click “OK” (Figure 2).
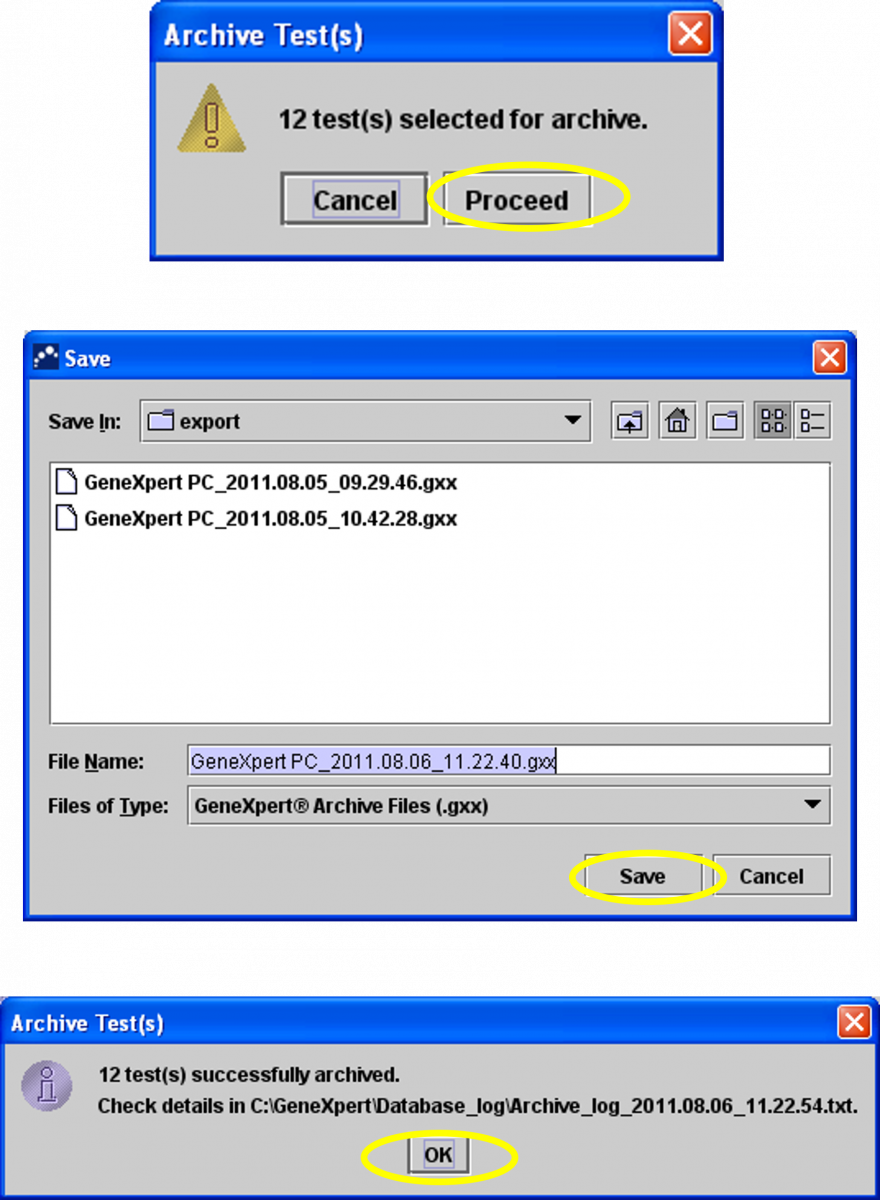
Figure 2: Steps to archive results (continued)
How to Retrieve Results
1. Click “Data Management” and then click “Retrieve Test” (Figure 3).
2. Select the file you want to retrieve.
3. Click on” Open” (Figure 3).
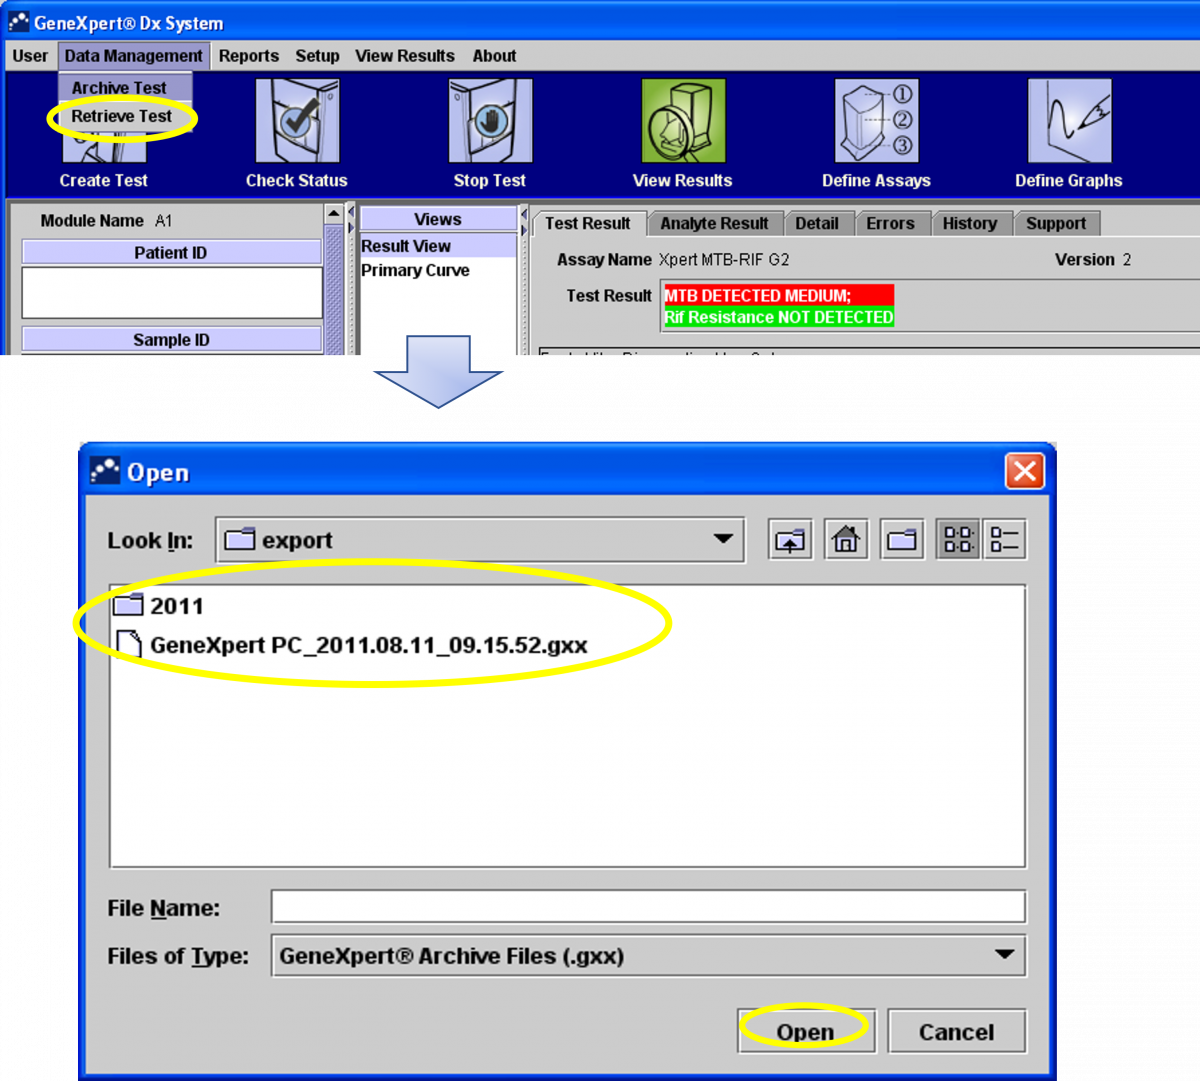
Figure 3: Steps to retrieve results
4. Select the test you may want to retrieve (or “Select All”) (Figure 4).
5. Click “OK” (Figure 4).
6. Click on “Proceed” (Figure 4).
7. Click “OK” (Figure 4).
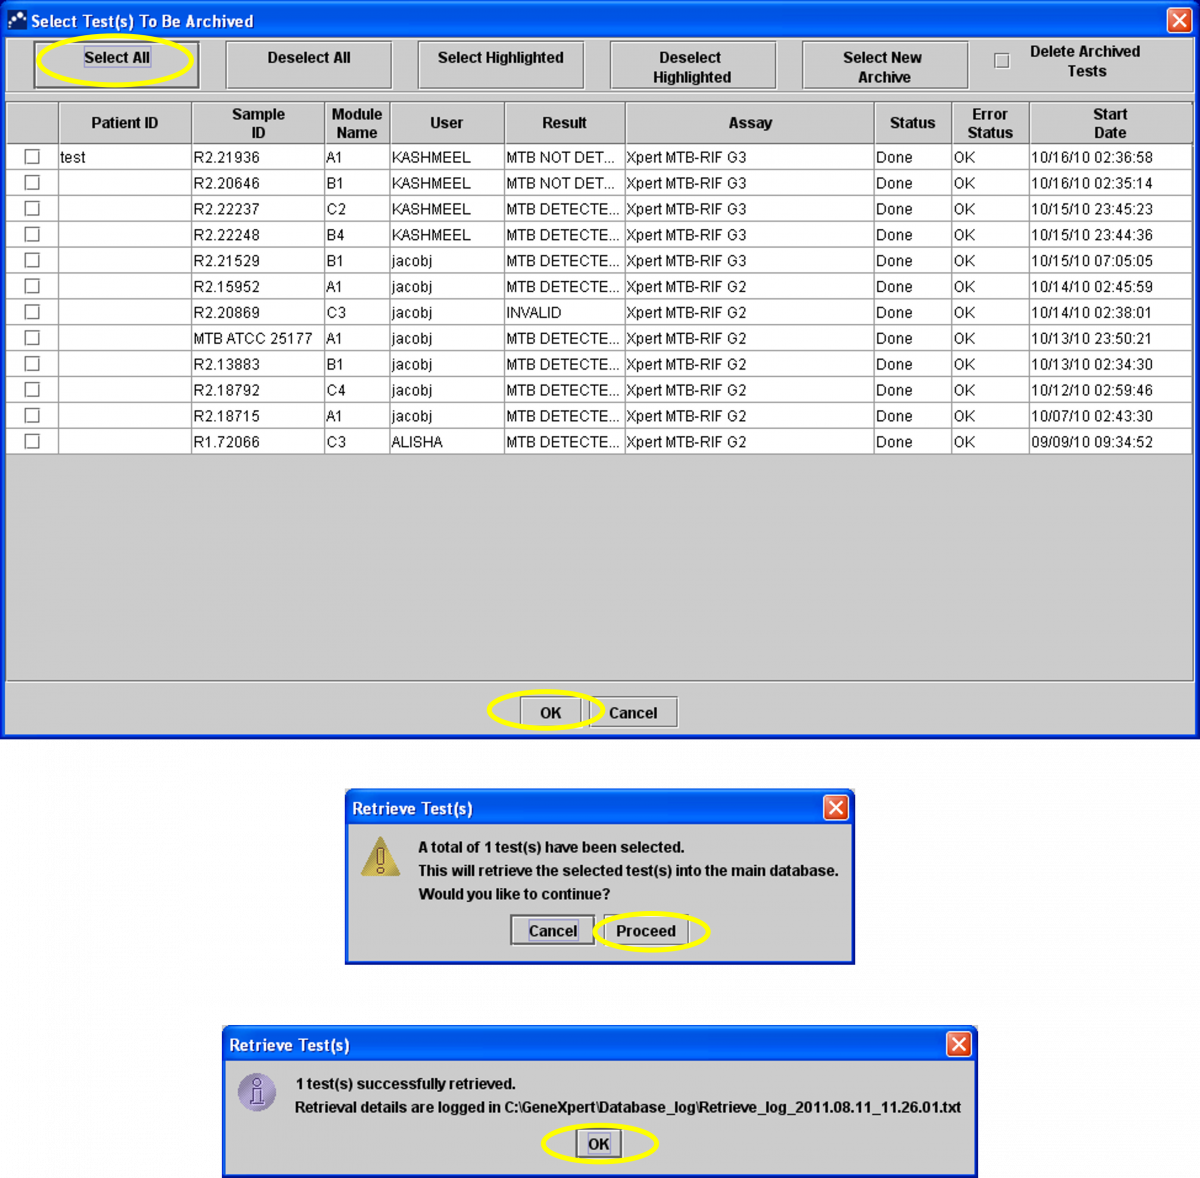
Figure 4: Steps to retrieve results (continued)
How to Back-up Data
Data backup should be carried out monthly.
1. Click “Yes” to the prompt (Figure 5).
2. Click on “Database Backup” (Figure 5).
3. Click on “Proceed” (Figure 5).
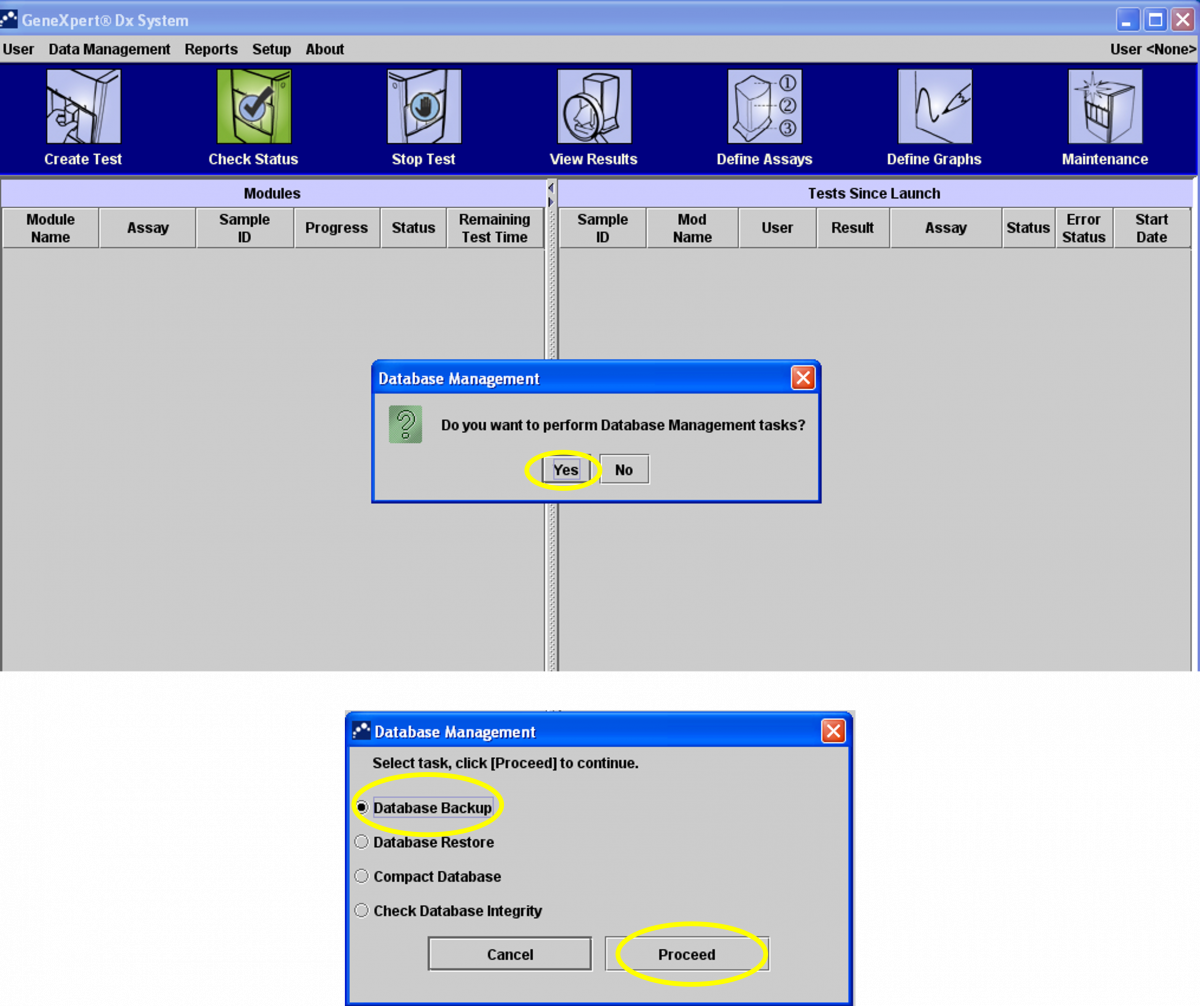
Figure 5: Steps to back-up data

4. The software will create a zip file with all the results (Figure 6).
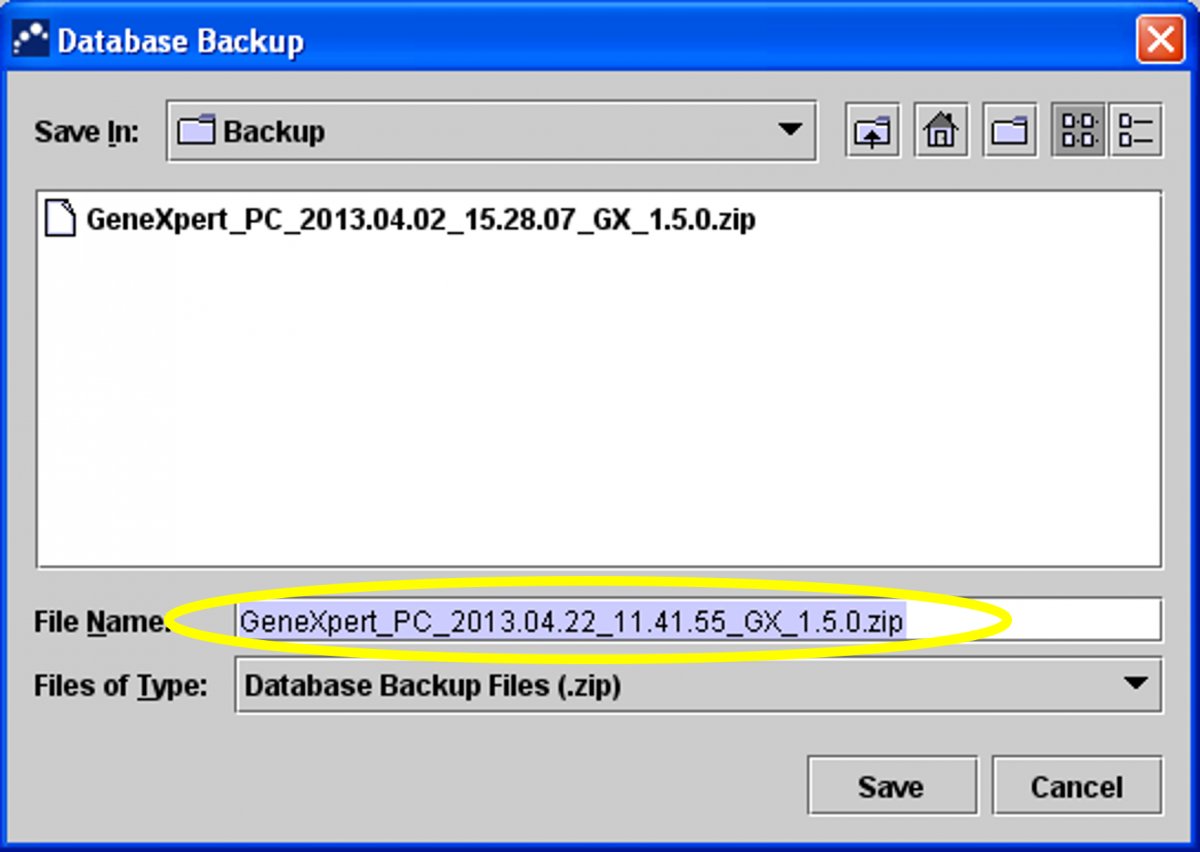
Figure 6: Software creates a zip file for all results

5. The file is saved on the desktop in the CBNAAT folder -> Backup section.
6. Click on “Save” (Figure 7).
7. Click “OK” (Figure 7).
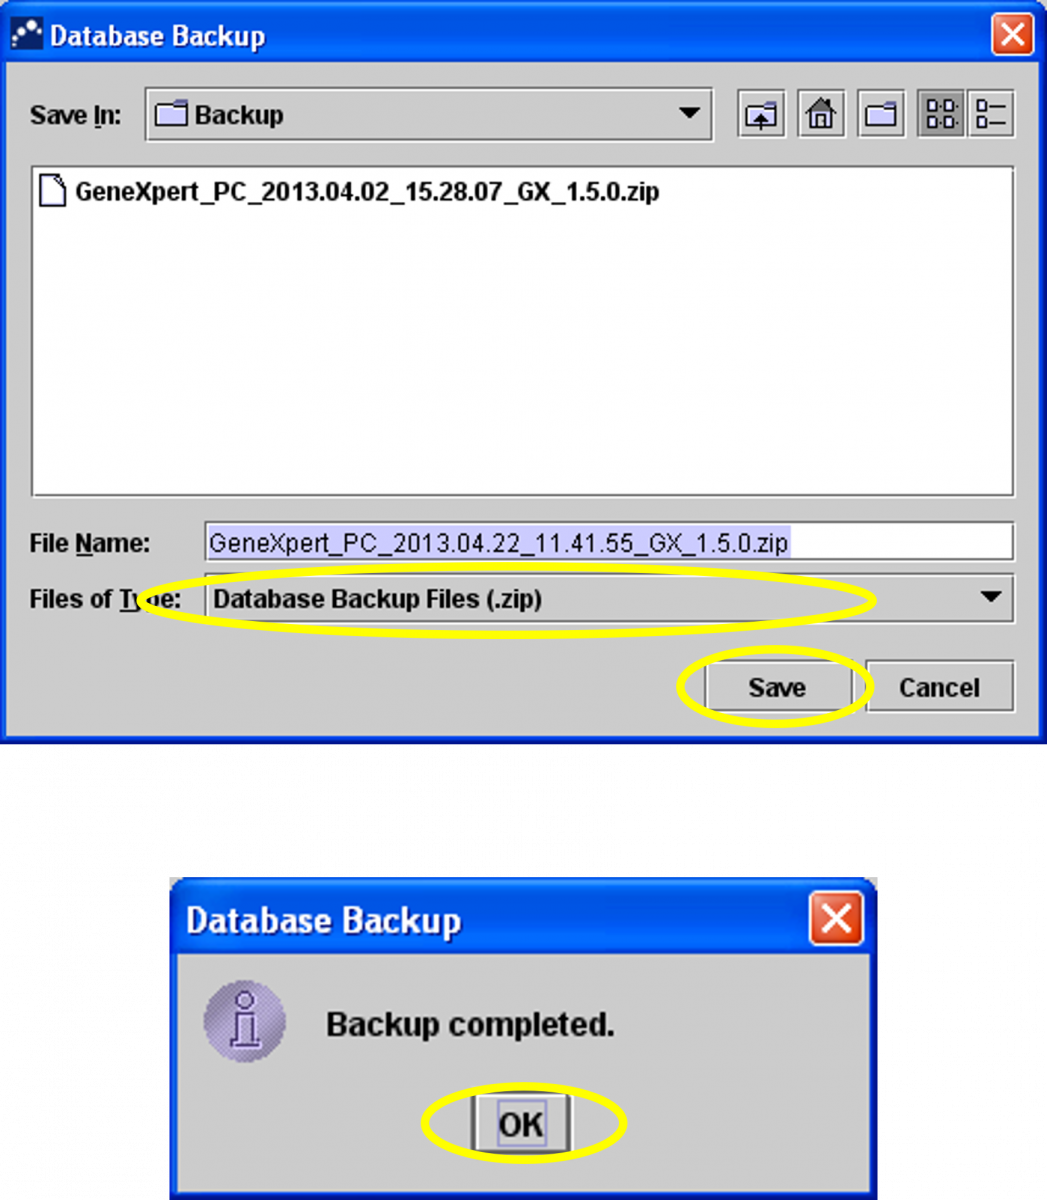
Figure 7: Steps to back-up data (continued)
Video file
Video : CBNAAT Monthly Data Archive and Data Back-up Process
Resources
CBNAAT Annual Maintenance Protocol
ContentThe annual maintenance protocol for the Cartridge-based Nucleic Acid Amplification Test (CBNAAT) instrument involves calibration of the machine.
Calibration:
- Calibration of the CBNAAT instrument is performed by the manufacturer before the system is shipped.
- Calibration is not required during the initial system setup.
- The manufacturer recommends that the system should be checked for proper calibration on an annual basis (or after every 2,000 runs on each instrument module).
- Based on the usage and care of the system, calibration checks may be recommended more frequently.
- The service engineer will perform the machine check during the annual maintenance visit.
Parameters Verified During Calibration
One calibration cartridge is used to calibrate a single module in conjunction with the calibration software.
- Recalibrate the optical system
- Verify the thermal system
- Module sub-system functionality: A series of system-level tests to ensure full system functionality within the instrument servicing specifications as provided by the manufacturer, and covers:
- Heater and fan performance
- Syringe drive and pressure performance
- Valve drive performance
- Ultrasonic horn performance
- Electronic components performance
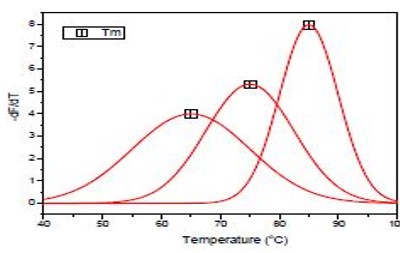
Figure: Temperature Calibration of the CBNAAT Instrument
Resources
Fullscreen


